Left Room[edit]
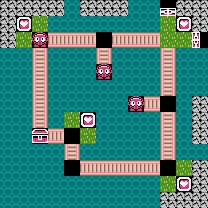
| Approach from | South | Strategy | ★ | Agility | ★★ |
|---|---|---|---|---|---|
| Exits | North, East | ||||
Solution:
You can approach this room from any direction, but you might be floating into it on a raft from the south. Some of the Heart Frames in this room give you Egg shots, which you should use liberally against the Almas so that they don't pose a major threat to you on the narrow passageways. If possible, push the eggs into the water to get rid of them. If you're really stuck, shoot the egg a second time to remove it, but you can only do this with two of the Almas. Remember to retreat to the grass if you're about to get hit.
Room 2[edit]
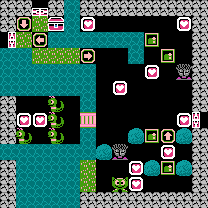
| Approach from | East | Strategy | ★★★ | Agility | ★ |
|---|---|---|---|---|---|
| Exits | East, South, West | ||||
Solution:
- From top upper door, walk through the Arrow Tiles, and walk between the two Heart Frames to avoid the Medusa gaze, then walk down to the Emerald Frame to the left of the up Arrow Tile and push it down. Then push it over to the left and collect the nearby Heart Frame two gain two Egg shots.
- Walk back between the two Heart Frames, and back down across the bridge to the Snakeys. Shoot the top Snakey and push it in so you can collect the two Heart Frames nearby. Then turn around and shoot the middle Snakey and push it over the bridge so that you can position it above the Medusa.
- Finally, shoot the bottom of the three Snakeys and push it down into the water and jump on board. It will take you to the grass area to the left of the Leeper. To be on the safe side, shoot the Leeper when it is just below the Medusa so that you can get off on the grass and push it below the Medusa to block it's view. Collect the two Heart Frames to the right.
- Push the Emerald Frame below the up Arrow Tile up and to the left of the top Medusa. Collect two nearby Heart Frames, then push the Emerald Frame just above the Medusa to the right to block it's view north. Collect the two Heart Frames near the top, and push the highest Emerald Frame down below the Medusa and right to block it's view south so you can collect the final Heart Frame.
- To reach the raft, just shoot the first Snakey that you shot and pushed to the left, and push it up into the water and jump on board. It will take you back to where the Raft is. To proceed to the south, just launch the raft from the original position of the lone Snakey on the left edge of the stage.
If you haven't completed the room to the east, don't enter through the door. You will not be able to solve the room from that direction, and when you return, you will find yourself stuck and unable to exit the room from any direction. You will have to sacrifice one of your lives to continue.
Room 3[edit]
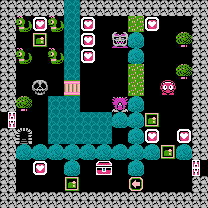
| Approach from | East | Strategy | ★★★ | Agility | ★★ |
|---|---|---|---|---|---|
| Exits | East, West | ||||
Solution:
- Start by pushing the Emerald Frame near the entrance up two spaces until it is next to another Emerald Frame. Carefully collect the two nearby Heart Frames so that you don't lure the Alma down to the space you're in. Then drop down to the bottom.
- Walk past the treasure chest, push the Emerald Frame in two spaces, collect the Heart Frame, and then push the Emerald Frame back to the left until it's under the gap in the boulders. Then do your best to safely lure the Alma down into the bottom row with you. Once it is lined up, it will roll to the left wall. At this point, jump up to the chest, let the rolling Alma pass you by, and then plug the hole with the Emerald Frame to eliminate the Alma as a threat.
- Push the Emerald Frame closest to the Gol up two and a half spaces so that it blocks the Don Medusa's view across the grass. When the Don Medusa is on its way down, run up and collect the Heart Frame at the top. Then return to the bottom of the Emerald Frame that you just moved, move it a half space up, and then across the grass to that the Don Medusa is trapped above it. Then push it all the way up to pin the Don Medusa against the top wall.
- Go back and move the remaining Emerald Frame on your right closer to the grass, and maneuver it so that it blocks the Don Medusa's view to the left. Collect the three Heart Frames along the water.
- Cross the bridge. Shoot the nearby Skull and push it into the top left corner of the lake. Then shoot the lower right Snakey and push that egg into the river. Then shoot the upper right Snakey twice and collect the last Heart Frame. Push the Emerald Frame down, and across the bridge, and position it in front of the Gol so that you can safely walk past him and collect the key from the chest. An entrance to a key chamber will appear.
Key Chamber[edit]
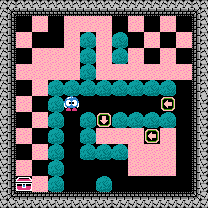
With only 15 seconds on the clock and a lot of sand between you and the treasure chest, you are going to have to execute the path to the chest flawlessly. This is one of the hardest of the 5 major Keys to collect.
- Start by heading down the path. Stay on the open area for as long as you can by walking around the low boulder, along the bottom, and up the right side.
- When you hit the sand, it is pretty much best to stay along the outer edge of the room, although some alternate zig-zagging can take place without penalty.
- When you reach the three spaces of open area near the upper left corner, it would be wise to take that path, but you must not hesitate or hit the sand at the wrong time or you will not reach the chest in time.
Room 4[edit]
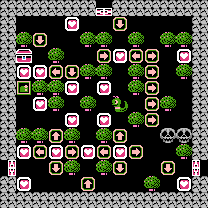
| Approach from | North | Strategy | ★★ | Agility | ★ |
|---|---|---|---|---|---|
| Exits | North, East, West | ||||
Solution:
- Start by walking through the down Arrow Tile on your right, and then straight down the column of right Arrow Tiles to the bottom of the screen. Collect the Heart Frames in the lower right corner, the lower left corner, the one above that, and the two that lie in the middle of the circle out outward bound Arrow Tiles.
- Next, collect the rightmost Heart Frame near the top of the screen, shoot the left Skull once, and push it down to return to the bottom of the Arrow Tile column. Return back to the top and head left.
- Collect the Heart Frame along the top, as well as the two below the treasure chest. Push the Emerald Frame down. Then collect the remainder of the Heart Frames in whatever order you like (preferably saving one of the frames furthest away from the Skulls for last, but it's not really necessary) and returning to the chest to collect the key.
Room 5[edit]
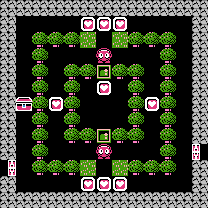
| Approach from | West | Strategy | ★ | Agility | ★★ |
|---|---|---|---|---|---|
| Exits | East, West | ||||
Solution:
There is no specific strategy to this stage, sufficed to say you must collect all of the Heart Frames while avoiding the two Almas that are placed in the middle ring of the stage. The safest strategy is to lure them over to the opposite side of the ring from the side you wish to clear, but you can optionally lure them to the outside so that the inside is easier to deal with. However, by adopting that strategy, you make the approach the to key a little trickier, so use your best judgment.
Room 6[edit]
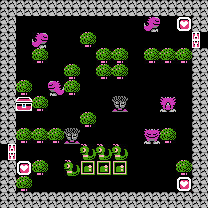
| Approach from | West | Strategy | ★★ | Agility | ★ |
|---|---|---|---|---|---|
| Exits | East, West | ||||
Solution:
- Although this stage looks complicated, it's actually quite easy. Start by collecting the Heart Frame in the lower left corner. Then walk along the outside of the stage, skip the Heart Frame in the lower right corner, and work your way up to the Heart Frame in the upper right corner. Then return to collect the last Heart Frame in the lower right corner.
- Now stand to the right of the row of Snakeys, and fire off all six egg shots to remove them. Then push each Emerald Frame up and on to the former positions of each Snakey. They will all reappear in different locations. When they do, push the left block up one space (to the right of the left Medusa), push the middle block up so that it is to the left of the right Medusa, and push the right block so that it sits beneath the right Medusa.
- Wind your way around to the key. You'll have to walk to the right of the Gol which sits to the right of the right Medusa, but a relocated Snakey will protect you from its fireball. On the way up, another Gol will blast a fireball at you. You should be able to walk above the trees and back down in front of that Gol well before the old fireball reaches the wall.
Room 7[edit]
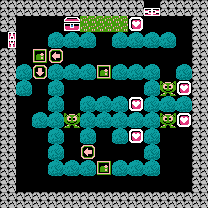
| Approach from | West | Strategy | ★★ | Agility | ★★ |
|---|---|---|---|---|---|
| Exits | North, West | ||||
Solution:
- Push the Emerald Frame below the treasure chest to the right. Walk through the down Arrow Tile. If the Leeper on the right stays there, put it to sleep against the right wall. However, if the Leeper approaches you, wait for him one space above the lower left corner and put him to sleep. Collect the Heart Frame on the right.
- Push the bottom Emerald Frame up. Lure the left Leeper out of the maze, and over to the side opposite from where you put the first Leeper to sleep. Collect the two Heart Frames from the inner ring, bottom frame first.
- You have some options when it comes to putting the final Leeper to sleep. The best choice is to get him to run up to the first Emerald Frame that you push, and push the frame at the top of the inner ring out when it is hopping to your left, so that you block off the path which you don't need. Worst case scenario, you let it chase you out to the left, sleep it behind you, and walk all the way back around.
- Once the final Leeper is asleep, you can collect the two remaining Heart Frames from the top and collect the key.
Room 8[edit]
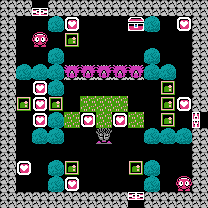
| Approach from | South | Strategy | ★★ | Agility | ★★ |
|---|---|---|---|---|---|
| Exits | North, East, South | ||||
Solution:
- In order to begin collecting Heart Frames in this stage, you'll first have to figure out how to pass beneath the Medusa waiting in the middle of the room. You won't be able to position an Emerald Frame to block the Medusa's view, so you're going to have to employ some help. Walk up to the row where you become visible to the Alma on the right. When the Alma sees you, it will tuck up into a ball and roll to the left. Duck back down, and cross over to the Heart Frame on the left along with the Alma, so that the Alma blocks the Medusa as you run beneath it.
- Once you are on the left, repeat the same trick to lure the Alma out of the left side, making it safe for you to duck inside, and collect the left Heart Frame below, along with the trio of Heart Frames above. Push the Emerald Frame to your right over so that it is above the Medusa. Push it down into place and collect the Heart Frames on either side.
- Of the trio of Emerald Frames to your right, push the outer two frames in, and push the inner frame aside, and collect the Heart Frame beyond. Push the Emerald Frame above you up, and collect the Heart Frame at the top. Then walk left and collect the last Heart Frame. The Gols are positioned far enough away that if you run straight the to key on your right, you will not get hit by their fireballs.
Room 9[edit]
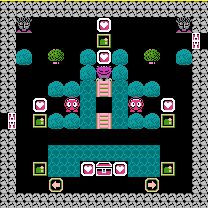
| Approach from | South | Strategy | ★★ | Agility | ★★ |
|---|---|---|---|---|---|
| Exits | South, East, South | ||||
Solution:
- To complete this stage, you have to have a strategy to deal with the Almas behind the Heart Frames. Those Heart Frames grant you two Egg shots each, so if you're fast enough, you can collect the Heart Frames and shoot the Alma before it can touch you. If not, you may have to pick up the frame and scoot out of the way and wait to shoot at it until you have a better shot.
- Start by collecting the Heart Frame in front of the left Alma. Deal with it as best as you can (preferably by shooting at it in the alley and pushing the egg in the water.) Then push the Emerald Frame nearby by all the way up to block the left Medusa's view.
- Cross along the top of the stage, pushing the Emerald Frame between the two Heart Frames to the left, and then up to block the right Medusa's view. Repeat the same steps as before to collect the right Heart Frame blocking the right Alma in the alley.
- Collect the Heart Frame at the top of the stage, then the Heart Frame below. Shoot the Gol to turn it into and egg, and push it straight down into the water below. Use the egg to cross over to the other side of the water, collect the Heart Frames on either side of the chest, and collect the key.
Right Room[edit]
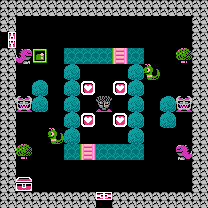
| Approach from | West | Strategy | ★★★ | Agility | ★★ |
|---|---|---|---|---|---|
| Exits | South, West | ||||
Solution:
- Being careful to avoid being seen by the left Don Medusa, walk down the left side of the stage, below the water, and across the bridge to collect the lower left Heart Frame. This will give you two Egg shots.
- Return to the Snakey that you past, and shoot at it twice to remove it. Then carefully push the Emerald Frame up, to the right, and down until it rests where the Snakey used to be. Wait for it to reappear between the two upper Heart Frames.
- Cross the upper bridge and collect those two upper Heart Frames, and you'll get too more egg shots. Now maneuver the Emerald Frame to the opposite side of the screen, shoot the right Snakey twice, and put the Emerald Frame in it's place. Wait for the Snakey to reappear below the Medusa.
- Cross the lower bridge and collect the lower right Heart Frame, and then cross back over one last time to collect the key.