Walz (return)[edit]
Go back to Worus for clues on what to do next. In the town, you learn that the king was wounded and is recuperating in the castle. The soldier you saw trying to protect the crystal is now at the castle as well. Go to the castle and find the king in his chambers, right of the throne room. The king tells the party that a meteor also fell in Karnak, so they must go there to protect the Fire Crystal. Go to the barracks on the 2nd floor and talk to the soldier who's also recuperating in bed. He says something about warping from Karnak while examining the meteor there. A mountain range around Tule blocks the air route, so it looks like the only way to get to Karnak is to warp in the reverse direction from the meteor in Worus.
Go back to the meteor and through the open door to go inside. At the innermost point is a warp tile similar to the one in the Wind Shrine. Step on the tile and, after a short cutscene, you're taken to a similar tile in another meteor. Get back outside to find yourself opposite the Tule mountain range.
Town of Karnak[edit]
- For more details on shops, see Karnak's shops.

Head west, then north following the shore, turn left when you reach a gap in the mountain, and follow the valley south. You reach the Town of Karnak. There are a castle and a boat nearby but you cannot enter because of guards.
Go to the inn on the east side and rest for 20 GP. The Item shop is here and has the standard inventory. Go west to the pub where you can pick up some interesting gossip and complete another part of the Pianos subquest. After doing everything else here, go shopping.
The magic shop is closed but the weapon and armor shops are both open, just south of the pub. When you peruse the inventory you may notice that the prices seem too good be true. That is they are and soldiers enter to drag you off to prison.
Karnak Castle[edit]
You find yourself in a prison cell. After a few moments, an old man in the next cell blows up the wall between you. Talk to him to learn that he was trying to escape but broke into your cell instead. He introduces himself as Cid, the inventor of the crystal amplifier. Cid was trying to warn people about the Fire Crystal being in danger of breaking, but was thrown in jail for his efforts. You show Cid one of the crystal shards to prove that you are also trying to save the crystals before it is too late. The chancellor enters; it appears that the crystal is showing signs of stress and they cannot shut down the amplifier that is running the Fire Ship. Cid offers to go shut down the ship and says he needs your help to do it. The chancellor agrees after a bit of blackmail from Cid.
You are now free to go. Talk to the guards on the way out to learn that someone called the Werewolf has been seen in the area, and the Queen of Karnak has gone missing. You may notice there are several chests and doors that are visible but cannot be reached because there are fires in the way. As you leave, the Werewolf appears at the gate but soldiers scare him away.
Town of Karnak (return)[edit]
Return to Karkak to update your spells and equipment now that they are truly open. There is Mythril armor to replace the Iron armor from from Worus. Do not buy the Fire Rod as a free one can be acquired soon. The magic shop, located in the southeast corner, has higher-level spells such as Fire2 and Cure2. There are a few new items and you might not be able to afford everything, but keep in mind that your next enemies are likely to be Fire based so your spells should be Ice or Water-based to counter them.
The dungeon coming up can be challenging, but you can prepare by stocking up on Eye Drops and having the SilvrGlasses equipped on your main fighter. When you are done, exit town, save, and head for the ship south of the castle.
The Fire-Powered Ship[edit]
When you enter the ship, Cid welcomes you and explains that the engine is still drawing power from the crystal, and that monsters are present in the steamship. He leads to you the door to the cabin. Unlike the Worus towers, finding your way around the ship is tricky and if you're not careful you'll wind up hopelessly lost inside. The Cool Dust monsters here use Flash, a learnable Blue Magic spell which inflicts blindness on your entire party. The SilvrGlasses picked up in Worus protect a character from blindness; Eye Drops should be used on the rest of the party. Mages do not need to see to cast spells, but fighters will be pretty much useless until they can see what they are attacking.
The MottleTraps found in the bowels of the ship can use Exploder on you, and Defeaters will summon 2 MottleTraps if a physical blow kills them and they are the last enemy in battle. A Blue Mage can pick up Exploder for their list of spells if it is used on them. At this point, it is a huge risk because these enemies have higher HP than the party does.
| Found | Container | Location |
|---|---|---|
| MythrilGlove | Chest | Small room though door northwest of the entrance to the first hold. |
| Elixir | Chest | Climb ladder in southwest corner of the first hold, follow catwalk to a small room. |
| Cottage | Chest | Northwest corner of the first hold. |
| Elixir | Chest | Enter hatch east side of the first hold. |
| Phoenix Down | Chest | Follow catwalk east after taking elevator from the first hold. |
| Moonring | Chest | Take stair from southeast section of the second hold. Activate the switch to open a secret door. |
| Thief's Glove | Chest | South central section of the second hold. |
| Green Beret | Chest | Northwest section of the second hold. |
| Elixir | Chest | North side of room with sliding platforms. |
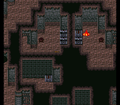
The first two rooms have wooden floors and nothing in them at the moment. Continue down to a room with a brown metallic floor where you will start to encounter random monsters; call this "the first hold" for reference. There are four ways out of the hold, not counting the way you came in. All except one are dead ends, though all lead to treasure at least. There is a door near the entrance in the southeast corner, a ladder to a catwalk in the southwest corner, a hatch on the east side which you have to circle around and approach from the north, and a door in the northeast corner that is the way forward.
The last door opens to an elevator. Check the lever on the left to go up to the next level and exit to a catwalk. Follow this to the northwest corner then ride down another elevator and exit to another large room, call this "the second hold". This room is divided into a number of sections; you start in the center but the others can't be reached at the moment. Climb the ladder to an air duct like the movie cliché. Follow this and eventually you come out in the southwest section.
Take the door here and ride a third elevator up to a small room with three doors on the north side and four air vents on the south side. Call the room "the hub"; this is where things start to get confusing. It simplifies things a bit to know that you don't need to explore any of the doors; the one on the left you just used to come in and the other two allow you return to this room after traveling through the air ducts. All the air ducts drop you onto a room full of conveyor belts. You don't have any control while riding them so you just hold on until you land somewhere.
The air duct on the far left takes you back to the southwest section of the second hold, you then have to retrace your steps to get back to the hub. The middle left air duct takes you to the south east section of the second hold, the stair here leads to treasure and the door leads to a small room with two doors. Here, the door on the right opens to an elevator taking you back to the hub, and the left is the way forward. Go right for now since there is more to explore here.
The middle right air duct in the hub takes you to the south central section of the second hold. Grab the treasure here and take the conveyor belt to the central section, then retrace your steps back to the hub. The extreme right air duct takes you to the north east section of the second hold. Enter the air duct on the right and follow it until it eventually takes you to the northwest section of the second hold. Grab the treasure and ride the conveyor belt to the northeast section; the door here opens to an elevator to the hub.
When you've explored everything, take the middle left air duct again and this time take the left door in the small room to find a save point. Save, use a tent if you've done any fighting on the way, and continue north.
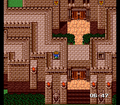
The next room is a maze of platforms but there is only one way in and one way out so it is just a matter of getting through. The idea is to activate the levers which cause the platforms to move around and create a path to the exit. You should be able to find the way by flipping the levers more or less at random but here are the details just in case. Start with the lever directly in front of you and ride the platform north. Flip the lever here; this doesn't actually help you get out but you need to activate it to reach some treasure. Now go south, circle to the west and flip the lever there to extend a platform across the room. Cross and activate both levers at the other side; one retracts the bridge and the other opens a path south. Follow the path and flip the lever to the north while standing on the platform next to it. (The lever to the south allows you to get back to the start and if you do this you'll need to reset the room by leaving and coming back.) There is another lever when you're done riding the platform but this is only to get back as well. Grab the treasure (assuming you activated the switch that allows you to reach it) and exit.
You enter the Power Room where Queen Karnak can be seen standing in the center. Approach and she is suddenly enclosed by a shadow and speaks to you as if possessed by some evil force. Flames come out of the engine and attack.
| LiqudFlame |
| Boss level: 19, Recommended party level: 15 |
| HP: 3000, Weaknesses: Ice, Nullifies: None, Absorbs: None |
| Gold: 0, ABP: 6, Drops: Fire Skill (human), Fire Rod (hand), Fire Bow (whirlwind) |
Renamed to "Liquid Flame" in the GBA version. Preparation: You're going to need plenty of healing so have at least two characters who can cast Cure. Cure2 will be useful here for healing the entire party at once. You should also have a couple of characters with Ice based magic, preferably Ice2. If you have Shiva then a Summoner will be very helpful. A Time Mage with Demi will be helpful as well. A good fighter type is useful but not entirely necessary, but avoid Berserkers since you'll need to control when to attack. Tactics: Liquid Flame has human, hand and whirlwind forms. Each has different behavior and the tactics are slightly different for each. When you attack the monster it counterattacks, usually with some type of flame based spell, and then switches to another form. The human form uses physical attacks which aren't too bad, and Blaze which does Fire damage to the entire party. Blaze is similar to Wingraptor's main attack in that it is an HP percentage attack. If you are near the start of he battle and if possible, cast Demi, otherwise cast Ice2 or Shiva or attack with a sword infused with Ice2. The human form counterattacks with Blaze. The hand form is immune to magic of all kinds, even a magic-infused Swords, so attack it physically. Only attack if your party are all at least around 300HP since it counterattacks with Fire2 on a random character. Otherwise you will need to cast Raise or use a Phoenix Down. The good news is it has only enough MP to cast the spell three times. The hand form attacks physically, occasionally causing paralysis, so you can afford to heal up before attacking. The whirlwind form just casts Fire2 on itself to restore its health. Attacking the whirlwind form makes it retaliate with Magneto which forces the attacking character to be pulled to the front row. The whirlwind form can only cast Fire2 five times, so one idea is to let it spend all its MP near the start of the battle; this does not affect the MP of the other forms. |
The queen is released from the spell after you defeat the monster, but she falls to the floor. She says something about being controlled by a dark, evil force trying to be reborn, then points to a pipe that leads to the Fire Crystal.
Head north into the pipe.
Fire Crystal[edit]
Continue until you reach the Fire Crystal, a cutscene begins. The Werewolf breaks in and recognizes Galuf. Bartz tries to scare him off but it turns out he's friendly and trying to save the crystal. A soldier comes in and starts tampering with a lever in back of the room; it seems he's possessed by an evil force as well. You rush to the lever but it is broken. Then pipes start connecting themselves to the crystal starting an overload. The Werewolf tries to slow down the process and warns you to make your escape while you can, but you attempt to help him anyway. Unfortunately the floor starts to go and you fall through to the floor below. The fire Crystal finally shatters and the Werewolf disappears in the flames. Meanwhile, you notice that the flames that were continually burning have died away. You quickly go back upstairs to see crystal and the Werewolf are gone. realizing you the castle is about to blow, you rush back out, through the floor below and into a room with a save point.
Karnak Castle (escape)[edit]
| Found | Container | Location |
|---|---|---|
| 2000 GP | Chest | Cell, west side of B. 4 Floor (the jail). |
| Elixir | Chest | Cell, northeast corner of B. 4 Floor (the jail). Fight Sorcerer, Karnak x2. |
| Ribbon | Chest | B. 3 Floor, west side near bookshelves. Fight Sorcerer x2. |
| Shuriken | Chest | B. 3 Floor, east side near bookshelves. Fight Gigas. |
| 2000 GP | Chest | 2nd floor, west section, north end on the left. |
| Elixir | Chest | 2nd floor, west section, north end on the right. Fight Sorcerer, Karnak x2. |
| Elixir | Chest | 2nd floor, west section, south end. Fight Gigas. |
| 2000 GP | Chest | 2nd floor, east section, north end on the right. |
| Elixir | Chest | 2nd floor, east section, north end on the left. Fight Gigas. |
| Elixir | Chest | 2nd floor, east section, south end on the left. Fight Gigas. |
| Elixir | Chest | 2nd floor, east section, south end on the right. Fight Sorcerer, Karnak x2. |
| HuntingKnife | Chest | Follow path starting from stairs in 2nd floor, east section. Fight Sorcerer, Karnak, Gigas. |
| Elf Cloak | Chest | Follow path starting from stairs in 2nd floor, west section. Fight Sorcerer, Karnak, Gigas. |
| Esna (spell) | Chest | 1st floor, southwest corner. Fight Gigas. |
| LgtningSkill | Chest | 1st floor, southeast corner. Fight Sorcerer, Karnak x2. |
Starting now you will have 10 minutes to escape from the castle. It is a good idea to save your progress here in case things go wrong since you do not want to have to repeat the previous boss battle. It only uses a few seconds to save because the timer does not run while you are in the save screen. You can also use a Tent to heal "overnight", though it is better to go back to the previous room and use the urn to restore your health.
While it is not difficult to escape the castle, the challenge is opening as many chests as possible within the time limit. Chests with money inside can be opened as usual, but chests containing an item also have monsters. Fleeing these battles may take less time than fighting them, but then you will not get the item from the chest. So unless you are strong and can wipe out these enemies very quickly, you will need to pick which items to go after and avoid being too greedy. You may have random battles with an enemy called Sergeant; you can use Flee to escape from these battles, but the normal escape seems to take much longer than usual with these. Remember to allow several minutes to defeat the final guards. Any chests left closed will be lost forever.
Don't obsess about getting every item since all will be found later in the game as well. So it is really a matter of when you get the items and how many you want to own by the end. One item you can definitely skip is the LgtningSkill since it will soon be available in a shop for a reasonable price and Thunder Anemones in the ocean drop them constantly. You cannot have too many Elixirs, but there are others to be found throughout the game so it may not pay to go after them unless you have time to spare. Which of the remaining items you go after depends on which Jobs you're planning to concentrate on. For example you should not bother going after the Shuriken if you are not going to use Ninjas. The White Magic spell Esna is a high-priority item as it is a useful addition to a White Mage's repertoire. It can be bought later, though at an expensive price. Seven of the chests trigger a battle with a Gigas. Since these drop a Giant Drink each time it may be worthwhile opening some of those chests for that reason.
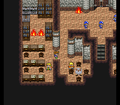
Continue to the next room, which you may recognize as the jail where you met Cid. There are chests in two of the cells here; check the cell doors to open them. The room after this is a kind of library with chests on either side. Now go up two levels to the 1st Floor. There are two doors here that connect to the 2nd floor. Each door leads to a different section and the sections are connected to each other by a small outside ledge to the south. there are a total of seven chests here. Also, in a corner of each section is a stairway to the roof, and winding routes back down to the lower levels where there is a chest. There are two final chests on either side of the 1st Floor as you exit.
-
Gold on the bottom left, Elixir on the right.
-
The ribbon chest; shurkien to the right
-
The outer wall; left wing has Elf Cape, and the right has Guardian.


You are stopped on the steps of the castle by a Sergeant and his pets. This time you cannot escape.
| Sergeant, Karnak x3, Iron Claw |
| Boss level: ?, Recommended party level: 15 |
| HP: 1000, Weaknesses: None, Nullifies: None, Absorbs: None |
| Gold: 523, ABP: 3, Drops: |
Preparation: For a boss this one is fairly weak, more like an unusually strong random monster; it is the time limit that makes the battle difficult. The most important thing is to leave yourself enough time when you escape the castle. If you have time before the battle, adjust your Jobs and Abilities to concentrate on damage dealing rather than healing. Use Cure or Tonics to heal your party before the battle since this will save time in the long run. Tactics: Eliminate the dogs with a few group attacks such as Kick or a Black Magic spell targeting all enemies. The Sergeant transforms into Iron Claw. Keep attacking and do not worry too much about keeping your HP full. Occasionally it will use Death Claw, which paralyzes an ally and reduces their HP to single digits. It can be learned if a party member with the Learning ability is hit by it. Note: The Sergeant only transforms into Iron Claw if you kill all the dogs first. If you kill the Sergeant first, or you kill him too fast (like the next attack) after the last dog dies, you will lose the bestiary entry of the Iron Claw. |
If you find yourself with time left over you can go back into the castle to grab some chests you may have passed by.
Aftermath[edit]
There is now nothing left of the castle but three crystal shards. You collect them to learn three new Jobs: Trainer, Geomancer, and Ninja.
When you get control of your character again you will find only a bit of rubble to mark the location of the castle. More importantly, the wall that separated Karnak from the region to the west was partially destroyed and you can now reach a new area. But first visit the ship again. Cid is there and runs off upset. The ship is unchanged except that the duct from the power room to the crystal room is destroyed.
Go back to Karnak to find a few changes. All the flames that were burning earlier have gone out allowing you to reach some treasure you could not get to before. You can find Cid in the upstairs room trying to drown his guilt with liquor. You try to get him to snap out of it but he's too far gone. Next go to the weapon/armor shop to find a new weapon merchant wandering around. Finally, go to the inn; you will need to rest up for the next journey anyway. The chancellor is there and Queen Karnak is in a bed upstairs, delirious from her ordeal.