- Dokugake Tairiku (毒苔大陸? Poison Moss Continent)
1: The first enemies that you encounter here appear at the top of the steps. Three burrowing lizards will pop out of the ground, shooting projectiles at you at the top of the jump. Stand on the step below and shoot rapidly to take them out quickly. You'll have to repeat the experience at the next ledge, where it's a bit too high to shoot the lizards without jumping. In addition, a whirling blade enemy will bounce over the ledge in an effort to slice you. Fire up and the blade, and then squat in the corner waiting for the lizards to jump to the left so you can remove them. More blade will come at you from both directions, so be prepared to take them out.
Another trio of lizards pop out just before the first pool of lava. Hop over the small first pool (taking out any spinning blades that might be bouncing around in them first) and prepare to use Blizzard. Not only will it turn the lava into safer ice, but it will also freeze the small one-eyed insects that are otherwise invulnerable to your attack. With everything frozen, you can safely enter the next room. Keep Blizzard ready to go.
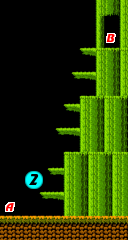
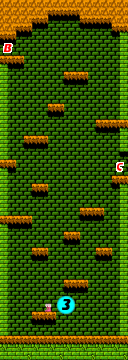
2: Cast Blizzard almost as soon as you enter this area. It will free more of the one-eyed insects that infest this area, and stop the eyes from shedding tears that roll down the branches which you must now climb. On your way up, you'll encounter two eyes. If you defeat the first one, it will drop a red potion. If you defeat the second, it will drop a blue potion. Cast Blizzard again before collecting the blue potion if necessary. If you're quick enough, you can actually collect both potions before the first Blizzard wears off. Then head through the door at the top.
3: You begin at the top of this column which is occupied by more invulnerable insects. You may wish to cast Blizzard again if you don't want to deal with them, but the speed at which you begin to drop should make it difficult for them to keep up with you. There's an exit along the middle of the right side, but to reach it, you need the ability to jump higher. You'll find the item which gives you that ability at the bottom of the room: the jump boots. Collect them, and you'll instantly notice that you can jump significantly higher. Use them to propel you into the opening on the right.
4: The game's difficult takes a serious turn here. You've seen the bats before, but the floating fish enemies are new, and dangerous. From far away, they're not much of a threat, they spit out smaller fish which drop to the ground and travel until they collide with something. After a while, however, they rush toward you in an effort to collide with you, for a full bar's worth of your health meter. This is when they are at their most dangerous. As soon as they begin to fly towards you, simply move back a bit, turn around, and shoot them.
There's a trick to these fish, however. They are less likely to hit you if you are far enough away from them vertically. If you are well below where they are floating, you shouldn't fear them colliding with you. They will stop short, allowing you to jump up and shoot at them. If you have magic points to spare, the Breaker spell can be very useful in removing them quickly. But you need the ability to fire Breaker at just the right height, or the spell will miss the fish, and you will have wasted 10 magic points. Either way, there are several bats along the ceiling, and you will encounter three orange fish along the way. Take them out patiently to ensure your survival through this dangerous corridor.
5: If you weren't a fan of the fish in the last section, you won't enjoy this section very much either. As soon as you arrive, you will be greeted by two fish, one on either side of you. If possible, use Breaker against them. Do not be afraid to use up your magic points right now, you'll be able to recover them very shortly. It's more important that you survive this encounter.
Once both fish are cleared away, advance to the left. Another fish will greet you, on which you may also wish to cast Breaker. After you deal with it, you'll see a wing on the ground near some lava. At this point, prepare to cast Blizzard and do so now if you have the magic points for it. With that cast, drop down and collect the wing. Just as the red container allows you to possess more health, the wing allows you to possess more mana. Collect it, and your mana should instantly refill up to 78 points. Now you have to make it through the rest of this section.
Continuing to the left, you will encounter not one, but two orange fish. If you are low enough, these fish will stop short of flying into you, allowing you to shoot at them before they rise back up and attack again. Once you remove them, the danger is far from over. There's a new enemy between you and the exit, a hopping bush-like creature with a scorpions tail. It bounces up and down, firing projectiles at you which fly straight ahead. As a result of it's rhythmic bouncing, those projectiles tend to fly at the same heights. Ideally, they should fly high enough above you and low enough below you, that you can crouch on the ledge before the creature and shoot it until it's destroyed, with little risk of harm to yourself. If you do destroy the first one, you'll obtain a valuable red potion. Beyond the first such creature is a second which offers no reward for defeating it other than you guaranteed safety as you climb the steps to the next section.
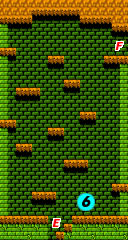
6: As soon as you arrive in this section, as many as four spinning blades will come crashing down to the floor alongside you. Take them out and then proceed to leap from platform to platform as you make your way to the top. More blades will appear as you climb, so proceed with caution, and be prepared to fire up and destroy a blade if it's on a collision course with you from above.
7: Throughout this entire corridor, you'll encounter blades exclusively. While a large number of them can feel overwhelming, you can use this corridor to your advantage to restore any health you may have lost. The corridor consists largely of platforms that are connected to the floor through steps. The truth is that you can send Randy below those platforms and safely attack the blades that bounce up along the steps. Occasionally, one may drop a heart. The only trick is figuring out how to dart out and collect it, and return to safety without getting hurt and losing the very health you just recovered, Of particular note is a second mana enhancing wing that you can collect halfway through the corridor on the highest platform. Be sure to gather it before you leave to send your MP count up to 86. Then drop down through the hole on the right.
8: You're close to the end, but you must make it through one last particularly difficult corridor before you can escape. Right when you arrive, you may notice the 1-up doll that has sunk to the bottom of the lava. Though it may intrigue you, it's difficult to collect without losing some health, and may not actually be worth your while. (It can be worth it if you're already low on health and want a free refill. In which case, drop down, collect the extra life, and allow yourself to die so you respawn with full health.)
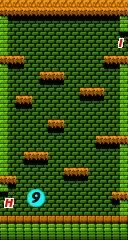
Deal with the bat on the ceiling before heading to the right, where you'll be greeted by another hopping bush creature. Try to find a good rhythm between it's projectiles if you can, and clear it away. Watch out for the bat positioned just behind it. Next you'll see a lava waterfall. You know the drill here by now: use blizzard and punch a hole through the waterfall. On the other side, a set of eight breakable bricks may hinder your ability to reach the platform on the other side. If that doesn't, the second hopping bush on the other side may. You might need to cast Blizzard once more if the blocks prevent you from quickly accessing the platform beyond. Again, take out the hopping bush if you are able to. If you defeat it, it may drop a red potion. This is nice, but considering that there's a red container just beyond which will expand your health meter by a bar, it's not as necessary. Collect it, and then punch your way past a final bush and the bats on the ceiling beyond.
9: You have one last final challenge before the boss: the climb up this small column infested with one eyed insects. You can challenge your skill and see if you can make it to the top unscathed, or you can save yourself a lot of trouble and simply cast Blizzard to freeze the insects in their tracks.
Boss:Carnivorous Plants[edit]
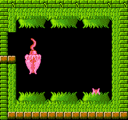
You'll enter into a grassy room, and the door will close behind you. In this room, you will find two large pink plant-like enemies that move vertically across the screen. They sprout from one of six locations in the room, three along the top, and three along the bottom. They may fire projectiles around the room, or simply fly across, releasing a tail which bounces back and forth along the floor, and which can be removed with a single shot. Your goal is to inflict enough damage to both plants that they are destroyed. The safest place to stand during this battle is directly between the first and second, or second and third plants along the floor. Whenever one pokes out from any of the spawning locations on the bottom, pelt it with as many shots as you can before it gets away. Watch out for when the tails get released, and prioritize removing them so they don't become a threat. Keep pelting them with attacks (Twin Fire is not a bad idea to use here) until at least one of them explodes. Then focus all of your efforts on the remaining plant until they are both defeated and the room explodes all around you.
Once you kill both of them, the walls and background will disintegrate and a new spell, Overdrive, will appear. Grab it to move on to the fourth level.


