The Infected are everywhere, and have one goal in mind; kill the survivors. This page lists all of the types of Infected you will come across, how to deal with them as a survivor, and how to play them in Versus mode. Health values where given are based on the Versus values, but in single player/campaign modes health values of special infected vary somewhat depending on how you are doing and the difficulty you are playing on.
The Horde[edit]
- Health: Variable (usually less than 50)
- Abilities: None (besides clawing and kicking)
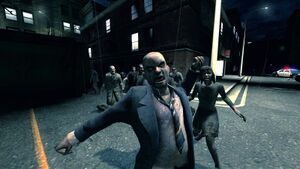
The Horde are by far the most common enemy, and are little more than zombified versions of ordinary people. However, they are most certainly not slow - they can outrun the survivors. Although they are weak individually, they often make up for it in sheer number, and you will often find them burst through doors or from over rooftops in swarms of 20 or more (dependent on the difficulty level) and you will quickly find yourself being attacked from all sides. Fortunately, their head is very weak, and one shot from any weapon to the head will kill them. Also, if you find yourself being swarmed, use your melee attack to give yourself some room to breathe, or throw a pipe bomb to lead them away to an unsuspecting doom. If you see a swarm approaching, finding a mounted gun (where applicable) or, more likely, throwing a molotov, or using gasoline cans will set up a nice wall of fire which they will blunder into and burn to a crisp.
Players cannot play as members of the Horde, although when playing as one of the lesser special infected (i.e. not the Tank) it is often advantageous to time your attacks with Horde swarms to maximise the chaos you can cause.
The Boomer[edit]
- Health: 50
- Abilities: Vomiting, exploding
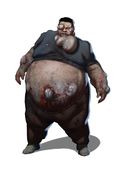
Boomers don't look menacing; they're morbidly obese, and slow. Unfortunately they are also full of Horde-attracting vomit. If these get too close they can puke all over you, severely reducing your vision and attracting a swarm of the Horde to attack you. Moreover, when they die, they explode, showering everything in the nearby area with the stuff, and that includes any survivors that are too close. The vomit effect lasts for about 20-25 seconds. During this time, be advised that it becomes very difficult to see, and the telltale halos and names of other survivors disappear, as well as having the vomit music playing over the top. As a result, you cannot distinguish a pounced or constricted survivor except by reduced vision, and survivors may look a lot like infected.
To minimise the damage that a Boomer can cause, kill it from a distance so it can't shower anyone nearby with its bile, and so it can't vomit over anyone. If you find yourself toe-to-toe with a Boomer, quickly hit it with your melee attack, which will stun it and knock it back. Put a little more distance between you, then shoot it. In this regard Boomers are very easy to kill, but this is a drawback when you shoot one that is suddenly face to face with you by accident.
Versus Mode[edit]
When playing as the Boomer, your goal is chaos; you lack the ability to deal damage directly. Make sure that the survivors don't have chance to kill you before you can get within exploding range/vomit range; hide behind corners or on top of objects that the survivors can't see the top of. Your survivor-vision will allow you to see the survivors as they approach, so wait until they're about to spot you and start vomiting. You'll most likely get one of them, and if your enemy is suitably surprised you might be able to get closer and be shot, showering more of them with bile. However, try not to be immediately obvious as to where you are hiding, as survivors can often hear your telltale throwing up sounds from a short distance. Alternatively, if you want to deny your foes a chance to safely dispose of you, drop onto them from a tall ledge; if you fall far enough you will automatically die upon hitting the ground, exploding like a bomb over the survivors.
Also, it is worthwhile to note when playing as the Smoker and Hunter that the Boomer's vision/halo obstruction means that many teams will not be able to detect a helpless survivor until their vision has returned or the music has stopped playing after survivors have been recently-Boomered. Therefore, it's generally a good idea to attack non-Boomered survivors since their friends may not notice in time.
The Smoker[edit]
- Health: 250
- Abilities: Constricting, releasing gas clouds
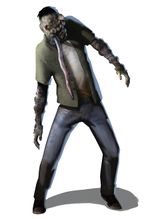
The Smoker is tall and lanky, but the main thing is his ridiculously long tongue. This can easily reach distances of 100 feet when stretched, and if it connects with a survivor will wrap around them and begin to drag them back towards him. After a few seconds of being wrapped the survivor can no longer move, and if they are pulled against a solid object, suspended from above, or dragged into the Smoker's waiting grasp, they will start to take damage. A survivor that has been in the grip of the Smoker's tongue for too long can no longer rescue themselves, and must be saved. Upon death, the Smoker also releases a cloud of thick smoke, which obscures vision and also causes any survivor who walks through it to start coughing for a few seconds, preventing voice communication.
You can save a fellow survivor in four ways; melee the Smoker, kill it, melee the trapped survivor, or shoot the tongue. You will hear the telltale music spike when a survivor has been constricted, so quickly find them and free them before they start taking damage either from being constricted or from attacking members of the Horde. Being completely constricted deals anywhere between 5 and 30 damage per second or two depending on the difficulty you're playing on, so make sure you spot entangled survivors quickly. Smokers will often try and attack from obscured positions like rooftops, through windows, or from just around a corner, and try to stick close to a straggling survivor in case a Smoker decides to attack them and the survivor cannot use the brief period of control that they have to kill the Smoker. You can also see where one has been recently by the spore trail it leaves behind in the air as it walks.
Versus Mode[edit]
When playing as the Smoker, your ideal role is to break up the survivor formation. Dragging a survivor away from the group opens them up to attack from the Horde or other specials, and this effect is only amplified if you can drag one off of an object or into an awkward position which opens up any rescuer to attack also. Attacking from obscured positions as previously mentioned will increase the chance that your tongue will grab and pull a survivor, as well as making it more difficult for survivors to opt for the better method of saving their friend; by killing you. Landing yourself in survivors and hacking away at them with your secondary claw attack is also a good strategy to try, especially during a particularly severe Horde swarm in a cramped place, as on top of the swarms when you die you will obscure the survivor's vision, making it a lot more difficult for them to fight back.
If there are any cars with alarms or witches around, a great strategy would be to stand behind it and pull someone towards it with your tongue. When the teammates shoot at you, they may hit the witch or alarm causing even more havoc. Alternatively, try aiming for spots which drag survivors off ledges; although they don't lose much actual health from this if they are helped up it still incapacitates a survivor.
The Hunter[edit]
- Health: 250
- Abilities: Leaping, pinning survivors
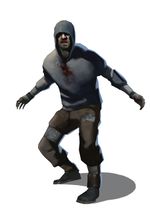
The only real distinguishing features of the Hunter compared to other infected are the fact that they crawl a lot more, leap around, and have a hood. The Hunter's main attack is its pounce, which after crouching for a short amount of time will allow them to leap a great distance. If this leap hits a survivor, they will be instantly pinned, unable to fight back as the Hunter rips their torso to shreds. Also, there can be more than one Hunter in action at any given time, unlike with all other special infected.
As with the Smoker's constricting tongue, the Hunter's pounce leaves a survivor helpless, so it's important to save any survivor you see pinned as quickly as possible; being pinned can take off a lot of health in a short amount of time (between 5 and 25 health per second or so depending on the difficulty). Unlike with the Smoker, however, a survivor is rendered helpless immediately, and will start taking damage from only a second or two after the Hunter has pounced them (in some cases the pounce itself will knock off health). Hunters are also very agile, and should one live through an attack on you, it can very quickly retreat and leap out of sight. Either kill or melee a Hunter pinning a survivor to free them. Stragglers are also a prime target for Hunters, so make sure you do not go too far ahead of a slow-moving team member in case they get pounced.
Versus Mode[edit]
When playing as a Hunter, you should aim to cause havoc and assist fellow infected where possible. A Hunter pouncing into a close formation of survivors will likely do no damage even if the pounce connects, as you will just get melee'd off or killed before you can start dealing damage. Instead, try and target survivors that are a bit ahead or behind, to maximise the chance that you will survive long enough to deal damage. You are most likely to deal a significant amount of damage however by pouncing a survivor in one of the following situations:
- Caught in a Horde swarm (the surrounding Horde act as a temporary meat shield from survivor fire).
- Constricted by a Smoker.
- Saving someone constricted or pounced (by another Hunter).
- More than a ten-second time gap away from another survivor.
In Versus 10 seconds equates to roughly 30-50 damage, and if everything goes well it might be longer before you are removed from the survivor you are ravaging. Also, longer pounces, in which the Hunter spends longer in the air, will do contact damage upon connecting with a survivor, up to a maximum of 25 damage. Pounces which exceed 15 damage are generally difficult to pull off but if successful is a significant contributor to the infected team, and will put low-health survivors even closer to the critical incap point.
It is not often that you will incapacitate a survivor unless they are already weak, let alone kill one, but none of the lesser special infected are designed to outrightly kill survivors with ease. That task is reserved for....
The Tank[edit]
- Health: 6000
- Abilities: Smacking things, throwing rocks
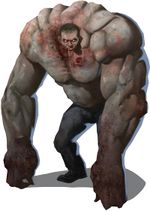
No need to search for telltale signs of this big, bad, pulsating wall of muscle; every step it takes makes a thud that can be heard for miles and shakes the screen. This is the strongest of all the playable infected (second only to the Witch, who cannot be played as) and the toughest of any enemy you will come across. Up close, its punches do a ton of damage (between 30 and 80, depending on difficulty) and knocks survivors flying, stunning them momentarily. At a distance, it can also throw chunks of rocks ripped from the ground, which do a similar amount of damage and also stun. The Tank can also utilise objects in the environment (like cars) by smacking them into survivors.
The Tank is arguably a boss battle every time it shows up; it takes a significant amount of pounding to go down even with all four survivors shooting it, and it is not particularly slow either. It can cut corners and close in on you, and once you are in range of its fists it can be very difficult to get out of, especially considering that you might lose enough health to start limping, and then there is really no hope. Fighting a Tank in an open environment with few objects for it to use is the best scenario, as you can split up and leave plenty of space to continue running without worrying about it being able to hit you from a distance (you will be able to dodge any rocks it throws). However, in a cramped space or, even worse, a dead end, a Tank (especially on higher difficulties) can spell certain doom for a survivor team. Setting the Tank on fire with a molotov will not damage it, but instead will kill it after a certain amount of time passes (varying from 30 to 40 seconds) so doing so and then dodging it for the remainder of the time is a viable tactic if you have enough room and you are low on ammo.
Versus Mode[edit]
The Tank's objective is very simple; smash the survivors to pieces. Although this sounds simple, it is a good idea to briefly consider where you are fighting before rushing in with the Tank and engaging the survivors; remember that in open areas the survivors have the upper hand and can quickly whittle down your health. Also, do not change who you attack until your target is incapacitated; this indecision wastes valuable killing time, which to be effective you cannot afford to do. You are more likely to deal a crippling amount of damage by hitting one survivor until they are incapacitated than by trying to hit all of them. However, if you cannot chase down a survivor, hit them with a rock to stun them, or find a closer one to go after. Finally, do not underestimate punchable objects; they are capable of incapacitating any survivor they hit whilst moving.
The Witch[edit]
- Health: Variable (anywhere from 200 to 3000)
- Abilities: Powerful claws, one-hit knockdown
The Witch, for most of the time, simply sits bent over on the floor, crying. And if you're careful, that's all she'll ever do. She doesn't want to be disturbed, but if you shine your flashlight at her for too long, shoot her, or stay too close to her, you will anger her, and that's not something you want to do. On all difficulties, one hit from the Witch will incapacitate you, and given how fast she runs, fleeing rarely works. On Expert, this one hit will actually kill you outright even from full health, and to top it off the Witch is easier to startle. Once you are incapacitated, the Witch will scream for a few moments, then proceed to slash you to ribbons. Her slashes whilst you are on the floor do anywhere from 30 to 75 damage per second or two.
Fortunately, the Witch is only interested in killing the survivor who startled her, and once she has succeeded she will simply run away screaming and covering her face. Also, she does not often have that much health, and a few seconds of sustained fire will often do a decent amount of damage to her, if not kill her. More often than not, though, it is better to avoid the Witch wherever possible. Sometimes however this is not possible, as the Witch may spawn in a doorway or corridor which is impossible to get past without startling her. If this is the case, have everyone take aim at her, then one person fires to startle her, who then runs away. On easier difficulties this usually works especially if the startler gets a bit closer with either shotgun.
Even though the witch is powerful and deadly, she can still be confused or blocked by terrain (for example, she can get stuck descending a ladder or climbing a ledge if there is a player in the way.)
Versus Mode[edit]
You cannot play as the Witch, but when she is around it can sometimes be worthwhile to try and force the survivors to trigger her. Dragging a survivor across a Witch with the Smoker's tongue is always a good bet, or trying to time attacking the survivors as a Boomer so that a Horde swarm appears and one of the survivors accidentally shoots the Witch. Given her static nature it can sometimes be difficult to utilise her, but experiment.
See Also[edit]
- Left 4 Dead Statistics on Steampowered.com forum
- Left4Dead Weapon and Infected Statistics