The stage starts off in the traditional Gradius manner, providing you with an opportunity to power up before the stage truly begins. 12 sets of Beruberumus will fly in from the center and expand to the outside giving you the chance to collect 12 power-up capsules. Given the nature of the early portion of this stage, having strong Missile capabilities is highly recommended. Therefore, a good strategy is to use the 12 power ups to obtain two Options, and the first Missile weapon. As you proceed, collect two more power ups to activate the second Missile weapon, and you will be at your strongest Missile capability.
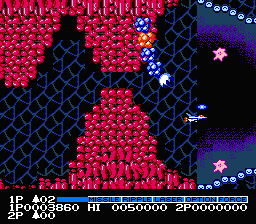
In the first section of the Bionic Germ, you will encounter Death Hands which are the tentacles that extend from the ceiling or floor and reach out to grab you. Shoot the orange segment in the middle to destroy them. Cellular growth will also occur, shrinking the size of safe passage, so don't hang out along the sides. Amoeba like enemies called Swarms fly by, so zap them for more power ups. Eventually the screen will split between a top path and a bottom path. Cells along the wall on either side of the path will extend. The top path is safer because it offers more space to avoid getting hit, but the bottom path has another power up opportunity.
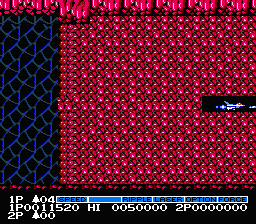
You will emerge into a section with blue walls. More Death Hand tentacles will extend from the linings of various walls. Stationary cannons line the walls of the inner section and Octas patrol this area. If you see gold Octas, there is an opportunity for more power ups. They stay relatively close to the edge, and the power ups they leave behind may lie close to the wall. However, the NES version of the game is a little more forgiving with wall collisions, so you should be able to safely collect the power ups unless you are moving too fast.
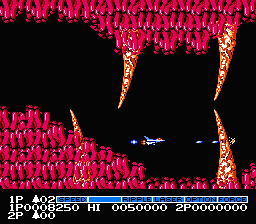
The next section contains the deadly Sharp Crosses. These are the giant fang-like objects which extend from the floor and ceiling. They cannot be destroyed, and must be completely avoided. They move at regular intervals so you should not have much trouble anticipating their approach. More Octas and Swarms travel through the area. Rely on your missiles to destroy them and reveal power ups. Only collect them if it's safe to do so, and avoid the walls and Sharp Crosses.
When you escape from the Sharp Crosses, you will see Hair lining the edges of the screen. Shortly before this, a large growth of cells will extend, closing off passage through the middle of the screen, so advance to the right side quickly. Blue corpuscles will appear inside a web of thin tissue. These corpuscles do not grow like their arcade counter parts, but they are more numerous and must still be shot several times before they explode. Continue firing straight ahead to cut through the webbing and destroy the corpuscles before you get too close to them. As you make your way through the second webbing, which will contain fewer corpuscles, two sets of Swarms will fly by.
Beyond the webbing, more cellular growth will extend from either wall, creating a narrow passage through the middle. Hair will attack you on the other side. A Death Hand will rise up from the regenerating tissue. Destroy the Death Hands by hitting their weak point, and prepare to move up or down. Watch out for the cannon antibodies, and another Death Hands, then situate yourself in the middle of the wall of regenerating tissue. Begin to blast a hole through the tissue, and stay on the right side of the screen to avoid getting swallowed up when the tissue returns. You will pass through a gap, but don't give up your position; keep firing through to the next very long wall of tissue until you are all the way through. Keep your Options behind you so that they will shoot away any tissue that might be approaching you from behind.
When you arrive in Brain Golem's lair, the tissue surrounding him wears away. Then he unleashes two very long and indestructible Death Hands. Stay in the upper left-hand corner of the screen as they appear. Once the second hand is fully extended and pointing toward you, Brain Golem should begin moving. Start by moving down along the left side of the screen and begin to circle around him in a counter-clockwise direction. Eventually the eye ball, his weakness, will open at the front of the brain. As you pass around his left side, be sure to fire continuously at it, but don't stop moving. Keep moving around him. If you have two Options and Lasers, you may not even have to make two passes before he is destroyed and you are on your way to the next stage.
2nd loop changes: The hands shoot projectiles at you while reaching out for you.