Items to collect[edit]
Mission requirements[edit]
- Clear Time Limit: 8:40
- Enemies Killed: 23
Note: Get your Sub Tanks filled up for this mission.
Yggdrasil[edit]
Ciel informs Zero that he can enter the final area of Neo Arcadia. Answer yes, and the mission will begin. Ciel tells Zero not to overstrain himself again.
Zero will appear in a room filled to the brim with energy conduits shaped like crosses, and circuits in the floor. These are parts of Yggdrasil's extensive techno-organic roots. You are at the trunk of a towering plant defended by spikes, the Pantheons, and Mechaniloids. From here, it's a pure gauntlet: make it past the enemies and traps, while getting through each challenge. There are no more Cyber-Elves, just get in, get out.
If you stayed true to the guide, you'll have all the Cyber-Elves. If you want to end the mission with a sufficient rank, hold off on using any. If you want a secret though, use up every last Elf prior to the mission, but you should save in a different file to avoid ruining a high rank.
You only need 23 kills, but with few enemies, don't miss a beat. Your time limit is the biggest for the final mission, but if you remember the first game, there's a good reason why...
Starting off easy[edit]
The first room starts off with a ladder. Smash the Gli-Eye along the way. You'll meet several Pantheon Hoppers when you reach the top and go left. Cut them apart without getting pounced. Damage count is very, very crucial.
The path stops at another ladder. Since you're scaling the inside of a huge tower, keep going up, which takes you to another Gli-Eye and Pantheon Hopper. This path ends with another ladder, but look out for two Gli-Eyes nesting in the way. Keep climbing and they won't get you, and you can get them as they follow you to the next level of the tower.
A duo of Pantheon Hammers comes at you from the edge of the left side. Hit them with the Triple Shot, Tenshouzan, or the Shield Boomerang.
Taking risks[edit]
Now you'll begin to see some actual danger. Spikes are popping up at the end of the hall. You can easily jump from the first set, then jump onto a ladder over the second step. Beware another Gli-Eye in the midst.
What now? You've got nowhere to go! Wait... the ladder to the right looks reachable. Climb to the top of the first ladder and jump to the right while holding ![]() . You'll catch the ladder and be able to continue. If you do it wrong, expect spikes.
. You'll catch the ladder and be able to continue. If you do it wrong, expect spikes.
You've reached a shutter that leads into an empty hall. When you get to the end of it, you'll enter a room with a familiar sight; teleporter pods. That's right: Elpizo revived the Reploids you slew. It's boss rush time!
Boss rematches: part 1[edit]
There are just 3 teleporters instead of the 4 you initially reached in the first game, but each one takes you straight to a nasty Mutos Reploid you hoped to never see again.
Phoenix Magnion[edit]
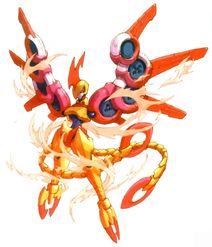
Starting with the hardest boss, enter the teleporter in the lower-right corner. Phoenix Magnion drops in with his usual showy display, just as mesmerized by Elpizo as the others.
Under any condition, this fight is brutal, but the floor poses a time limit: it's identical to the floor in the Power Room with the most slag pits. If they erupt, you can't dodge them, so you'll have to beat Phoenix Magnion under pressure. Keep walking close enough to him to dupe him into attacking, then clobber him with Thunder attacks. Beware the attacks he throws at you, especially the ones that can trap you, like his EX Skill, Rising Flame.
Phoenix Magnion has enough sense to figure out what went on. He calls himself foolish for being tricked so easily, before dying for good. Be glad he won't come back again. After every boss fight, you get a health refill for yourself or your Sub Tanks, and with Dable, this health drop is doubled.
Hyleg Ourobockle[edit]
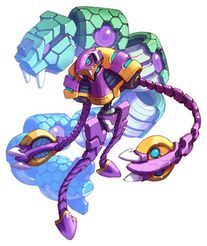
Take what you need and enter the top teleporter.
Hyleg Ourobockle and Altoloid are waiting. Hyleg feeds Zero the same line as Poler Kamrous before the fight. Hyleg Ourobockle won't be a problem. Don't get up close and deliver constant damage to him, and he may not even get to start using Altoloid. Even if he does, remember the pattern and wait it out. He has no weakness other than a tendency to go down quickly.
Hyleg Ourbockle can only remember seeing Elpizo and the Baby Elves when he returns to his former self. It's a nasty end for an equally nasty snake.
Poler Kamrous[edit]

Finally, enter the lower-left teleporter but this battle is easy.
Poler Kamrous is back again, but something's very different about her. She's become hypnotized by Elpizo into thinking he's her master, as are all the other Reploids. She lets out a feisty growl and says that with Master Elpizo and Master Dark Elf, the new world is ready.
Keep on using Fire attacks and Poler Kamrous won't do much of anything. You should remember everything she can do. The floor is always frozen, but it doesn't affect the battle.
Poler Kamrous suddenly wonders what's going on after another walloping. She says it's so hot just before dying again.
Now that you've made half of your old foes permanent residents of the scrapyard, the door will open to the next part of the tower, where things get challenging.
Fast judgement[edit]
It's no surprise seeing Pantheon Gunners defending X's resting place. They won't last with your superior Buster Skills.
After the first ladder, look out for the spike pit in the way. Make a dash-jump off the edge of the floor and you'll get over. It might take another quick wall-jump for you to avoid a mishap. Use Tenshouzan on the Pantheon and keep moving.
Panel Cannons surround the next area. Keep away from them when they fire, then dash by while they have to recharge. You can waste them before they ever get you, no sweat.
Slice your way past the next Panel Cannon and then use Sengatotsu or the Shield Boomerang against the next Pantheon. There's a second group of spikes for your displeasure. Dash-jump just like before, only this time, get ready to deal with a Pantheon with a charged Saber. When you jump, just as you reach the edge, hack through that Pantheon and climb up before you impale yourself. Make use of the health if you need to.
Look out! When you're going up the wall, there's Panel Cannons all over creation. Deal with the first two by using Triple Shot, and then shoot the lone Pantheon in the lower-right corner. Hop over the spikes onto the ladder and slash the Panel Cannon up here with the Saber as you climb. Pull a quick strike on the Pantheon above, and you're almost to the next checkpoint.
There's a big spike pit here. Dash-jump onto the first ladder. Unleash Buster fury on the Panel Cannon when you line up with it. Move onto the second ladder and go up to the shutter. You're about to go head-to-head with the remaining Mutos Reploids.
Boss rematches: part 2[edit]
Three more teleporters, and at least three more bosses to contend with before getting anywhere near Elpizo. The hardest boss in the second lineup is in the lower-left teleporter, so that's the one to put out of commission last.
Burble Hekelot[edit]
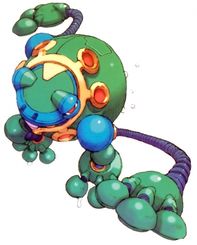
The next Reploid boss in the preferred order waits in the lower-right teleporter. Burble Hekelot drops from the canopy above with the same brainwash syndrome as everyone else. First, he was loyal to Harpuia, but now, Elpizo is the greatest thing in the world.
The battle against Burble Hekelot isn't difficult at all. Wallop him with the Z-Saber at every turn, and he won't be able to attack. Keep him from snacking on Caterpulls so he won't get tougher, and be on the lookout for his Energy Tongue EX Skill. Remember you can burn the canopy of leaves, but this will remove the tell of rustling foliage that will let you anticipate the landing spots of the falling Caterpulls.
Out of all the unlucky brainwash victims, Burble Hekelot is likely the most surprised. The snap back to his senses shocks him so much, he can't even remember what he is! His last breath is a anguished ribbit.
Panter Flauclaws[edit]
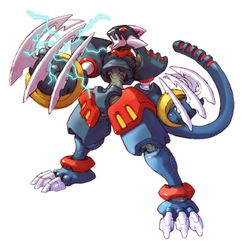
Four Reploids gone, two to go. Enter the transporter at the top of the room.
It's Panter Flauclaws, also preaching, "Master Elpizo, forever!" And to think he was once a respectable warrior.
This boss fight may not be on a train anymore, but the platforms in this room mimic the spastic movements of the train cars. They can still crush you if you're wedged between them, and you can also fall into a frightening pit below. Panther Flauclaws is still a tough enemy who darts at you with lightning reflexes. Don't take him lightly. Keep clear of his deranged strikes and sudden Spark Shots, while making sure he's not attempting his Tail Spark EX Skill. With the Ice Chip, he's far easier to dispatch. He'll be frozen for a short time after a hit, letting you get away from his attack range, and plan your next move accordingly. Stay sharp, and it's certain he's not going to be around for much longer.
When the killing blow has been levied, Panther Flauclaws snaps out of his trance, deeply disoriented. The feline cries out in pain as he falls a second time to the fate of a miserable death.
You'd think Kuwagust Anchus is waiting in the last teleporter. Think again...
Brothers Reunited[edit]
In two bursts of lightning, BOTH Anchus brothers show up in front of Zero! Herculious Anchortus and Kuwagust Anchus are planning a tag-team assault! They might be hypnotized, but the one thing they clearly remember is their bond as brothers, brothers who undeniably hate Zero!
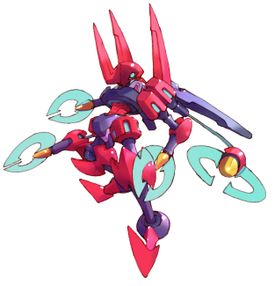
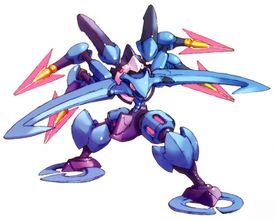
It's a surprise that Elpizo resurrected Herculious, and that means its sibling revelry. The fight is a mix of the Anchus Brothers taking turns attacking you in a repetitive pattern, and double-teaming you. It's very hard to continually dodge attacks between the two of them, making this fight the hardest by far to escape damage-free. 2-on-1 isn't a real issue in the final segment of the game, but they share a three-tier health bar. Keep in mind both are weak to the Ice Element. If you go back and forth and take turns hitting each brother, you maximize the damage.
Herculious always attacks first, while Kuwagust strays into the background. He uses his EX Skill, the All-Range Attack, ignoring rank. His pincer claws stretch out and shoot plasma bullets your way. Don't stay in the same place for very long. He can corner you much easier in this fight than in his original battlefield. You can block the EX Skill with the Erase Form or hide behind the Shield Boomerang.
After his attack, Herculious goes over to the edge of the battlefield and pulls away. Kuwagust tags in and attempts to use his spinning pincer jaws to suck you in. If he grabs you, you'll get hit with an explosive crunch. Keep dash-jumping out of his wind tunnel and try to score some counter hits.
When Kuwagust quits attacking, the Anchus Brothers will come in at the same time and try to ram into you several times while crisscrossing the full length of the room. Always dash under Herculious just before he nears you and you'll never get hit. You've got a good chance of hitting either brother when they pause between charges. After this, they start the same pattern from the beginning. Unless...
EX Skill: All-Range Spinning Strike
If your rank is still at least A, you'll see another EX Skill. Instead of repeating their pattern, the Anchus Brothers pull off their ultimate technique. They link their arms together and make a full two-and-a-half circles around the whole room with electrified arms. You'll be hit if you stand still, and the brothers can't be damaged while using their EX Skill. As one brother nears you, strike the coupling between their arms. They'll lose power for a few seconds, where you can dash jump over and out, but smacking into the coupling itself can still hurt you, but not if you jump precisely. When they complete their "orbit," they turn around in reverse. Don't let this trip you up. As long as you keep disrupting the attack, they can't get you. From here, they repeat the pattern, with this attack added in.
The Anchus Brothers proved themselves as challenging adversaries in the past, but they've been reduced to acting as the tawdry puppets of Elpizo. Whatever honorable qualities they once toted have been ruined. They need to be defeated.
After you land the final hit (it doesn't matter who takes the damage) and they lose all health, they don't die just yet. The Anchus Brothers will attempt to pierce you with a final, ditch effort charge from opposite sides of the room. Dash-jump over Herculious. It's easier to dodge him than his brother.
Their attack backfires; they collide and kill each other. Then they realize they've been manipulated, and both die at the same time. At least they won't be separated in death.
That's it for all the bosses who stood in your way of Elpizo. You can proceed through the next shutter. The end is in sight, but it's got the highest number of enemies, plus obscene numbers of spikes. Think you can go the distance?
Nearing the End of the Journey[edit]
The final section of Yggdrasil starts off with temptation to the right; a path to some health where a Pantheon Guardian is. You'd have to use the Chain Rod and wall-jump, but it's definitely a waste of time.
Dash-jump from the edge up to the wall on the right. You're going to see Securipiders locking down almost every inch of the path to the top of the tower. It's all over if they snare you in the wrong place, where you would most certainly fall into a spike pit. Dice up those arachnids on the spot!
Cross over the spike pit and hug the wall to your left. Hop from the side to the edge of the ladder, but don't climb as far as the spikes. Like it or not, they can get you from an angle.
Next, carefully scale to the top and cross onto the next ladder, and so forth by jumping off and catching them in mid-air. That last ladder doesn't exactly reach safety, so you'll need some wall-jumping skills to survive.
So many spikes![edit]
Further beyond here, the spikes jut out from the edges of the walls. You wouldn't want to mistime a jump and get killed. For added protective measures, there's more Securipiders and Pantheon Guardians. Make a small wall-jump up the left wall. Control your fall over to the ladder, but stop holding right the moment you line up with the edge. Scaling up, you can only jump right with spikes on the left, but you'll enjoy a decent health refill. Those Pantheons aren't so tough, so do away with them now.
You'll need to repeat the same tactic that's worked with the spikes every time: stand on the edge of the platform, make a strong dash-jump, and you're going to make it in one go-around.
It's easier to clear the spikes by the ladder. Just dash-jump without too much force, then grab ahold of it.
There's an absurd number of spikes ahead, so many that this has to be the major trouble spot of the tower core. They cover all four walls! Not just that: the floor won't reach over far enough to land safely! How can you possibly escape? There's only one way: cheating death, of course! It has to come to this... Lower yourself completely off the ladder, but don't just let go; climb down until you're off it, while gently holding ![]() . You'll get past the spikes on the left wall, and just barely land on the platform's narrow right-hand corners. Wall-jump immediately! You need to leap over to the floor before the spikes finish you! Just as long as you didn't make a terribly big jump and risk spike contact, you're all set! The remaining path is just an enemy gauntlet, and you get one last health refill over to the right.
. You'll get past the spikes on the left wall, and just barely land on the platform's narrow right-hand corners. Wall-jump immediately! You need to leap over to the floor before the spikes finish you! Just as long as you didn't make a terribly big jump and risk spike contact, you're all set! The remaining path is just an enemy gauntlet, and you get one last health refill over to the right.
The door at the end isn't just a plain shutter: it's a maximum security vault door. Nothing can penetrate it but the most powerful cutting instruments in the world. However, Elpizo has already typed in the password, and he's even left the door open for you. He actually wants you to catch him! But... why?
Neo Arcadia's most protected secret is in your sights...Are you ready? The final showdown has come! Enter the forbidden chamber.
Farewell, X[edit]
Elpizo is calmly waiting for Zero's presence with the Dark Elf and Baby Elves. However, there's another surprise: there's a gigantic, cybernetic tree in the room. Directly below it is a shrine, and sitting in a throne, at its roots is... Mega Man X!
Except... it's just his body, and it's totally defenseless without X's mind attached to the hollow shell. He broadcasted himself as a Cyber-Elf and never returned to the body you see before your eyes.
X made a seal with his body one hundred years ago to keep the Dark Elf's massive power absorbed and regulated through his own components. The tree sprouting up from behind is the end result of this seal. Essentially, Yggdrasil really means "Tree of Life." He's created this tree with his energy to lock away the Dark Elf, but now, it's being threatened by the power-hungry Elpizo.
Elpizo wanted a sense of satisfaction in his moment of triumph, so he let Zero reach him before destroying X. Elpizo strongly believes X is the symbol of his misery from what went on before Zero woke up. He's too caught up with his delusions to realize he's about to do in Zero's best friend. Angry beyond all doubt, he tries to intervene, but Elpizo uses the same power Harpuia fell victim to, and locks him in an energy cage.
Helpless, he can only watch Elpizo announce the true "retirement" of his friend, and foolishly plunge a Saber of his own into X's chest!
X meets a tragic end, being blown to smithereens along with his tree of life. Zero snarls as the core bursts open.
The Dark Elf awakens[edit]

The remaining half of the Dark Elf is free! Seeing this, Elpizo chortles with excitement over slaughtering X. He's truly a fiend, indeed.
The freed half of the Dark Elf fuses with the other half, making it whole again. Now fully awake, it has a much more menacing glow and sprouts wings. The Baby Elves fly around their mother in joy, while the whole group ominously flies over Elpizo.
Elpizo happily invites the Elves into his body. The Baby Elves, and then the Dark Elf immerse themselves deep inside him. Elpizo lets out a terrible scream, and begins a grotesque mutation into a devilish knight!
After an intense series of cutscenes, Elpizo has radically changed. With clawed hands, white armor, evil red eyes, and a superpowered Saber, he's a monster! Overcome by the ultimate extreme of madness, he's going to kill Zero, waste Neo Arcadia to dust, and slay all the humans on the planet to make the world a paradise only for Reploids. As Elpizo raises his saber for battle, Zero finds himself in the crosshairs of a raging maniac!
Boss: Dark Elpizo[edit]
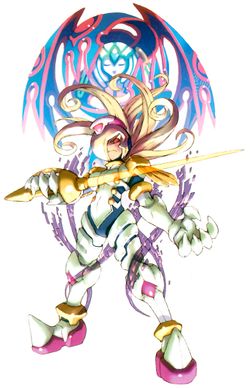
Elpizo received a terrifying power boost from the Dark Elf and Baby Elves. He's commanding fiendish strength with almost no limit, and on top of that, he's turned power-mad to the point his psyche is shredding apart like tinfoil. Are you up to the task of defeating him before he loses what's left of his humanity?
Elpizo is very agile and viciously powerful. He knows to jump out of the way of your attacks, or block them with his saber. In this form, he's got no element weakness, leaving you forced to chip his health down to zero the hard way. Just be prepared for the multitude of attacks he's capable of flinging your way.
If Elpizo suddenly freezes and yells, "Kurae!" ("Eat this!"), a Splash Laser attack is on the way: dash right in front of him. Stop right beside him, but don't make any contact. He's going to point his saber up and fire small energy spikes all over the room. The ones that hit the floor become shockwaves that don't stop until they hit the walls. If you stand in the spot mentioned shortly ago, the entire attack is almost certain to miss, and you've got a good chance for a powerful counterattack. Just beware his next move. It's harder to get away from close range.
Utilizing a Distortion Aura, Elpizo can bend the fabric of space itself. He periodically tears open portals to summon either a Pantheon Gunner or a Spiking by surprise. Either way, don't stand next to the portal (you can't use it), and repeatedly use the Kougenjin on whichever enemy pops out to stop them from so much as twitching before they reach you. It's always hits, and might even reach Elpizo. However, you can only use it as well as its maximum range, and that means getting too close for comfort. You can always regain energy from the enemies he summons, and they do up your kill count if you haven't made 23 kills just yet. If it gets a little too crazy, just back away or get on the other side of Elpizo.
Elpizo means business when uses Saber Dash, charging forward with several rapid stabs of his saber. He gets into an attack stance before he dashes, pointing his rapier forward right before he begins his melee. This warns you of the incoming attack, so you've got plenty of time to react. Either jump over him or use the walls so you don't even come near him.
If any attack causes the most trouble, it's Elpizo's Dark Drain, a life-draining energy ring. He'll jump into the air, spin around, and shout "Kokodesuka!" ("It is there!"). He'll fire a ring of six dark energy spheres that make a sloping pass at Zero. If these hit him, they latch on for a few seconds, and Elpizo begins ripping them off and stealing health to replenish his own. You can shake them off with rapid dashing, but even that's not very useful. As he sends the ring, dash away about a second before it reaches you and dash-jump over it. It's the best method of dodging it.
EX Skill: Grand Burst[edit]
This is one time where having at least an A-Rank means big trouble. Elpizo keeps a powerful EX Skill at his grasp. After Elpizo loses enough health, he lashes out with all his power.
He performs Dark Overdrive, a corrupted take of the Guardians' Overdrive. He's coated with a purple flame aura that makes him invincible for the duration of his attack. Using the dark power inside him, he can now manipulate his sword without having to physically wield it, giving him a bigger attack range. With little effort, he sends it pinwheeling through the air for a few seconds, while he stands back and prepares to send forth his main attack. His sword stops in place, then channels so much dark energy that it doesn't just fire out the tip of the blade: it radiates out of the whole weapon as a malevolent blue column, while the sword floats in the middle. The beam acts as a solid barrier too thick to penetrate with a weapon, giving Elpizo a temporary line of protection from any of your attacks. The cascade of energy is also vicious enough that it starts blasting away chunks of the ground, catapulting them violently into the air. These wayward rocks are impossible to destroy, giving you no other option but to take cover as he uses the EX Skill, preferably at the very edge of the room or top of a wall, safe from the flying rocks. After the attack ceases, Elpizo whisks his rapier sword back to his hand, and it cartwheels through the air again like a boomerang. Although the forceful onslaught is over, the sword alone is sharp as a raven's beak, and you obviously don't want to be standing in front of it while Elpizo retrieves it, or you'll get a nice big gash for your mistake.
Elpizo has become a true Maverick. A Maverick is a rouge machine that leaves a swath of destruction as they go, with no remorse as to how high the toll of victims will be. To them, it's merely a way of keeping score. Because Elpizo is willing to slaughter the innocent for his own personal gain, he has crossed the line that separates him from friend or foe. Finish him while you still can. Make every move count! Whittle his health down to nothing before he does a fatal number on you! Without extreme effort, he's left quaking in his boots... but defeat is not in his agenda...
A Punishing Wish[edit]
Reeling from the battle, Elpizo is totally awestruck. He thought he had godlike powers that made him practically invincible. The very same powers that almost destroyed the world have let him down. Elpizo feels cheated and explicitly furious. Unable to accept defeat, he makes the worst decision of all... he asks the Dark Elf for even more power!
The Dark Elf grants Elpizo's last wish, and fills him with her evil energy. In a frightening shadow, Elpizo is transformed once again, and lets out a most painful scream! He is imbued with the full might of the Dark Elf, but the power is so great, it overshadows his psyche and consumes him. His mind, an insignificant speck compared to size of the evil bottled up in the tortured Dark Elf, cannot remain in control. Elpizo's psyche becomes overwhelmed with murderous thoughts, wiping out the last bit of his sanity and self-control.
The thing that emerges from the shadow isn't even Elpizo... he's gone from a righteous leader... to a hellish wraith!
Who would have thought it would end like this... Like it or not, this is your final battle!
Final Boss: Demon Elpizo[edit]
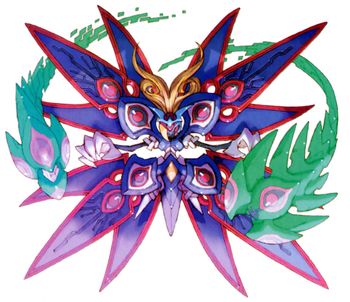
This replulsive form is the final result of Elpizo's madness. Unable to control the vast power of the Dark Elf, his insanity has consumed him. He's become a primal demon who desires destruction worldwide! The Baby Elves have even been affected and transformed, swirling around him in the shape of giant parasites. His power has virtually no limit beyond the Dark Elf's capabilities. You know what will happen if he breaks loose across Earth: total annihilation. As sickening as it sounds, you're forced to kill your former comrade to save the world.
Demon Elpizo's abilities are almost absolute. He easily summons whatever instrument of destruction he desires, if the bloodthirsty monster still has a mind left to use. From time to time, he'll use Teleportation to shift over to either the left, right, or middle of the room, and the Baby Elves will keep flying around trying to protect him. His only true weak spot is his head and upper body, and only a charged Z-Saber can deliver the most effective damage, but you can still get dinged up by running into the demon's claws or wings. The armor on his body won't make him flinch like before: if he attacks, it's inevitable. He's still not weak to any element, but you should utilize any Form you've surmassed that might help, like the Active, Power, or Defense Forms.
Demon Elpizo summons two kinds of attacks: green orbs that house miniature vortexes with malevolent red cores made from warped plasmic energy , or spiked objects created from liquid metallic gold.
If the demon uses his plasma orbs, he'll create two kinds. His smaller attack is Vortex Drain, when he releases several glowing vortex spheres from his claws, which you can cut apart and destroy without even letting them touch you, and dash away from with little effort. However, if left unchecked, they home in and attach to Zero. Each one slows him down, while doing steady damage. If too many cling onto him, he's finished. You'll have to press the controls randomly and rapidly to shake them loose.
Demon Elpizo's bigger version of the attack is the one to look out for: Shadow Vortex. He amasses a giant green orb, and unwinds it around himself counterclockwise, just like a giant mace. As it moves, it gets faster and further outward, forcing you to get out of the way or get badly hurt. This one can't be stopped until the demon physically loses control of it and it flies out of the room.
Demon Elpizo also creates different obstacles to injure you further, but also because his powers has made him so unstable, he can hardly balance himself. To that extent, he sometimes creates a platform, but it's not very dangerous at all, it's so he can keep himself from toppling over. It's also safe to stand on for a height boost, but the spiked underside isn't so friendly. The platform begins kicking up dust and hovering around the demon in a sort of infinity-shaped (∞) pattern while he tries to maintain his balance. It's also a trap that lures you right to him. As long as you're not trying to land hits as it's coming by, it's never a real problem. It always sticks to the same path, one that rights Elpizo's body.
Chain Walls is one of the few genuinely frightening attacks Demon Elpizo can dish out. He builds up two spiked walls that crunch into the opposite ends of the room. They don't kill, but you can tell it's bad news to get skewered. Retreat to a wall and hug the upper part. This attack only hits the lowest corners of the battlefield. If it catches up faster than you can run, dash-jump over it. Better yet, if you're directly under Elpizo, then his attack has already failed from the start! He has a blind spot, between where he summons his walls, where they never hit. Under there, you're totally out of reach!
Don't think that the Baby Elves aren't going to step in. You're technically going after their mother, too. If Elpizo wants them to attack, they obey him under the impression he's their "mama". The Elves charge out in parasite form and make spastic flight patterns over the entire room, in a Dual Macabre Attack, cloning themselves to sweep over the empty parts of the room. They tend to weave and stop without warning to dupe you into going where they're about to be. It's fine if you've got the skills it takes to dodge everything going on, but if you flee to the very upper corners of either wall, the Baby Elves never go there. Let them snake over the room until they get tired and return to Elpizo.
EX Skill: Chaos Blazer[edit]
It might be easy playing a game of hit-and-run, but Demon Elpizo has one attack to keep you nervous: the Chaos Blazer. His winged segments light up as they charge at random and launch homing proton spark blasts after Zero. They always target Zero's position, no matter where he's located. You need to keep dashing in a way that keeps the sparks from crashing into you, but still have enough room for escape in case several converge on you. This is the strongest attack the demon can use, and it keeps you from getting close enough to land the final blow. Wait it out until you have a clear shot at Elpizo again.
It's a hazard-filled final battle, but it's not the worst thing imaginable. Sub Tanks provide enough health to keep you alive to slice and shoot the devil form of Elpizo. However, it's not going to be pretty when he's finished off. Every attack he makes strains his body. He can't handle the power of the Dark Elf at all, and now you're seeing just how much inner turmoil he's endured all this time. If the Elf takes massive damage, it can break away to heal and regenerate, but he won't be so lucky.
Elpizo will not come to his senses anymore... you've got to end this. Give it your all and defeat him for good!
Ending[edit]
Elpizo's redemption
When the chaos has stopped, and the battle is at end, the Dark Elf and Baby Elves are fine, released from the one who tried to command their immense power... but it's a painfully sad sight for Elpizo. He's slumped on the floor, barely conscious and dying from his wounds, but no longer plagued by demented dreams of evil. He's returned to his kind, noble self once more, although if only for his final moments. Weary, he knows Zero had to do what he did, even if it meant killing him. Elpizo apologizes for the atrocity he caused (the attack that finished X) and for what he almost did (brought destruction upon the world).
Elpizo curses himself for his weak and pathetic mind. All he did was caused by the weight of his failures and being unable to bear the pain of accepting them. He feels a little stronger from this lesson, but not enough to carry on physically. Saying his final goodbyes, he asks Zero to tell Ciel he's sorry. He's ready to die... but something remarkable happens.
The Dark Elf flickers with a golden light, until it turns bright and powerful, having seen that Elpizo has a kind heart. The Baby Elves see this light and become terrified: they never saw anything like this happen to their mother since they were born. They're so scared, both scatter far away and abandon her.
Through sheer willpower, the Dark Elf has re-awakened her benevolent powers hidden beneath the evil that contaminated her. Her light pours onto Elpizo, and he feels its warmth. Suddenly, he's compressed into the form of a blue Cyber-Elf. The Dark Elf had to convert Elpizo into this form to ensure his survival, and while doing so, she communicated with him. Elpizo quietly whispers to Zero that the Dark Elf saved him, and in reality, she isn't an evil being. He gives Zero his thanks one final time, and with a quiet goodbye, he flies off into the unknown, looking for a place where he can be at peace, and perhaps redeem himself one day.
Zero stares at the Dark Elf, wondering what it will do next, but its warm light fades away in place of cold darkness once more. The Elf struggles to speak, and manages to utter his name before being swallowed by the evil power ensnaring it. Before Zero can find out how it knows his name, the Elf flees from the ruins of Yggdrasil, possibly to find her lost and terrified children, and escape the world that oppressed her.
Shortly after the Dark Elf has vanished, X's spirit arrives to speak with Zero. He finally tells him the absolute truth about the Dark Elf. She wasn't always called the "Dark Elf", she was made to save the world, with another name, but her ability became so much of a threat to the world, people began to call her such out of fear she would bring an apocalyptic fate down on their heads. It wasn't her destiny to be evil; she was cursed and bound to her current form by a terrible man named Doctor Weil.
Zero feels he knows the Dark Elf in some way. He gazes into the sky through a hole in the ceiling of the Yggdrasil's ruins, hoping to remember the past that X finds too difficult to explain, and how he came to this future...
For now, the Reploid warrior can be at peace, having averted a tragedy before it began. However, his struggle against Neo Arcadia is far from over. The Resistance is still a perceived threat to capital city, one they refuse to let threaten their livelihood after a century-long conflict that still continues to plague the world. Where one battle ends, another shall begin... and it will shake the world to the very core.
But as with all his victories, a price has been paid: Mega Man X's physical body is now gone, so in a sense, the great Reploid Hero has perished, but not in spirit. Unfortunately, his Cyber-Elf has long since exhausted its projected lifespan, only staying alive beyond its limits through his attachment to his old body and the mechanical tree that was his life-support. Now that both are gone, it won't be long before his Elf body gives out... and X passes on from this world...
Victory!
With the story wrapped up for the time being, you'll be treated to the credits. Enjoy the catchy music and your hard-earned victory: you've completed the game! As a reward, you get the ![]() Proto Form by default, and unlock Hard Mode. Proto Form increases Zero's attack power, but he can only perform the first slash of his triple-slash combo, his defense is lowered, and none of his weapons except the Shield Boomerang can be charged. You're locked into using this form when entering the first mission of Hard Mode.
Proto Form by default, and unlock Hard Mode. Proto Form increases Zero's attack power, but he can only perform the first slash of his triple-slash combo, his defense is lowered, and none of his weapons except the Shield Boomerang can be charged. You're locked into using this form when entering the first mission of Hard Mode.
Beating the game allows you to continue again in hope of finding any EX Skills, Forms or the Cyber-Elf from the Power Room you might have missed. Keep in mind that any Elves you've used will carry over to the next game, and ones with permanent effects will ALWAYS affect rank!
If you want to test your mettle again, try your hand at the new Hard Mode, and see if you can get the Image Gallery along with it. View Unlockables for more details on Hard Mode and the Image Gallery.
This game doesn't have an Ultimate Mode, buy if you took the extra step of using all Cyber-Elves, you get the best Form of all, the exclusive ![]() Ultimate Form! This final Form allows you to perform charged attacks without charging by using Street Fighter-like button combinations to shortcut straight to the move's execution. It has equally balanced stats, but better than the Basic Form, and unlike other Forms do, this one has no weapon restrictions. It's a splendid final reward for everything you've had to do!
Ultimate Form! This final Form allows you to perform charged attacks without charging by using Street Fighter-like button combinations to shortcut straight to the move's execution. It has equally balanced stats, but better than the Basic Form, and unlike other Forms do, this one has no weapon restrictions. It's a splendid final reward for everything you've had to do!
However, there is still one last surprise in the closing moments of Mega Man Zero 2... but it's a terrible one...
The Call to Action
After the credits, a scene opens in on a darkened chamber door with the emblem of Neo Arcadia. The door is beginning to open and a sliver of light is leaking from the inside. An unseen presence speaks. The person noticed the Dark Elf was awakened, and is hatching a sinister plan. In the darkness, they call out for an entity named Omega to wake up and take action...
Omega... a word that when translated, quite literally means "the end"... With a name like that...it could be a creature meant to spell the end for all life on Earth... Only time will tell...
TO BE CONTINUED... Mega Man Zero 3
