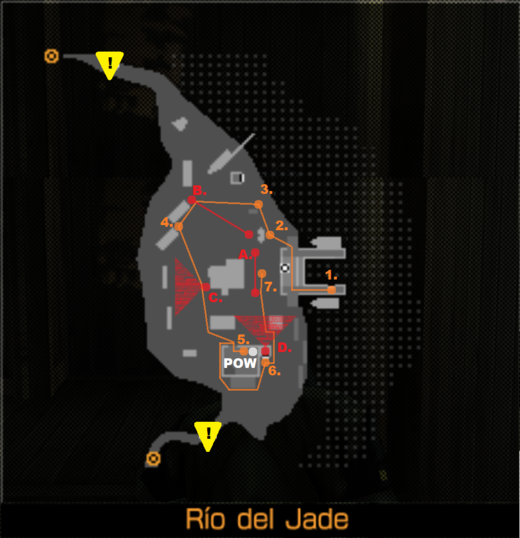
An enemy patrol has occupied the Boathouse on the Rio del Jade. All these guys could be recruited into MSF.
- Neutralize the enemy contingent at the Boathouse and extract them with Fulton recovery.
Mission Prep[edit]
Bring one of your lower-ranked soldiers to boost his Life, Psyche, and GMP+. You will need the ★2 Fulton Recovery System to participate in this mission and a weapon to neutralize the hostiles such as the ★2 Mk.22. Wear the Squares uniform for maximum camouflage in this area. Killing any of the soldiers results in a failure, so do not bring any lethal weapons.
Rio del Jade[edit]
There are two hostiles patrolling, one on the north and one between the Boathouse and the central building. There is one hostile up on the observation post south of the boathouse and the southern building. He is surveying the area to the north. There is another guard posted west of the central building surveying the west. You start in the loft of the boathouse. How you got there is a mystery. You need to get down the ladder. None of the soldiers are wearing helmets, so you can neutralize them with headshots. If you're not comfortable with the gunplay, turn on Auto-Aim.

- 1. Get Down the Ladder

Just move over the top of the ladder and fall down to its base. Do not move immediately, or Soldier D will see you. Count one-one-thousand before moving, and he will have moved his head by then. Move to point 2 to the east of the two red barrels.
- 2. Neutralize Soldier A

With proper timing, Soldier A will always have his back turned when you arrive at the red barrels. Take him out with a headshot or three shots to his back and leave him there for later extraction.
- 3. Neutralize Soldier B

From the north side of this lumber stack, you should see Soldier B with his back turned, but he should turn around any second. Eliminate the threat before he turns to see you. Make sure the Fulton system is equipped and move to extract him. Watch Soldier C, making sure he turns away before moving to point 4.
- 4. Neutralize Soldier C

Point 4 is between the stacks of lumber, but you should stop at Soldier B and either make sure Soldier C is facing away from you or take C out with a headshot where you stand. Wait for Soldier C and move to point 4 if you're not comfortable with the gunplay. Get Soldier B and C extracted as you approach the southern shed.
- 5. Extract the Friendly

Move to the entrance of the southern building. Get in, exfil the friendly, get out. Move south and west around the exterior of the southernmost building and approach the base of the observation tower.
- 6. Neutralize Soldier D

Approach the ladder and climb it gently, stopping just short of the top. Since he's the last soldier on the map, you have some latitude to get a little loud; press ![]() to neutralize him. Get off the ladder and extract Soldier D. It isn't advised to rely on this tactic as the scream and thud! of soldiers pulled from ladders is very loud.
to neutralize him. Get off the ladder and extract Soldier D. It isn't advised to rely on this tactic as the scream and thud! of soldiers pulled from ladders is very loud.
- 7. Extract Soldier A
Approach and extract Soldier A, then move to the Recovery Point nearby when it appears to end the mission.
Completion[edit]
This is a very easy mission to get an S-Rank if you followed all the instructions.
The prisoner will be a C-ranked R&D soldier. All the other soldiers are either medics or cooks, so you can put them in the appropriate team or the Combat Unit for their GMP+ for a negligible change in your setup.
