- Password: 576 5WHD M7D
Stage 3-1[edit]
Here's another odd-ball stage. Notice the parallax scrolling in the background? The Tram Cars you see moving along the track throughout this stage are the main enemy here. They don't do anything but don't run into one obviously. Walk to the right and destroy the Tram Cars if they get in your way, which will be often enough. You'll be sick of them by them time you're done this stage.
When you get to the spikes do a Gravity Jump and then another to get the Flame powerup. I wouldn't recommend getting it if you already have the Weapon or the Armor powerup since that one will negate it. There will be a Shield and another Armor powerup just ahead if you do want to get it though. Drop to the floor if you haven't already and nab the Armor and then continue to the right.
When you get past the wield neon green blocks there will be a White Turret sitting at the top right side of the screen. You can either stand on the edge and fire at it, while walking right again when it fires at you or just go head to head with it under the track. If you still have the Shield, it should absorb the hits from the White Turret. Once it's gone, head to the right to find the second part of the stage.
Stage 3-2[edit]
There's more Tram Car action ahead. Yee haw. Head right until you see the two powerups. You have a choice here, the Armor or the Weapon powerup. Whatever you grab, jump back through the platform on the other side of the wall and continue right. Stick to the ceiling until you reach the wall of flame coming from the machine below. Do a Gravity Jump to solve that problem.
Jump to the platform above the spikes and again to the ground ahead. You have to time it and don't jump all the way or you might hit the spikes on the ceiling. Head right and destroy the White Turret if you have the Weapon powerup, otherwise jump to the platform ahead and do a Gravity Jump. Do another Gravity Jump when you come to the long line of spikes on the ceiling and continue on.
Jump across the holes and do a Gravity jump in the corner and jump onto the small platform sticking out of the wall. Jump over the top and grab the Barrier in the corner. Walk right again, jump onto the raised part of the ceiling where the spikes are and do one final Gravity Jump onto the platform below. Go right to find the boss of this place.
Stage 3 Boss[edit]

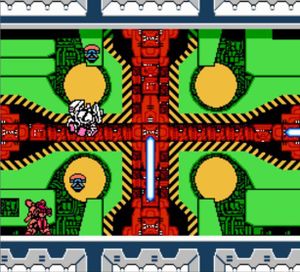
I think this boss is considerably tougher than the previous two. You have do some timing and a bunch of Gravity Jumps on the spot so I hope you can do that well enough now. The boss is the round machine surrounded by the two balls. What it does is wait for about 10 seconds and then it goes in the quadrant you were in. It doesn't attack you with bullets, lasers, or any kind of stuff like that.
The area that you fight the boss in is separated into four parts, hence the term quadrant, and the slow moving lasers that separate the area are as much trouble as the boss itself. The trick is to blast the boss while counting to ten in your head and then doing a Gravity Jump through the lasers or moving to another quadrant before you reach ten. If you move too soon the boss will just follow you to new quadrant you're in.
Expert mode: The balls spin faster in a larger circle, and the boss waits for shorter time between movements. Since you may be possessing the Gravity Fireball (which is super useful in expert mode), it may be actually easier since you can stand below the boss and shoot upward, then flip gravity when the boss is moving, going through it, land on the ceiling and shoot downward, and wait until boss moves again and pass through him for another time, and repeat.