
Final upgrades[edit]
Medi's Shield[edit]

From the cavern where you collected all of Treo's equipment, first head south to the village where you can purchase more Stones of Protection. Then head north to the Town of Galia from the very beginning of the game. Heal up, and the travel west until you spot another cave. Save the game at this point. You are about to fight another Hanj. If you have no Earthquake Staffs, or Sacred Nuts, you may wish to do the necessary traveling to acquire those items before the fight, but if you successfully block the Hanj magic with the Stones, this fight should go smoothly with four fully armed warriors. If you beat the Hanj, you will be rewarded with the Celene Shield for Medi.
Guy's Shield[edit]

You must now travel all the way back to the west, near the Town of Minos (prepare for another battle with a Hanj if you like by purchasing Staffs and Stones, and fighting Liphants for Nuts). While you are there, don't forget to visit the Village of the Sword Smith and upgrade Treo's weapon for 60,000 guilder. From this village, walk five squares west, into the desert, and then proceed to travel north until you find the cave in the bottom right corner of the picture shown here. There are several strong monsters that you may encounter in the desert. They are useful for building experience levels, but none of them will provide you with any money:
 |
 |
 |
 |
Inside the cave that you will arrive at is the third and final Hanj that you must defeat. Doing so will earn you the Hector Shield for Guy. Now your party is completely armed with all of the Legendary Weapons, Armor, and Shields.
Exploring Areos[edit]
Sailing the angry seas[edit]
Looking at the portion of the map where the cave is visible, there is a lake west of the cave. In the middle of this lake is a hidden village. This village is your next destination. They have a ship that is strong enough to withstand the stormy seas surrounding Areos. However, only one with the blood of pirates can properly pilot it. Fortunately for you, Treo has such lineage. As long as he is with your party, the village will bestow the Argonaut boat upon you. Now you will be permitted to sail through the dark blue seas which you were prevented from sailing across before.
The sea itself poses a bit of a challenge, including a cast of enemies that are among the most dangerous creatures that roam the planet:
 A powerful fish. |
 Casts sleep magic. |
  |
Town of Tegea[edit]


Aeros is a completely unexplored continent, containing many wide expanses of desert on it's western side. To ensure that you don't get lost, it would be best if you return to the Town of Kadia where you recruited Guy and sail south, or return to the Village of Kadmos where you obtained the first boat and sail west. You will reach the northern corner of the plains of Brontes. Your first destination should be the Town of Tegea which is centered in the northern half of the plains. You will encounter many monsters that you are likely familiar with, except for the Ganatow, shown left. The Ganatow is possibly the strongest plain occupying monster, but it should not present a huge threat to your team. Head to Tegea to heal up and stock up on supplies.
Gathering supplies[edit]
In addition to the usual arsenal of magical items that you can collect, like Sacred Nuts, Staff of Earthquakes, and Stones of Protection, you may now add one more item to your list: the White Sphere. This sphere is the most powerful item in the whole game, surpassing the Staff of Earthquakes, but you may only carry one at a time. To find it, you must travel west along the plain from Tegea, between the northern and southern deserts. Just when you pass beyond the mountain range, head north and you will discover a small village in the desert. This village is where the sphere can be purchased, but it will cost you 1000 of your collected fangs. You should have no trouble parting with a thousand of them at this point in the game. Wandering through the desert alone will help you increase the size of your collections. There are two new monsters that you will encounter while wandering through the desert:
 This powerful opponent can be found in the harshest environments, from the deserts of Areos, to its rugged mountain climes. It will challenge you for its 60 Fangs with magic of fire. |
 The Gijim is not nearly as powerful as the Desert Wanderer, but with it's own powerful defensive shell, the giant insect is no pushover. It will take many whacks to put this enemy down. |
The scroll's instructions[edit]

At this point, you must begin to collect the keys which open up the gates to Terarin's lair. To translate the instructions on the scroll, you must have listened to the advice of many travelers, particularly the White Monks. They provide you with clues such as "The South Wind carries the sweet & luscious fragrances of Spring," and "'Face not dawn.' means you should go West." One hint, however, is problematic. The quote which says "Medi's town was once called Saria," can only be true if Medi was originally from Tegea. Otherwise, you might be inclined to believe that the scroll instructs you to start from Donis.


Following the scroll's instructions, you are to walk 8 days south of Tegea. There is a monument 8 squares south of Tegea. You will hear laughter from this monument. If you follow the next instruction from here and walk 8 days west, you will arrive at another monument 8 squares to the west, where you will also hear laughter. The next instruction is to head north 5 days. Five squares north is another laughing monument. And the final instruction says to walk three days west. You will arrive at one final monument three squares to the left, only instead of laughter, you will encounter a Basailz. You should not find this creature terribly difficult, and you even gain 1000 reputation points as a reward for his defeat. However, you may find the rest of the reward disappointing. You have not found any keys, or even the gate to Terarin's lair. All you've done is gone on a wild goose chase.
This point in the game has lead to many players getting stuck. The spoiler below and the instructions that follow spell out the method to complete the game. If you are stuck at this point, try reading the contents of the spoiler below and complete the game on your own before examining the remainder of the walkthrough.
The trick to understanding the scroll's instructions comes from two more hints provided to you by White Monks. One hint, which may seem like boastful nonsense is "Thou art only about half as big as Iason!" However, that hint in conjunction with another, "Iason was twice as fast as a normal man and of great stature," should illustrate the mistake that most people make when interpreting the scroll. What you consider one day's travel (one square) is actually only half a day's travel to Iason. A full day's travel to Iason was two squares. Therefore, to properly interpret the instructions on the scroll, you are meant to double the numbers in order to arrive at the proper locations.
Gathering the keys[edit]

Now that you know how to interpret the scroll's instructions, begin once again from Tegea. From here you must travel a full sixteen squares south. You will arrive in the area shown to the right. Examine the tile you arrive on, and you will find a monument. Cast the spell that you've learned, "COME, IASON" and you will be granted access to a dungeon.
Heaven Key[edit]


The Heaven Key dungeon is the first of three dungeons that you must explore in order to collect the three keys. It is a standard dungeon, only one floor deep, and it's one and only treasure chest can be found in the opposite corner from the entrance. When you reach the treasure, you will be attacked by the particular monster, Rokhod. While Rokhod is a powerful foe, you shouldn't experience the same level of difficulty as fighting the Hanj. You should be able to defeat Rokhod without resorting to any particular magic item. Failure to do so may indicate that you are not yet strong enough at this point in the game. Upon defeating Rokhod, though you may lose the 1000 reputation points you gained for defeating Besailz, you will earn the first key, the Heaven Key.

Once you collect the key, you can simply exit the dungeon. You may be wounded, and be inclined to return to Tegea, but don't. Instead, follow the next scroll instruction, and walk 16 squares to the west. You will reach a small oasis. Note the location where the next monument can be found, but explore the north west corner of the oasis. There you will find the 9th and final town of the game, the town of Eratia. Although it contains no special features, it should be your new base of operations. From here, you can heal up, purchase herbs, and embark for the next key. Return to where you identified the location of the next monument, 16 squares west of the Heaven Key dungeon. Cast the spell "COME, IASON" and enter the next dungeon.
Earth Key[edit]


The Earth Key dungeon is the second dungeons that you must explore. While exploring it's single floor, you will encounter many more powerful monsters than you did in the previous dungeon. Mixed into the monsters that you have faced before are Senpis! At this point in the game, a Senpi won't present the same level of challenge as it once did as the armor guarding boss. They should be considered a regular enemy here. When you reach the treasure chest, you will face a similar, but different enemy for the second key, the Sehod. It is only slightly more powerful than the Rokhod. Once again, while the battle may take a while to complete, you should not have need for any particular magical items in this fight. Your reward for beating it, aside from the loss of 1000 reputation points, is the second key, the Earth Key.
Hell Key[edit]


Only one more key awaits your collection, and it will be the most difficult key to collect. From the location of the Earth Key dungeon, you must now travel 10 squares north. You will see nothing but desert in this area, but sure enough, if you search the tile, you will discover a monument. One chant of the "COME, IASON" spell, and you will access the third and final dungeon. As can be expected, the monsters here will be quite challenging, including random encounters with a Hanj. Make your way to the location where the key is found, and you will come face to face with the strongest of the key guardians, the Ohod. You may actually wish to use a Stone of Protection on him in order to prevent its use of spells. Then attack it with your healthiest party member to whittle it down into defeat. You will have your hands on the final key, the Hell Key.
With all three keys in your possession, it's time to follow the last instruction on the scroll. As usual, you may wish to postpone the execution of this step and ensure that you have a full assortment of magical items, including 11 Sacred Nuts, 4 Staffs of Earthquake, 6 Stones of Protection, and 1 White Sphere. It would also be wise to ensure that you have collected 3 Potions of Resurrection from Sea Dragons, as they will surely prove useful in the battle against Terarin. If you have all of these items, including a full collect of Herbs, travel six squares due west from the Hell Key dungeon to arrive at...
The Gelkis Shrine[edit]
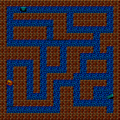
This is the Shrine which you were told you must find by the king at the start of the game. Now that you have made it here, you must successfully explore it and locate Terarin's lair. This dungeon is three levels deep and not without it's surprises. Be sure to save before you enter. The first level contains a chest with a Stone of Protection. You should have a full supply of them, so you can ignore it and head straight to the stairs that lead down to the second level. This second level contains a number of descending stairs, but only one of the is the correct flight. The rest are traps that will send you to other dungeons around the world! The only correct flight of stairs are those found farthest away from the steps you arrived on. They are located in the lower-right corner of the dungeon. Make sure these are the only stairs you take. The third level will be crawling with the most powerful monsters that the game as to offer. In this case, there is a treasure chest that you should be sure to examine. In the lower-left portion of the level, you will find a chest that will double your Herb carrying capacity, and fill it to the maximum. You'll likely need to use these to restore the health of your party before you enter Terarin's lair for the final combat. Consult the maps below for the dungeon level layouts.
-

The first level of the Gelkis Shrine.
-

The second level of the Gelkis Shrine.
-
The third level of the Gelkis Shrine.


Once you reach the stairs in the upper-left corner of the third level, use as many herbs as necessary to restore the health of your party, and then take the stairs to arrive at your final destination: Terarin's lair. Inside, you will encounter Terarin herself. Despite being the toughest boss in the entire game, the strategy that you must use against her is practically unchanged from the one you've used against previous bosses. Use the Stone of Protection until her spells are blocked. Then use up the White Sphere, the Staff of Earthquakes, and the Sacred Nuts until you are out of these items. Then proceed to attack her with the healthiest party member you have available. Be sure to restore the health of any member who is about to die by using one of the Potions of Resurrection. If you follow this strategy, you are sure to defeat her before she can wipe your party out. Then you will be treated to the ending of the game. Congratulations.