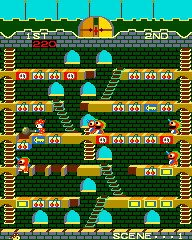
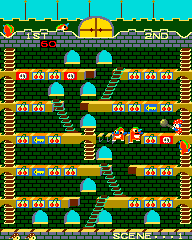
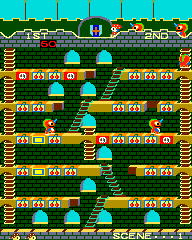
Complete the scene by killing Unicorns[edit]

The most common method of ending a scene in Mr. Do's Castle is by defeating all of the Unicorns in the scene. There are a couple of ways to do that; the most common is to knock a block on their heads. You can do this either by waiting for one to walk underneath your current position, or you can whack a hole in one floor, and climb up to a higher floor, and wait for a unicorn to get stuck in the hole before hammering the block above it. Better yet, you can wait for a unicorn to get stuck in the floor and another Unicorn to walk on its head before batting down a block and killing both of them at once.
In the very early levels, when the unicorns are especially slow, it is possible to kill them by knocking out the floor under their feet. Beginning on Scene 3, this method becomes much less effective unless you time it exactly right, and only really works with blue unicorns.
Likewise, it is possible to wait for a unicorn (including a blue unicorn) to climb all the way out of a hole and replace the gap with a fill block, and then smash the fill block at the earliest moment possible. The unicorns remain still for a split second after filling in a gap, and if you time it right, you can kill them by knocking them to the floor below. Either of these methods is extremely difficult to master, and takes a lot of practice. If you time your hammer throw too soon or too late, the Unicorn is unaffected and can catch you.
Understand unicorn behavior[edit]
A key strategy for success in Mr. Do's Castle is to understand how each of the unicorn types behaves, both in early and later scenes. The gist of it you already know - at the beginning of every scene, they drop in with the sole purpose of wanting to get up close and personal with Mr. Do. Further understanding the nuances of each character will help you get an even better edge on your uninvited guests.
Red unicorns are the most direct of the group. They head toward you with reckless abandon. In the early scenes, they're quite slow, but as you advance through the game, they become nearly as fast as the blue unicorns when they are at their top speed.
Green unicorns are a little smarter. Their intent is to kill you, just like red unicorns, but they will sometimes wait at the top of the castle in the early stages of a scene to see how things play out. They'll also find other paths to you - oftentimes they'll wait underneath a swing ladder while you are above knocking other unicorns back. When you are forced to jump, you end up right in their lap.
Beyond being more cunning than the red unicorns, the green ones have a stark propensity to turn blue at the slightest bit of aggravation. Whacking one through a gap with your hammer will cause it turn turn blue as soon as it lands. Leaving one alone by itself also causes it to change color (as well as multiply). Here are the other cases where green unicorns will turn blue:
- Beginning on Scene 9, one green unicorn turns blue right at the beginning of the scene.
- From Scene 12 on, all unicorns turn blue after about a minute and a half of scene time, unless they are already blue or are actively wiggling in gaps.
- On Scene 17, two green unicorns turn blue at the beginning.
- Finally, from Scene 19 on, Mr. Do must initially face down three blue unicorns.
The blue unicorn is the most enigmatic of the three. Oftentimes, it does not chase after you in the beginning, but rather hangs back around the top of the castle, almost wandering aimlessly. When a scene begins, blue unicorns always start off very slow, initially being left behind by their red and green compatriots. But their speed ramps up dramatically, and once they've reached top speed, they are virtually unstoppable...and very relentless.
It's best practice to keep at least two unicorns on the board alive before collecting the shield for a number of reasons:
- More unicorns alive means more opportunities to whack Alphamonsters and earn an extra Mr. Do.
- Single unicorns can cause lots of problems, especially if they're blue.
One is the loneliest number[edit]
The topic of single unicorns is important enough to deserve its own section. This is because of the distinct changes that occur when a single monster remains in a scene, especially in later stages of the game.
A single unicorn has a much higher chance of turning blue (and splitting into two) than multiple unicorns do (except as noted above).
When you kill all but one of the unicorns in a scene, a timer starts. On Scenes 1 and 2, this timer is set to 20 seconds. In later scenes, the timer can be anywhere between 0 and 19 seconds. When that time is up, the unicorn turns blue and splits into two. The unicorns' initial speed depends on several factors, such as the scene you are on, the time you've spent in the scene, and whether or not you recently died.
A second, 25-second timer then begins. When that time expires, the blue unicorns begin to multiply rapidly. They can (and often do) easily overwhelm Mr. Do in this state. Once they reach this phase, they continue to multiply every five seconds until either you exterminate them all, end the scene another way, or die. If you die, the scene restarts with the number of unicorns that were present when you were killed (no more than eight).
The best strategy is to dispatch single unicorns as quickly as possible.
Sometimes you have to die to live[edit]
If you don't have enough time to set up blocks to kill the lone remaining unicorn, or you don't have any skull traps available to spring, you can use a trick known as the "sacrifice" to eliminate the monster.
You execute a sacrifice when you intentionally kill Mr. Do by walking into or jumping onto a unicorn as it wiggles its way out of a gap. In this case, Mr. Do begins to die, but since you killed the last monster, the tie goes to Mr. Do. The scene ends, Mr. Do does not lose a life, and the game proceeds to the next level.
There are different types of sacrifice that you can perform (such as dropping down through a gap onto a wiggling unicorn from one level above), but this method provides the most impact in the least amount of time.
To perform a sacrifice, do the following:
- Create a gap by whacking out a cherry or fill block with your hammer.
- Lead the unicorn so that it falls into the gap. Note: There can only be one unicorn left in the scene; this trick does not work if there are more than one unicorn left.
- As soon as the unicorn falls into the gap and begins to wiggle, push and hold the joystick so that Mr. Do runs up against the wiggling monster.
- The unicorn will eventually wiggle its way out and deposit a fill block. Continue holding the joystick until Mr. Do steps forward into the fill block, causing it to drop slightly.
- This action causes Mr. Do to collide with the unicorn at the same time the fill block drops, effectively crushing the unicorn. Since the unicorn is now dead, the scene ends, despite the fact that the unicorn came in contact with Mr. Do and started Mr. Do's death sequence.
This trick will save you from many a precarious situation, especially in later scenes. It will work on any color unicorn, as long as there is only one remaining in the scene.
Use swing ladders effectively[edit]
Unicorns have a general strategy of taking the shortest path that they can find to reach you. Many times, this includes swing ladders that you can push when you stand above them. If you need to escape from chasing Unicorns, you can climb up a swing ladder, and push it away once you get to the top. Just make sure that you don't strand yourself on a ledge with a Unicorn on one end, and Unicorns waiting for you below. Swing ladders are typically position under blocks, so it's possible to wait for Unicorns to climb swing ladders and knock a block down on top of them as they climb.
Note: When a unicorn uses a swing ladder to change levels, it must complete the move up or down the entire ladder before it can change direction. A great way to give yourself a few extra seconds is to wait until a unicorn that is chasing you starts up the swing ladder, then kick the ladder the other way.
Use the bridge traps[edit]

Proper use of the bridge trap can be one of the most effective methods of killing unicorns. A skull bridge is only formed with both skulls that comprise either end of the bridge are knocked out. Therefore, in order to properly set a bridge trap, you must remove one of the skull blocks. You want to choose the skull block that is on the end that the unicorns are most likely going to attack you from. If you choose the wrong side, you put yourself in danger of being captured by them. After knocking out one skull block, knock out as many blocks between the skull blocks as you have time for. Then wait on the other side of the remaining skull block for the unicorns to approach. Wait for a few unicorns to get stuck in the gaps and spring the trap by knocking out the last skull block.
When you spring a trap, every block between the skulls falls, and the unicorns that were stuck die. Any unicorn that was standing beneath the blocks also die. Any unicorns that are standing directly above a gap - whether or not it contains a stuck unicorn - also fall through the gaps and die. Unicorns that are not directly above a gap at the time you spring the trap do not die, and continue to chase you across the newly-formed skull bridge. Be sure to have an escape plan once you spring the trap.
Complete the scene by breaking cherry blocks[edit]
Note that this method is only available in later revisions of the game. This can be a particularly difficult method of clearing a scene but it is possible, especially after you've reduced the number of Unicorns that are chasing you. It takes a considerably long time to do this, and by the time you are close to finishing, the remaining Unicorns may become Blue Unicorns and start multiplying. It is best to work from the bottom of the screen to the top because the game is less dangerous at the start of the scene, and you are safer at the top of the castle when the pace picks up. One thing to be mindful of is to watch out for the Unicorns when they begin to approach you from the top of the screen. Be flexible and be prepared to skip a floor or two until you can come back to it. Since you can fall any height without fear of dying, you can always drop down a floor or two (or more) much faster than the Unicorns can. If you are attempting this method of clearing a scene, you do not have to remove the key blocks or the skull blocks, although knocking out two skull blocks is usually faster than knocking out all of the cherry blocks in between, unless you are attempting the skull bridge trap mentioned above.
Complete the scene by collecting EXTRA[edit]

This is another tricky method of completing a scene, but depending on how many letters you currently have and need, it can be the fastest method of the three.
The key (pun not intended) to this method is clearing out all three key blocks in the scene. You'll have an easier time removing at least one or two if you run directly to the closest ones as soon as the game starts. Getting the last one or two keys might become problematic based on where they keys are and how quickly the unicorns chase after you. It might be necessary to lure some of the unicorns away from the last key or keys before you attempt to hit them.
Once all three keys are smashed, the door at the top opens wide, the Flag Shield flashes, and you hear a chime. Now you must safely maneuver Mr. Do to the top of the castle. If you make it there, do not immediately rush over and grab the shield. Instead, wait as close as you possibly can without touching it, and wait for at least one unicorn (if not more) to get as close to you as you dare allow before grabbing the shield. This way, you will have access to at least one easy Alphamonster that you can smash before pursuing the rest.
Note: There is a small wrinkle in this strategy as well. The amount of time that the Alphamonsters remain on the screen decreases the longer you wait before grabbing the shield.
The Unicorns don't remain Alphamonsters for long, and they have an unfortunate habit of clinging to the side ladders where you can't drop blocks on them. Chase after them by creating and falling through holes in the floor, you fall faster than you can climb. It is still possible to hammer them when they're on the ladder. In order to hit them with your hammer, you have to be very close. If there is a gap between you and the Alphamonster, you are more likely to miss, giving them a chance to get farther away from you.
They also don't remain one letter all the way through. If you hit any block, they advance through the letters "EXTRA" in that order. For example, after you hit a block, the 'X' Alphamonster becomes become the 'T' Alphamonster. So if you need the letter X, and an X is far away from you, look for an E that might be closer and hit a nearby block so that it becomes 'X'.
On later scenes, the amount of bonus time decreases significantly; after Scene 11, you only have a little over 6 seconds to whack Alphamonsters before they become unicorns again.