Simply walk right. At the very end of 1-A, just before it becomes 1-B, you will kick a scroll out from behind a bush. Collect the Roll of Magic to gain the ability to fire projectiles.
1-B
The first tree trunk has a star. If you land in the canopy, push down over the trunk to land on it and reveal the star. The fifth trunk (second from the right) also has a star. Avoid the skulls in the ground and the scorpion that follows.
1-C
Snakes, Scorpions and Bats will attack you as you pass in front of a town. The fourth tree trunk (second tall trunk) has a star. There is an object in the canopy. Kick it to the right, and you will reveal a Wizard Hat. Collect it for 10,000 bonus points.
Jump through the water to collect this doll.
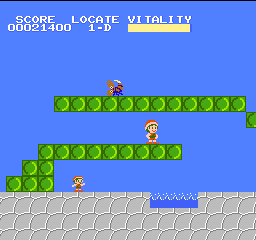
1-D
Shoot the Scorpion on the green platform. Get to the end and double back for the Hao Doll. If you hop in and out of the water as quickly as possible, you will minimize the damage that you take. The next tree trunk has a star. Walk through the tunnel. Let the Scorpion fall down to the ground and shoot it before using the trampoline block to reach the top (hold down as you jump on it). Collect the sign post at the bottom of the steps.
1-E
The trunk before the bridge has a star. When you reach the skulls, jump on the cloud to be ferried over them and avoid damage.
1-F
Although you don't have to, shoot the Dragonflies that fly over town if you wish. The first trunk after town has a star.
1-G
The middle trunk between the two tall trunks has a star. The blocks between the green steps are bounce blocks that will let you triangle jump off the walls. Use this technique if you get stuck between them to jump out of the area. The second tall tree trunk after the mountain has a star.
1-H
This section contains a series of not-so-difficult jumps that should be taken seriously in order to avoid unnecessary damage. Be sure to jump over the large pit that has a bottomless pool of water at the bottom.
Shoot the bottom of the left wall to find a lamp
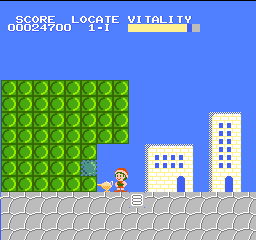
1-I
After you land on the ground, turn around and shoot out the green blocks to your left until you reveal a lamp. Collect it for invincibility as you run in front of a town. The first trunk after the town has a star. Collect the sign post. The middle sized trunk before the end of this section has a star as well.
1-J
After passing over water in the platform, and then another shallow pool just beyond, shoot the green blocks to the right of the shallow pool to find an SOS hidden inside. Drop down the gap in the floor to arrive in a section of the first underground level. Walk to the right to find a moon which will restore all of your lost health. Collect it and turn around to jump back out.
1-K
Jump over the deep water in the floor. There is a broom hidden in the blocks to the right of the water. If you stand on the right side and kick it to the left, the broom will go into the water and drain it. This will provide a one way shortcut to the moon that you probably collected moments ago. Both the second and third trunks after the broom have stars, as well as the last tall trunk. Watch out for the Dragonflies that fly over the mountains.
1-L
The first trunk has a star. Take any level of platforms that you prefer.
1-M
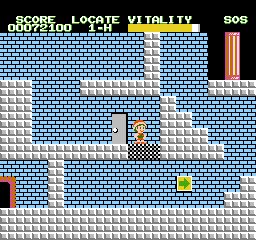
You will arrive at the castle. Collect the sign post and enter.
There are no tricks to reaching the first door. Simply walk through the passages to the right and double back if you hit a dead end (the lowest path works well). The first door will be on the bottom, and can even be omitted if you like. If you wish to skip this door, simply shoot the bricks just to the right of the door, or one flight up, in order to advance to the second door.
Back layer of door 1
You will see a moon as soon as you arrive. Jump up to the platform above it, and the castle mini-boss will attack you. Shoot the mouse and the bubble projectiles that it fires at you until the mouse is defeated. Collect the key, then continue to the right, fall down the steps, and double back to collect the moon. Then jump up to the highest platform, walk back to the left, and return through the door you arrived in.
Front layer to door 2
As mentioned above, you must shoot out the bricks in the stairs to proceed. You will have to take the top route eventually to get around the dead-ends. After taking this high route, drop down to the middle, and shoot the wall to your right to reveal a bonus wizard hat. Then return to the top route and fall through the gap to reach the second door.
Jump on the floor to access the rest of the castle.
Back layer of door 2
Walk to the right and you will be attacked by another mouse mini-boss. Defeat it to collect the key. Then continue right and drop down to the foot of the steps. Shoot out the lowest two rows to reveal a moon. Collect it to restore your health, and jump up to the top level. Walk to the right to collect the Power Boots. Note the ceiling fan above you. This is usually an indication that you can use the Power Boots to jump on the bricks below and break them. Return through the door that you arrived in.
Front layer to door 3
Break the blocks to the right of the door by jumping on them with your Power Boots. Fall down to the bottom, travel along the bottom route until you see an arrow on the middle level, and then climb up to the top level. Run all the way to the right. Head down the stairs to the door below.
Back layer of door 3
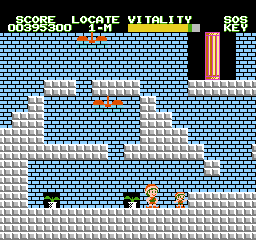
Head to the right, and fight the mouse mini-boss to collect the key. Then continue right, and climb up the steps to the top level. Walk all the way to the left, and collect the symbol of money. Then jump beneath the ceiling fan to create an opening in the floor, fall down to collect the moon, and jump beneath the second ceiling fan to fall down again.
Find this doll by jumping through the floor.
Front layer to door 4
From the door, climb up the stairs to the right. You will come to ceiling fan. Jump beneath it to access the middle layer, and the run below the next ceiling fan and jump beneath that to get to the bottom. Shoot the two flowers and then shoot the wall to the right and you will reveal a life extending Hao Doll. Then run along the top or middle layers until the fourth door comes into view.
(Alternate method to door 4)
There's an alternate method to reach the exit through the back layer, but you will miss the chance to collect the second Hao Doll (there will be other opportunities however). Instead of heading back through the third door in the back layer, climb up the steps, and shoot out the left wall at the top. Walk to the left and you will come to two rows of flowers. If you shoot the middle row quickly, you can earn 2000 bonus points for the last flower shot. The bottom row should net you 3000 points for the last flower if you're quick enough. At the left end of the bottom row, you will find a Double Score item. Collect it to instantly double your current score. Then climb back up to the top level, walk to the left wall, and shoot it out to continue.
Back layer of door 4
Run through the middle layer to the left, jump up the stairs, and double back along the top layer to collect the moon. Then run across the top layer to the left, and down the staircase to the castle exit below.

 down as you jump on it). Collect the sign post at the bottom of the steps.

