Creating a new character on PlanetSide 2 must be done with care, as currently there are no options to alter any of these parameters. That said, however, the creation process is quite simple.
Upon first starting the game, it will present to you a list of three factions to choose from, and a brief description of each. Click here for additional information on the three factions.
- Terran Republic: Favours large magazines and high rates of fire. Low damage is compensated by high volume.
- New Conglomerate: Employs small magazines with a hefty recoil, but has the hardest-hitting of all three factions.
- Vanu Sovereignty: Uses directed energy weapons that have a remarkably quick reload time; emphasizes flexibility, but has fewer shots per magazine as the Terran Republic and has less power than the New Conglomerate.
The next step is to select a server. Although all the servers employ the same gameplay, with real no alterations made, this will be important should you choose to pursue a larger community. Outfits (also known as 'guilds' or 'clans') establish themselves on certain servers, and in order to play with one, you need to be on their server. If you have a preference to which community you join (or fight against), server selection is important.
The final screen you'll be presented with are the character customization options. These choices are very limited, and can be almost overridden completely with the purchase of armour and masks. There is a field for a screen name, a choice of gender, and a choice of faces.
Your First Spawn[edit]
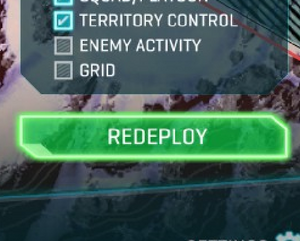
Starting out, players will spawn in one of the smaller facilities close to a large fight and be automatically placed in a random squad. Players who want to experiment should redeploy to the warpgate - the main base of operations that each faction has on the continent.
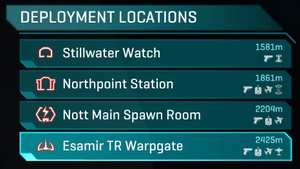
The redeploy button can be found at the bottom of the map screen, which can be accessed by pressing M. Pressing this button begins a five second countdown which will 'kill' you and enable you to respawn elsewhere. Select the Esamir, Indar, or Amerish Warpgate from the list of spawn locations.
Since the Warpgate has examples of everything discussed in the guide and has friendly fire disabled, feel free to experiment here without fear of doing anything you shouldn't. You should note particularly the large computer consoles you can employ. There are five different kinds. Press E to access them.
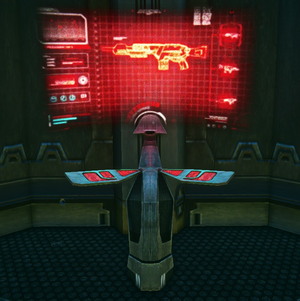
- Continent Terminals: Have a large globe on them, and are located in the center of the facility. Unlike other terminals, these are found exclusively here and nowhere else. Accessing one of these terminals allows you to choose which continent you are currently on.
- Infantry Terminals: Have an image of a gun on them. These terminals, when accessed, can be used to alter your current loadout. You can change which of the six classes you are, as well as completely refresh all of your ammunition reserves.
- Vehicle Terminals: These come in two flavours: the first version has a tank on it, and can be used to deploy any of the four vehicles available to your side. If found on the field, these terminals may be prevented from spawning main battle tanks (the Terran Republic Prowler, the New Conglomerate Vanguard, or the Vanu Sovereignty Magrider) depending on which facilities have been captured. The second version of this terminal has a six-wheeled truck known as the Sunderer on it. This version may only deploy Flashes (four-wheeler ATVs) and Sunderers (logistics trucks). It is also possible to alter the loadout of your vehicle from the menus, but you cannot alter the vehicle further once it is deployed.
- Air Terminals: This terminal may deploy the faction's fighter plane of choice, or the ground-attack Liberator. It is also possible to alter the loadout of your vehicle from the menus, but you cannot alter the vehicle further once it is deployed.
- Galaxy Terminals: This terminal may deploy the Galaxy air transport. It is also possible to alter the loadout of your vehicle from the menus, but you cannot alter the vehicle further once it is deployed.
All vehicle spawning requires resources, which will automatically refill over time. It also activates a several-minute long cooldown timer, so do your best to keep your vehicle alive.
Classes[edit]
- Main Article: Classes
There are six classes, one of which requires resources to employ.
- Infiltrator: A sabotage and sniping expert, the Infiltrator is armed with a cloaking field to help get behind enemy lines. The infiltrator leaves a very distinct shimmer, however, making it ineffective against attentive players. Their primary weapon is the sniper rifle, which (with the exception of the Vanu) must be aimed higher to compensate for bullet drop. Players must hold down the sprint key in order to remove scope sway for long distance shots. Infiltrators are also armed with the ability to hack terminals (and turrets!) and force them to change sides. This forces the enemy team to either destroy and repair them (with an engineer) or to re-hack them (with another infiltrator). Finally, the infiltrator may also deploy motion-tracking darts which enable him to track enemy movements.
- Light Assault: Essentially the Team Fortress 2 Scout class, the Light Assault favours a jet pack which enables them to reach high spots and attack from a perch. This makes them dangerous to players who run and aim mostly at ground level.
- Combat Medic: A standard medic class, the Medic is capable of healing and reviving downed teammates using a trusty healing tool. Armed with an assault rifle, the Combat Medic is not to be trifled with. The Combat Medic's special ability is to heal all teammates in a radius around him or her.
- Engineer: Armed with the same carbine as the Light Assault, the Engineer is a versatile class. The repair tool enables Engineers to repair damaged vehicles, terminals, and MAX players. Engineers come with two ammo packs - the first is deployed with the 4 key. This may be replaced by mines at later levels. The second ammo pack may be deployed by accessing the deployable machine gun (5) and then hitting B. The machine gun itself is effective against infantry and, to a lesser extent, aircraft.
- Heavy Assault: The tip of the spear on any attack, the Heavy Assault class is armed with a light machine gun that has a lengthy reload time, but with a high capacity. The Heavy Assault is also armed with an unguided rocket launcher, effective against vehicles. The Heavy Assault is a tough nut to crack, especially when the player deploys his or her "overshield" which greatly mitigates damage.
- MAX: The only class which requires resources (more on those later) to equip, the MAX is essentially a bipedal tank with only two arm mounted weapons - an armour piercing grenade launcher to contend with vehicles, and an anti-infantry rotary cannon. Various other weaponry can be bought for the MAX either for real life money or for the free currency, altering its role significantly. The MAX's default special ability is a charge ability, sacrificing its attacking ability in favour for speed for a short period of time. MAX units may be resurrected by medics who have upgraded their healing tool, but healed only by engineer players.
Resources[edit]
Resources are utilized to purchase various items in-game. Resources are automatically accumulated over time, and are earned through standard play. Additional resources can be gained by fighting in certain territories, or by purchasing a boost to gain more resources quicker.
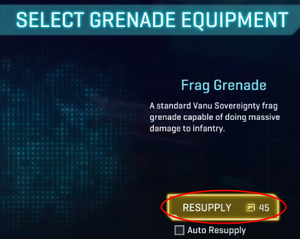

The Infantry resource is used primarily to purchase infantry consumables. Examples of this include bricks of remote explosives, personal healing kits, grenades, and landmines. Equipping the MAX suit also requires this resource. Since it is possible to purchase and hold items, it is acceptable to buy an entire inventory's worth of grenades or other use items for future use, especially if you don't use the MAX often.
To purchase additional items, such as grenades, you must first access an infantry terminal (see above). Click on the grenade icon beneath all of your equipment. This will enable you to select from your current inventory of grenades (you may unlock more grenade types later. Grenade types include smoke grenades and flash-bangs). Click on the RESUPPLY button shown to purchase your grenades, and the Infantry resource will diminish. The process is the same for any of the consumable items you can purchase using this resource.

The Mechanized resource is used to create any of the four ground vehicles available for your use. Unlike the Infantry resource, there are no persistent items to purchase using the Mechanized resource, so spend it carefully.

The Aerospace resource is the final resource and is used to spawn aircraft - specifically, the empire-specific fighter jet (or ESF), the Liberator, or the Galaxy troop transport.
Obtaining New Equipment[edit]
The standard weapons will serve you well under most circumstances, but there are several cases in which an alternate weapon is better for the task. Most infantry weapons are only marginally different than their standard counterparts, but several classes and vehicles have different weapons that drastically alter their playstyle.
Obtaining new equipment depends on what sort of equipment you are attempting to purchase. There are two currencies used to purchase new equipment.

Certifications are earned through standard gameplay, and are tied directly to experience. It takes approximately 250 experience points to gain a single certification point. Certification points are spent on the Certifications screen to purchase items that give the player an edge; a different scope type, ammunition, or something as simple as an upgraded repair tool. Certification points can be spent to unlock additional weapons at a hefty price.

Station Cash or SC are bought using real life money. $1 USD equals 100 SC, but it can only be purchased in $5, $10, $20, $30, $50, or $100 increments. SC is used to purchase new weapons for about 700 apiece, or be spent on cosmetic items costing as little as 50 and as many as 500 points.
In other words:
- Items that directly affect the player's gameplay, such as unlocking remote explosives and various weapon and vehicle modifications, are bought exclusively through certifications. The cost for these ranges as little as
 1 and as much as
  1000.
1000. - Weapons, whether carried by infantry or mounted on vehicles, are bought for either about
 700 or
  1000.
1000. - Cosmetic items cost anywhere from
 50 to
50 to  500.
500.
Objectives[edit]
Although running around and killing bad guys is a good way to rack up points, the true experience - and thus the certifications - lie in completing various objectives.
Pressing M will reveal the map screen, allowing you real-time access to the state of the continent. As the battle lines shift, you may want to either attack an enemy-held position, or help defend a beleaguered friendly facility.
The first thing you'll notice are the large hexes that dot the landscape. These hexes provide resources to your faction, allowing them to purchase items using them (see above). Hexes are grouped together and are controlled by a single facility, each with its own unique name.
These facilities are the goal to capturing territory and are thus the source of most of the fighting. The ultimate goal currently is to simply capture as much of the continent as possible, leaving only the tiniest sliver of land to the other two factions - namely, their warpgates, which cannot be captured. Accomplishing this feat gives all players on that server a discount on infantry, mechanized, or aerospace purchases - at least until another faction recaptures the continent.
Facilities can be broken down into three distinct types.
Small Facilities[edit]

Small facilities are the easiest to capture, and consist of a single control point. The attacking team must assault this point and stand near it to capture it. Once it has been captured, it begins to exert its influence on the territory, starting to sway it.
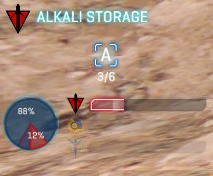
The whole territory's allegiance will then be displayed at the bottom left, close to the map. It will also display the status of the control point, showing how many players are on it. The more players that are on the point, the faster the territory will be captured. In the shown case with Alkali Storage, the capturing speed bonus ends at the sixth player.
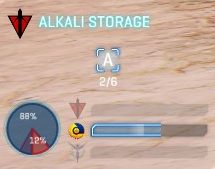
The other factor that alters the speed at which players capture a given territory is the amount of "influence" the surrounding sectors have on it. This is displayed as the pie graph shown on the left. In this case, Alkali Storage has many sides touching a New Conglomerate sector. The New Conglomerate therefore has 88% of the influence on this sector, allowing it to be captured much faster. Conversely, the Terran Republic has only 12%; undoing the New Conglomerate's attempts to capture will take some time. The Vanu Sovereignty, having even less influence, will find capturing this point almost impossible.
By capturing and holding the control point, you will be able to sway the territory to side with you.
Successfully being within range of the territory (you needn't be outside of a vehicle) when it is successfully captured yields as approximately 250 or more experience points.
Medium Facilities[edit]
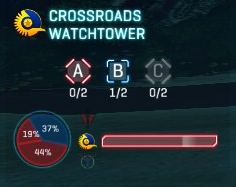
These facilities play out much like the small ones, except they have multiple capture points that must be taken. Their control points typically only require two players to be on it instead of the six found at normal points. The same rules, however, apply to the small facilities. The only real difference is that the fighting is spread out more than smaller facilities, so a larger force is usually necessary to capture one of these bases.
Note the different colours in the bars from the two shown examples. On tactical displays such as this one, red always indicates hostiles and blue represents friendlies. The physical models and the map screen, however, go by faction colours (red and black for Terran Republic, blue and yellow for New Conglomerate, green and blue for Vanu Sovereignty). If this is confusing, however, it is possible to alter the colours in the options menu to whatever colours you'd like.
Large Facilities[edit]
Large facilities are the ultimate goals of large fights, and as such are often highly contested. Capturing one of these yields upwards of 500 to 1000 experience, so participate in these battles whenever possible.
There are three types of large facilities, each conferring a different bonus to your faction when held.
- Biolabs are large structures that are shaped like mushrooms. If one of these is held by your empire, infantry will slowly regenerate health.
- Tech Plants are massive facilities that appear to be on legs. The layout of tech plants changes slightly, but these plants are often highly contested for their ability to spawn Galaxy transports. If one of these is held by one of your empire, it enables some of the vehicle terminals in the field to start producing your faction's main battle tank.
- Amp Stations are also large facilities that are wider than they are tall, unlike Tech Plants. Combat-wise, however, the two are remarkably similar. If one of these is held by your empire, the turrets that players employ to defend bases will not overheat as easily, allowing for sustained fire.
![]() The first thing players will want to do is to establish a front. This can be done by capturing one of the several outlying bases. These bases are tied directly to the control point; standing near the point until it is yours will sway the entire base to your side. The icon such a base is shown to the left. These bases are also known colloquially as 'satellite bases' or simply 'satellites'. If you are defending one of these larger facilities, keep an eye out for these icons and be prepared for an attack if one changes colour.
The first thing players will want to do is to establish a front. This can be done by capturing one of the several outlying bases. These bases are tied directly to the control point; standing near the point until it is yours will sway the entire base to your side. The icon such a base is shown to the left. These bases are also known colloquially as 'satellite bases' or simply 'satellites'. If you are defending one of these larger facilities, keep an eye out for these icons and be prepared for an attack if one changes colour.
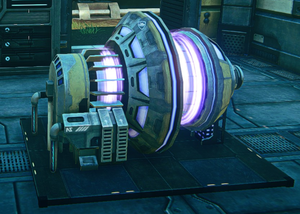
Once one of these bases is secure, players must take the fight to the facility itself. Usually they are protected by two layers of shields: the first layer has a tank on it. This blocks vehicles and most attacks from entering the main facility. At this stage, defenders can attack from the walls and use the various guns surrounding the facility to their advantage. Neutralizing these turrets yields a lot of points, so knock them out while you can.
The outer anti-tank shields can be deactivated by destroying the generators that power them. The generators can be disabled by running up to them and holding E to destabilize the generator. Once it's been rigged to go, step away from it and defend it long enough for the generator to explode. Defenders may 'stabilize' the generator by walking up to it and holding down E. In the event the generator explodes, it can be rebuilt by an Engineer player using the repair tool.


There are five generators in most facilities - two enable the anti-tank shields, two boost the shields in the facility itself, and one final generator powers the shields that protect the Spawning Control Unit, or SCU. The SCU can be destroyed just like a generator, and destroying this prevents the defenders from spawning inside the facility until it is repaired.
From here on out, the facility is captured in the same manner as a small one - it has the same control point and players must stand around it to accelerate its capture.
Finding a Group[edit]
Although it is possible to play PlanetSide 2 alone, it is best enjoyed as part of a larger group. Therefore it is highly recommended players join an outfit, also known as a clan or guild, in order to accomplish larger objectives with skill.
In the interim, however, playing alone is possible thanks to what is known as the 'zerg'. Named after the race from StarCraft that emphasizes numbers over quality, the zerg is essentially a giant collection of players who will romp around the map, taking anything they can. Because of its size, a zerg is enough to send most players and smaller outfits running. This enables players who are operating alone to focus their efforts into a semi-cohesive group.
The main problem with the zerg is that it tends to draw unscrupulous players. Cheaters, team-killers, and their ilk often gather here to find an audience for their antics. The sheer size of the zerg also limits mobility on the narrow roads that the zerg is forced to follow. Accidental team kills, usually by roadkill, are common.
Finding this group often entails locating primary battles. The "deploy" options found on the map can often help, but don't always direct you to the zerg.
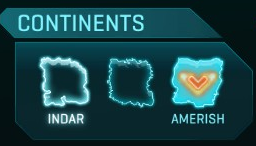
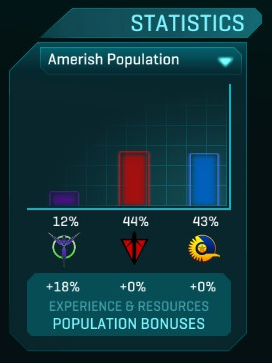
Usually the zerg is found on the continent that has the highest population. You can observe the status of the various continents by using the map screen. The population is shown as a bar graph. Although you gain more experience by going on a continent where your team has a disadvantage, newer players will want to stick with the zerg until they find an outfit.
Once you've located the zerg, you'll be able to take your place as one of the fifty or more players in the group. This makes you less of a target and helps the zerg's momentum as it makes inroads into enemy territory. Use this opportunity to become familiar with shooting targets that actually attack back and see how your loadout stands up against enemy players.
The zerg is a good interim solution, but it is recommended that you find an outfit to make the most of PlanetSide 2. To find an outfit, you can try the official Sony forums or a fansite such as this one.