Basics[edit]
- Not all of the steps listed in the walkthrough are necessary to complete a chamber; some parts of a chamber or level can be skipped.
- Save your game after anything tricky or long, especially in the advanced chambers and challenges. The game automatically reloads when you die, but not if you don’t die, and not necessarily where you want it to.
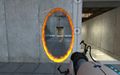
- Cameras are seemingly useless, but can really be very helpful. You can jump on them, hit pellets with them, or even knock out turrets.
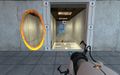
- Turn portal funnel on in the options, and look down when falling into floor portals. It is much easier to sail through this way.
Using the minimum number of portals[edit]
- Make your portals as accessible as possible. You may be able to use them again later.
- Fling. Use that momentum. It’s fun, and gets you places you couldn’t normally get to.
- Experiment! Explore every possibility. If you can find a tiny corner of a surface to get a portal on, try it. If you can shoot a portal while falling where you can’t on solid ground, try it.
- You are allowed to get shot. Just don’t die.
Using the minimum number of steps[edit]
- Use lots of portals!
- Alternating stepping and hopping, if done with the right timing, gets you farther per step on average than normal walking. You want to maximize the amount of time that you are on the ground in between jumps, while still only gaining 2 steps each time.
- Don’t step on objects like cubes (unless absolutely necessary); you’ll rack up steps for no reason.
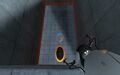
- Place one of your first portals right in front of the elevator. A step and a hop can get you there in 2 steps.
- If you travel straight up through a floor portal, and then shoot that color portal elsewhere, you might not gain a step for landing if you are only traveling a small distance upwards (see No-step movement, below). Floor portals are the most useful way to get around without stepping.
- Play around with angles. Momentum applied at an angle into a portal can get you a lot further and help you take fewer steps when steps seem necessary. This will take a lot of experimentation to get the correct angles, but can be really impressive when you get it.
Completing chambers quickly[edit]
- Portals are the fastest way to travel. If you need to take more than a few steps to get somewhere, portals may be faster.
- If you absolutely must walk, jumping constantly will get you there faster. Note that if you are constantly jumping, changing direction will be harder, so you may need to temporarily stop jumping.
- Use alternate methods. If you discover another method while trying to do a different challenge, consider using it here, even if it uses more portals or steps than your best method.
- Know ahead of time (or learn for next time) which way you need to move after you’ve gone through a portal so you don’t have to spend time reorienting yourself.
- Practice, practice, practice. Get your hands used to exactly how far you need to move.
Advanced techniques[edit]
Cube throwing[edit]
- Description
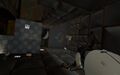
Easy to try, difficult to master. The idea is that you want to get a cube (or other object) somewhere without actually going there yourself. While there is no button or key to specifically throw something, the concept can be achieved due to momentum being programmed into the game. All you have to do is move or turn, and while in the process, release the cube (or other object) you are holding.
- Application
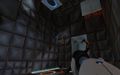
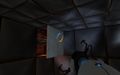
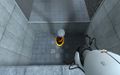
Turning is usually better for having to throw it a distance or upwards. Moving can be useful if you need to drop something into a portal that is not quite directly below it, and also to help create more speed while turning. You can practice this any time you have a cube. Go ahead and try it in chamber 00. Grab the cube and stand a little distance away from the button. Start facing diagonally away from the button. Rotate yourself towards the button and up, and while doing so, release the cube. If you get the timing right, the cube will begin to fly through the air. Try it from different locations and with different throwing methods to get used to it.
-
Start your turn here.
-
Release and watch it fly!
-
Success!


- Other useful locations
- Getting the radio in chamber 9.
- Using only the first cube in chamber 13 for least portals.
- Tossing a turret or cube at another turret in chamber 16.
- Locations where you want to fling an object.
Multi flinging[edit]
- Description
Sometimes falling into a portal once just isn’t enough speed, or may be applied at the wrong angle. Continuing to fly through portals can create the speed or angle you need. The concept is introduced in chamber 15, but can be applied further in numerous other locations.
- Application
The best place to practice this is the turret ambush room in escape 02, because it is one of the biggest rooms in the game, full of portalable surfaces and two nice angled surfaces. After disposing of all the turrets, place an orange portal on the lower angled surface, and then a blue portal below you. As you come out, spot approximately where you are going to land. Just before you hit, place a blue portal below yourself. You can then continue doing this forever, until you mess up (or until the game messes your momentum up). This is a good way to get the Long Jump achievement.
-
This will be your permanent orange portal.
-
Spot where you will approximately land.
-
Shoot right before you do.
-
Next spot will probably be farther away.
-
Make the final adjustment closer to the ground.
-
You can even fly into the other angled platform!


- Other useful locations
- Getting to the cube in advanced chamber 18
- Getting up onto the high platform in the turret ambush room in escape 02
Angle flinging[edit]
- Description
Sometimes flinging is as easy as simply jumping and sailing through. Other times, you must be much more precise with how you fly through a portal. Not only is momentum conserved, but the angle of entry is as well. Another aspect to keep in mind is that the top or bottom (or sides) of a portal can stop your angle, causing you to only keep your speed applied perpendicularly to the portal.
- Application
In the least portals challenge for chamber 13, it can be useful to reach the platform without using the pellet to make it start moving. In the main room, stand on the upper button, with one portal high up on the wall facing the second cube. If you place a portal on the floor directly below you and jump through, you will not make it onto the cube platform. Instead, place it further away, about halfway between the two platforms (maybe a little more towards the cube). You cannot jump any higher, so your perpendicular speed will not change, but since you have to run and jump to the portal, you will have speed that, when you come out the wall portal, will be applied upwards. Also note that with the wall portal placed the way it is, if you enter at the top, upward momentum will be stopped quickly by the ceiling. Instead, aim to fly through the portal towards the bottom of it. Your upward momentum will actually cause you to fly further than if you had come out at the top. You can easily reach the platform this way.
-
The wall portal.
-
This will not get you far enough.
-
This placement provides for a second direction of momentum.
-
Enter at the bottom.
-
Successfully flung all the way to the platform!


- Other useful locations
- Double-flinging without the side room in chamber 15
- Getting onto the two-dot platform in chamber 18
- Least steps challenge for numerous chambers
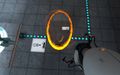
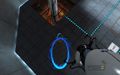
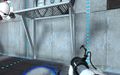
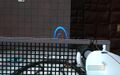
Infinite fall flinging[edit]
- Description
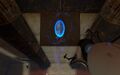
Sometimes you just can’t get the momentum you need in the space you have. However, if there is a portalable ceiling directly above a portalable floor, you can fall indefinitely to gain lots of momentum, and then finally fling where you want to go.
- Application
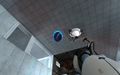
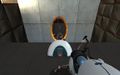
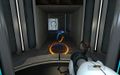
In advanced chamber 15, the first fling can make use of an infinite fall. In actuality, you only need to fall once for enough momentum, but you can fall as much as you want. First stand on the floor panel and look up as far as you can. Get yourself centered, and shoot a portal. Now, without turning, look straight down as far as you can (compare the grid lines to the edges of your screen for both to check that you haven’t turned). Shoot a portal, and you will start to fall. If you lined up your portals well, and if you don’t move, you will continue to fall and fall and fall. If you placed the portals this way (see the image with the orange portal on bottom), your view will be approximately the same every time you go through the portal, making it easy to line up your shot at the extended wall panel. If you miss, your portal is not likely to succeed, so you can just continue falling and try again. If you placed the portals differently, such as in the image with the blue portal on bottom, every time you come through, your view will change, making it much more difficult to get the correct shot in.
-
The view right before you shoot the ceiling portal.
-
The view right before you shoot the floor portal.
-
The portals should be parallel with each other.
-
Shoot now!
-

These portals will make your fall more confusing.


- Other Useful Locations
- Gaining momentum to fling onto the raised exit lift in chamber 14 for least time
- Terminal Velocity achievement - not that you need to fling, but if you just let yourself fall for a very long time (looking down helps keep centered if you have portal funnel on), you will eventually receive this achievement.
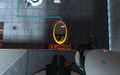
Changing both portals mid-flight[edit]
- Description
It is occasionally useful, as you are flying through the air, to recreate both portals, one where you will enter, and another where you want to come out. The main uses for this are to save time or steps. It is often hard to get both of these to happen in time, but it’s extremely satisfying when it works.
- Application
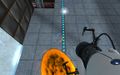
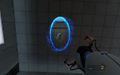
When going for the time challenge in chamber 15, you will want to make it up to the exit lift without using the pellet, and as quickly as possible. One way to do this is to use a ceiling portal to quickly create the momentum you need. You can take your time with the setup when practicing, but of course when actually going for time, you are going to want to shoot the original portals as quickly as possible. From the entrance, shoot a portal towards the far left end of the ceiling. Now face straight down and shoot the other portal below you. Immediately shoot again, as this will be where you are going to land, then quickly look up a little and shoot the other portal as close to right in front of the lift as possible. If you fly up from the ground, you did this successfully. To finish the chamber, you will have to work on your accuracy, as well as knowing which way you will have to apply a movement after exiting the floor portal.
-
The initial ceiling portal.
-
Shoot as soon as you start falling.
-
Another portal in front of the exit lift.


- Other Useful Locations
- Creating the fling to the cube in advanced chamber 18
Flinging an object[edit]
- Description
Sometimes you need to get an object somewhere else by using momentum, similar to flinging yourself. You need to be a little more accurate when doing so, since you can’t adjust anything when the object is mid-air.
- Application
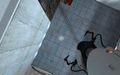
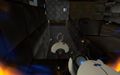
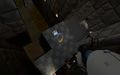
The last fling in advanced chamber 17 involves a situation where both you and an object need to fling through a small opening. It is useful to fling the ball first to both test out your portal placement and make sure the ball actually reaches the other side. Place one portal on the back wall, and the other on the ground of the pit. If you placed the ground portal at the near end, you can simply drop the ball in. If you placed it at the far end, you will need to do a simple toss by releasing the ball as you are walking forward. Objects like this are easily affected by the edges of portals, so it will work best if it goes right through the center. Left-clicking on PC may help give an extra boost.
-
The portal the ball will fling out of.
-
Drop the ball in if placed here.
-
Lightly toss the ball if placed here.
-
Aim for the center of the portal for best results.


- Other Useful Locations
- Getting the cube to the big button in chamber 18 if you have it on the 4-dot platform (for least portals)
- Traveling with the radio in chamber 19
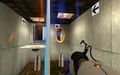
Flinging with an object[edit]
- Description
When you need to travel somewhere with an object, occasionally it would just be easier if you could take it with you through portals. Luckily this can happen if you do so correctly, even though visually it sometimes gives odd results. Generally an object will stay with you as you fly through a portal, even if physically there doesn’t seem to be enough space, but there are some things to be careful of.
- Application
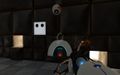
The time when this is perhaps most useful (and yet difficult) is when you need to get the first radio in chamber 18 up to the two-dot platform. Go ahead and place the portal on the ceiling above the two-dot platform as normal, and a portal on the wall to jump to. Now, if you just jump straight at the portal with the radio, one of two things is likely to happen. First, if you hit the wall first, it’s actually the radio hitting the wall, meaning that you are slightly farther away. When you fall to the portal, sometimes your radio will end up through the portal, but you won’t make it, and you’ll continue falling to the water. The other situation is that you and the radio make it through, but you lose grip of the radio, even though you haven’t pressed the use button. This may end up okay, but the radio may quite possibly bounce off the platform and into the water. It also sometimes creates a weird interaction with you, causing you to fly off in one direction that you should in no way have ended up.
In general, to avoid this, don’t make an object go through a portal before you do. Instead, turn sideways. In this situation, you can either turn, then jump sideways, or jump forwards, then turn sideways before you hit the wall/portal. Even though it seems like the radio is being pushed out of your grip because it doesn’t fit in the portal, it actually will come through and stay with you after you get to the other side.
-
Ready to jump with the radio.
-
Radio keeps you away from the wall.
-
Uh-oh... well the radio made it through anyway.
-
Even if you don't try to let it go, you can lose it.
-
Wait, what? How did I end up way over here?
-

Doesn't look good, but this will actually work fine.
-
See? Made it successfully!


- Other useful locations
- The last fling in advanced chamber 17
- Getting the cube to the big button in chamber 18 if you have it on the 4-dot platform (for least portals)
- Traveling with the radio in chamber 19
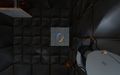
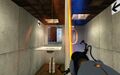
Post-fling maneuvering[edit]
- Description
One of the most important techniques, moving after coming out of a portal has many, many uses. A lot of times, you just can’t place portals to send yourself exactly where you want to go, but if you adjust your flight, you can get to new places easier and faster. It is as simple as holding a move direction while in the air, though sometimes the reorientation makes it a little confusing which way that needs to be.
- Application
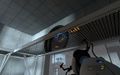
One of the most useful places to do this is in chamber 14. The exit lift is originally too high to jump onto, and the ceiling and nearby wall are unportalable, which is why you potentially have to go through the whole cube and pellet method, however it is still reachable by using a post-fling maneuver. Place one portal on the ground, right in front of the exit lift. Now travel towards the pellet receiver, up the stairs. When you get to the top, the stairs go back down. Simply create an orange portal at the bottom, and jump down into it.
Now, first, one thing to note about the reorientation that occurs. If, as you enter this ground portal, you are facing forward, when you come out, you will be facing the respective forward, but upside down, and so the game will rather slowly turn you around so that you are right side up. This is particularly confusing as to which way you need to move or turn. If, instead, you are looking down as you enter the portal, the game will treat the way you are coming out of the other side as if you are looking up, and body reorientation will not affect your view much.
Let’s take the first situation, where you are looking forward. With this portal placement, you will be able to travel up and down through these portals as much as you want without losing speed after the first time. Adjust your view side to side so that when you come up through one of the portals, the exit lift and emancipation field are directly in front of you. Now, the next time you are ready to come up through this portal again, hold down forward to move onto the lift as your body is still reorienting.
Now try again, but this time, look down into the portal as you jump. You will probably be able to see the exit lift on one side of the portal, which is very useful information. If, based on how you placed the first portal, the platform is on the right, you can just simply press right as you come up to get onto the platform. If the platform is at the bottom of the portal looking in, then when you come out, since you will now be facing up, you will actually need to press forward to get onto the platform. The weird quirk is that if you don’t turn, but simply look forward before entering the portal, even though the portals are in the same place, you will have to press backwards for this situation to get onto the platform.
-
The exit portal for the shortcut.
-
The entrance portal for the shortcut.
-
When looking forward, this will be what it looks like when you need to press forward.
-
Lift is on the right: press right!
-
Lift is on the bottom: press forward!


- Other useful locations
- Advanced chamber 14 to get the cube
- Getting onto the raised exit lift in chamber 15 for least portals or time
- Getting the second radio in chamber 15
- Getting over the field in the third room of chamber 15 for the advanced chamber or least portals
- Getting the second radio in chamber 18
- Getting onto the big button platform in chamber 18 with fewer portals
- Getting onto the catwalk directly from the first high platform above the turret ambush room in escape 02
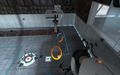
Peek-a-portal[edit]
- Description
This is a clever, and occasionally extremely useful technique, that you may even stumble upon by accident. What you do is shoot a portal, and in the process, enter through the existing portal before the new one lands and is created. This is very useful for situations where you want to connect points A and C with portals, but could normally only shoot C from an in-between point B. You can shoot portals to connect A and B, and then from B, shoot another one at C, but come back through to A while you can so that A and C are now connected.
- Application
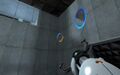
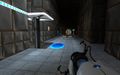
This could be practiced in safer locations, but the most useful location is in Chamber 15, to entirely skip the second pellet process. First shoot an orange portal at an accessible wall, and a blue one at the end of the first hall stretch. Now begin to enter the portal and look left. Up until halfway through the portal, you will not be able to shoot to the next wall. After halfway through, you will be able to, and yet you can still stand even though there is only a floor on one side. Shoot another blue portal at the end of this second stretch while you are just barely past the halfway point of the portal, and quickly press left to come back through to solid ground before the blue portal lands. Now come halfway through again, looking right this time, and aim a blue portal in the final room. Shoot and quickly press right to come through to safety before it lands again. Now you can just walk on through!
-
The initial portals.
-

Before halfway: can't shoot.
-
After halfway: shoot here.
-
The view at this point.
-
Shoot into the final room.
-
Successfully connected!


- Other useful locations
- Saving time when redirecting the pellet in chamber 14.
- Skipping the pellet process (first room and hallway) in chamber 19 to go straight to the start of your escape.
Portal standing[edit]
- Description
This is a technique somewhat similar to peek-a-portal, just with a slightly different application. It has the same potential of connecting locations that normally wouldn't be reachably connected, but this time you move so that you stay "in" a wall portal as the other side of the portal changes location. You basically press towards the wall portal, and attempt to move just far enough to stay in the portal without falling. This is often used for two wall portals, but can also apply with one wall portal and another floor/ceiling portal.
- Application
We will once again use chamber 15 as the example. Set up the portals the same way, with an orange one on the accessible wall, and a blue one at the end of the first stretch. Come just over halfway through and look left, but this time prepare to shoot an orange portal at the end of the second stretch.
As you do so, you are going to press left again, however you do NOT want to travel more than halfway through the portal until after the shot has landed. It is possible to stay in the portal without pressing any direction, or by standing and pressing towards the portal, but the easiest way to do this is to crouch and press towards the portal, as this greatly reduces your traveling speed.
So, while crouching, shoot orange, and then press left as the portal changes, and stop when you are safely in the middle of the portal. Now prepare to shoot a blue portal in the final room. As the portal is about to land, press right while crouching again, and hopefully you will now be moving into the final room!
-
The initial portals.
-
Aim an orange portal this time!
-
First portal stand successful.
-
Now aim a blue portal in the final room.
-
Second portal stand successful!


- Other useful locations
- Skipping the second room’s puzzle in chamber 10
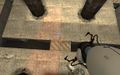
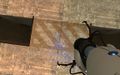
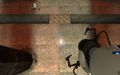
No-step movement[edit]
No-step movement is an ideal way to complete each chamber for one type of challenge available after completing the game for the first time. This is a way of getting around chambers without actually adding to your step count. If you are traveling up through a floor portal, and change the location of that portal without actually moving yourself, if you land with a low enough speed it will not count as a step.
- Application
The first chamber that has the least steps challenge is chamber 13. Place one portal right in front of the elevator, and another in the first room. Take a big step, and then jump so that you are now at two steps, and traveling into the floor portal. As long as you don’t move once you enter the portal, you can travel up and down through them as much as you like. When ready, shoot a portal of the same color that you just exited onto the ceiling (or anywhere really). You should not gain a step when landing, because you aren’t traveling very fast. From this location, you can use portals to grab the cube, and then drop it onto the button, all without moving.
Now you can try to get into the main room without stepping. Place a portal on the ceiling, somewhere that is above the main floor and not over an object. Place the other below you, and as you fall, shoot another portal of the same color as the ceiling portal, right below you. You should once again be flying between two floor portals, but this time you are traveling much higher, and so if you change portals now, you will gain a step. Before doing so, get oriented in such a way that you can shoot one of your floor portals under a low grating, such as the one at the exit door. You can change floor portals as much as you want if it helps. The grating will stop you from flying upwards, and thus you will continue at a much lower speed. Once again, when ready, shoot a portal of the same color that you are exiting, somewhere else. You should still be at 2 steps, and ready to continue.
-
The initial portals.
-
Step and hop into the orange: the necessary 2 steps.
-
First landing, still only 2 steps.
-
The portal to fall into the main room.
-
Shoot this before you hit the ground.
-
Redirect so this portal makes you fly up into the grating.
-
This reduces your speed.
-
Second landing, still only 2 steps.


