With only one Photo Scrap in hand, Layton and Luke decide to go investigate the alley blocked by the bulldog and hopefully reassemble the photo.
Food for the Bulldog[edit]
At the hotel lobby, you can talk to Krantz for Puzzle 092 and talk to Barton for Puzzle 111, both of which will give you a ![]() Diary Key. If you enter the room upstairs, you will see Flora behaving a bit suspiciously, though she won't tell you why. Leave the hotel and talk to Dawson to trigger Puzzle 064. After that, go to the Cabaret and talk to Ilyana for Puzzle 071, which will give you another
Diary Key. If you enter the room upstairs, you will see Flora behaving a bit suspiciously, though she won't tell you why. Leave the hotel and talk to Dawson to trigger Puzzle 064. After that, go to the Cabaret and talk to Ilyana for Puzzle 071, which will give you another ![]() Diary Key.
Diary Key.

Return back outside the camera shop and talk to Felix for Puzzle 069. Go inside the camera shop and talk to Joseph for Puzzle 096, which will net you the ![]() Sandbox hamster toy. Move up to reach the alley with Precious the bulldog. It will still block your path, but Layton will note that the bulldog seems hungry. You'll need to get some food for it from the grocery store, but you can talk to the new lady in the same scene as Clarice for Puzzle 120, which will give you another
Sandbox hamster toy. Move up to reach the alley with Precious the bulldog. It will still block your path, but Layton will note that the bulldog seems hungry. You'll need to get some food for it from the grocery store, but you can talk to the new lady in the same scene as Clarice for Puzzle 120, which will give you another ![]() Diary Key.
Diary Key.
Move to the top left from here and talk to Marina for Puzzle 075, which will get you another ![]() Apple hamster toy. Go inside the grocery store and talk to Garland. He agrees to give you some meat to the bulldog for free, though you'll need to solve Puzzle 074. After solving it, you will not only get a
Apple hamster toy. Go inside the grocery store and talk to Garland. He agrees to give you some meat to the bulldog for free, though you'll need to solve Puzzle 074. After solving it, you will not only get a ![]() Bone-in Roast, but it will also get you a
Bone-in Roast, but it will also get you a ![]() Joy Clover Leaf tea ingrdient. Now you can create 2 more tea blends (Radiance Blend and Cayenne Twilight) with it. Check the bunch of bottles near the counter for Puzzle 098. Go all the way back to where the bulldog was. You can talk to Hopper for Puzzle 113, which will net you another
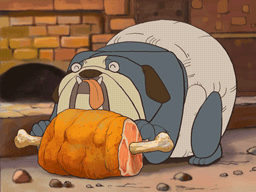
Joy Clover Leaf tea ingrdient. Now you can create 2 more tea blends (Radiance Blend and Cayenne Twilight) with it. Check the bunch of bottles near the counter for Puzzle 098. Go all the way back to where the bulldog was. You can talk to Hopper for Puzzle 113, which will net you another ![]() Block hamster toy. Tap on the dog to give it the bone-in roast, which will finally grant you access to the back alley!
Block hamster toy. Tap on the dog to give it the bone-in roast, which will finally grant you access to the back alley!
The seedy alley[edit]
Move up into the alley. In this area, you can check the top-left window, the street light and the brick in the bottom-right for hint coins. More importantly, there is a ![]() Photo Scrap flashing right on the ground, which you can pick up by touching it. You can talk to Gertie if she's thirsty to serve her the Radiance Blend, while talking to her when she's not will trigger Puzzle 083, which will give you the
Photo Scrap flashing right on the ground, which you can pick up by touching it. You can talk to Gertie if she's thirsty to serve her the Radiance Blend, while talking to her when she's not will trigger Puzzle 083, which will give you the ![]() Pool hamster toy.
Pool hamster toy.
Continue into the alley and grab the next ![]() Photo Scrap, while you can tap the broken pipe, the exposed bricks and the ivy under the lamp for hint coins. Take the left route to the garbage pile, which has another
Photo Scrap, while you can tap the broken pipe, the exposed bricks and the ivy under the lamp for hint coins. Take the left route to the garbage pile, which has another ![]() Photo Scrap. You can tap the hanging cloth, the rock near the wheel and drawer as well as the right window for hint coins. You can also take a photo of the location to reveal the hidden Puzzle 118.
Photo Scrap. You can tap the hanging cloth, the rock near the wheel and drawer as well as the right window for hint coins. You can also take a photo of the location to reveal the hidden Puzzle 118.
Go back and take the right path this time. Again, pick up the ![]() Photo Scrap and check the trash can, the space between two windows in the background and the leaves at the bottom-right for hint coins. You can also take a photo of this location to reveal Puzzle 124. Continue forward and check the bottom of both drainage pipes as well as the orange lamp in the background for hint coins. Talk to Dogey to get another
Photo Scrap and check the trash can, the space between two windows in the background and the leaves at the bottom-right for hint coins. You can also take a photo of this location to reveal Puzzle 124. Continue forward and check the bottom of both drainage pipes as well as the orange lamp in the background for hint coins. Talk to Dogey to get another ![]() Photo Scrap.
Photo Scrap.
Enter the building in the background and pick up the ![]() Photo Scrap. Tap the left jar between the candles, the rightmost jar on the bottom shelf and the top of the right bench for hint coins. Check the picture of the top hat for Puzzle 086, which will net you the
Photo Scrap. Tap the left jar between the candles, the rightmost jar on the bottom shelf and the top of the right bench for hint coins. Check the picture of the top hat for Puzzle 086, which will net you the ![]() Tonic Flower ingredient for the tea set and create 2 new blends (Root Remedy and Bitter Fruit) with it.
Tonic Flower ingredient for the tea set and create 2 new blends (Root Remedy and Bitter Fruit) with it.
The remaining photo scraps[edit]

Now you have a total of seven photo scraps, but 9 photos still remain, which means there are still some around scattered Folsense. Return to the entrance and talk to Hopper for another ![]() Photo Scrap. Go back in the Alley to Dogey and serve him Cherry Boost. Now enter the photo studio and serve Bitter Fruit to Joseph. Go to the museum entrance and talk to Duke for Puzzle 112 to get a
Photo Scrap. Go back in the Alley to Dogey and serve him Cherry Boost. Now enter the photo studio and serve Bitter Fruit to Joseph. Go to the museum entrance and talk to Duke for Puzzle 112 to get a ![]() Photo Scrap and serve him Bitter Fruit. Go left to find a
Photo Scrap and serve him Bitter Fruit. Go left to find a ![]() Photo Scrap and serve Root Remedy to Lila, and then go along the upper left path to get another
Photo Scrap and serve Root Remedy to Lila, and then go along the upper left path to get another ![]() Photo Scrap.
Photo Scrap.
Go to the carabet entrance for a ![]() Photo Scrap, then go to the plaza and talk to Niles to trigger Puzzle 101 for another
Photo Scrap, then go to the plaza and talk to Niles to trigger Puzzle 101 for another ![]() Photo Scrap. Go to the Promenade and talk to Joanie for a
Photo Scrap. Go to the Promenade and talk to Joanie for a ![]() Photo Scrap, then enter the antique shop and talk to Dawson if he is thirsty and serve him Cayenne Twilight, if you've already brewed it, for Puzzle 065. Move down an area to find your penultimate
Photo Scrap, then enter the antique shop and talk to Dawson if he is thirsty and serve him Cayenne Twilight, if you've already brewed it, for Puzzle 065. Move down an area to find your penultimate ![]() Photo Scrap. Move down further and talk to Rory, who will tell you that he saw a photo scrap at the old gate at the western edge of the town. On your way there, talk to Niles if he is thirsty and serve him Radiance Blend and for Puzzle 073 if he isn't.
Photo Scrap. Move down further and talk to Rory, who will tell you that he saw a photo scrap at the old gate at the western edge of the town. On your way there, talk to Niles if he is thirsty and serve him Radiance Blend and for Puzzle 073 if he isn't.
Meanwhile, Inspector Chelmey is gathering all the suspects of the doctor's murder at the hotel lobby. He has deduced the identity of the real murderer, but he intends to reveal it dramatically. On the way to the way serve Root Remedy to Marina if she is thirsty. At the gate, you will find the very last ![]() Photo Scrap, but you'll automatically trigger Puzzle 116 to piece it back together.
Photo Scrap, but you'll automatically trigger Puzzle 116 to piece it back together.

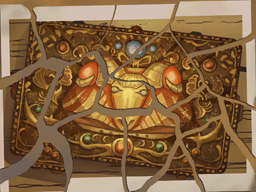
It appears to be the Elysian Box, with a goat symbol similar to the ones around Folsense. However, just before Layton was able to glue the pieces together, the wind blows away the center photo scrap, making the goat symbol look like the head of a frog instead. Mystery The Torn Photograph will be solved and the last mystery The Goat Emblem will appear. If you try to exit the area, you will bump into Barton, who orders you to return to the hotel as well. Who actually killed Dr. Schrader? That will be revealed in the next chapter!