Caution! This page contains all the hints and solutions for every puzzle from 101 to 125. Scroll carefully or you might spoil the answer of a puzzle for yourself. The solutions are hidden behind spoiler tags, so only take a peek if you're desperate.
Puzzle 101[edit]
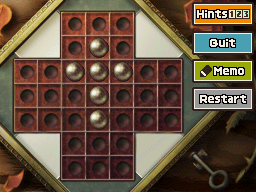
- Name: Disappearing Act 1
- Trigger: Talk to Niles
- Location: Clock Tower Plaza
- Chapter: 5
- Picarats: 30
Description: Here's a classic puzzle. The rules are simple--you can move any ball on the board below as long as it satisfies the following conditions:
- To move, jump your selected ball over an adjacent space occupied by another ball into an empty space on the other side. You can't jump diagonally.
- Once you've made the jump, the ball you jumped over disappears from the board.
- To complete the puzzle, you must remove all balls from the board except for one.
OK, enough rules. Try it yourself!
- Hint 1: Make the first of the balls disappear by jumping the ball in the center of the cross over the ball to its immediate left or right.
- Hint 2: Move the ball at the very bottom into the space formerly occupied by the center ball. With just a few balls to go now, you should be able to sail through the rest of this puzzle.
- Hint 3: With puzzles of this type, your first move will often determine whether or not you'll be able to solve the puzzle.
Jump the second from the top ball to the left, then jump the lowest ball to the top. Jump the rightmost ball to the left, then jump the leftmost ball to the right. Finally, jump any of the remaining balls over the other to solve the puzzle.
Puzzle 102[edit]
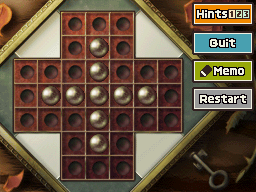
- Name: Disappearing Act 2
- Trigger: Talk to Hopper
- Location: Northeast Path
- Chapter: 6
- Picarats: 35
Description: Here's a different configuration for you to try. As with last time, you can move any ball on the board below as long as it satisfies the following conditions:
- To move, jump your selected ball over an adjacent space occupied by another ball into an empty space on the other side. You can't jump diagonally.
- Once you've made the jump, the ball you jumped over disappears from the board.
- To complete the puzzle, you must remove all balls from the board except for one.
All right, get hopping!
- Hint 1: Your options for a first jump are pretty limited. It has to be one of the four balls surrounding the center ball. The tough part is deciding what to do next. For your second move, pop a ball into the space that opened up when you moved your first ball.
- Hint 2: Next, move a ball into the open center space.
- Hint 3: Read carefully, because this next move is key. You need to take the ball now sitting in the center space and move it in the direction that you moved your ball in the first move. The rest of the puzzle is up to you.
Jump the second from the bottom ball down, then jump the second from the top ball down. Jump the leftmost ball to the right then jump the center ball down. Jump the rightmost ball left, then jump the bottommost ball up. Jump the bottommost ball up again then jump either ball over the other to solve the puzzle.
Puzzle 103[edit]
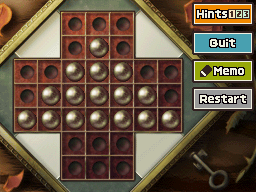
- Name: Disappearing Act 3
- Trigger: Talk to Rory
- Location: Station Plaza
- Chapter: 6
- Picarats: 40
Description: Hmm, these are getting pretty tough. You can move any ball on the board below as long as it satisfies the following conditions:
- To move, jump your selected ball over an adjacent space occupied by another ball into an empty space on the other side. You can't jump diagonally.
- Once you've made the jump, the ball you jumped over disappears from the board.
- To complete the puzzle, you must remove all balls from the board except for one.
OK, enough rules. Try for yourself!
- Hint 1: Wow, these puzzles are really getting tough. Here's a hint to take the edge of this puzzle. Start by clearing the ball three from the edge in the bottom row.
- Hint 2: Next, move the ball on the edge of the bottom row to fill the space that opened up when you removed a ball in your first move. Then repeat the process detailed in Hints One and Two on the other side of the triangle, and move the balls around until you're left with a number of balls arranged in a shape that resembles a pine tree. The rest is up to you.
- Hint 3: Hey, didn't Hint Two clearly say, "The rest is up to you"? Well, just know that you won't be able to rely on too many hints in the Disappearing Act puzzles to come! You can have a hint this time, though. Select one of the balls one in from the outer edge of the pine tree and jump it upward. Then, from this new location, jump over the tip of the tree. OK, this time, the rest really is up to you.
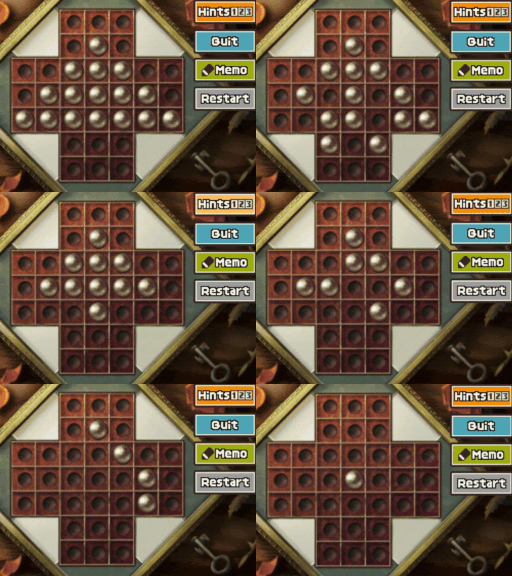
Jump the second ball from the left on the second row from the bottom down and mirror this move on the right side of the triangle. Jump the leftmost ball right and mirror this again at the right part of the triangle. Jump both of the lowest balls up, then jump the leftmost ball on the second row down. Jump the leftmost ball at the lowest row right, then jump the second ball from the right in the longest row left. Jump the leftmost ball to the right and jump the ball above its new space down. Jump the leftmost ball in the bottom row right, then jump the lowest ball up. Jump the rightmost ball to the left then jump either balls over each other to finish the puzzle.
Puzzle 104[edit]
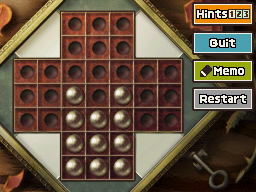
- Name: Disappearing Act 4
- Trigger: Talk to Olson
- Location: Western Path
- Chapter: 6
- Picarats: 45
Description: You know the drill by now. You can move any ball on the board below as long as it satisfies the following conditions:
- To move, jump your selected ball over an adjacent space occupied by another ball into an empty space on the other side. You can't jump diagonally.
- Once you've made the jump, the ball you jumped over disappears from the board.
- To complete the puzzle, you must remove all balls from the board except for one.
OK, enough rules. Try for yourself!
- Hint 1: These puzzles are a lot more fun if you experiment and try to come to the answer on your own. Don't depend on Hints Two and Three to give away much of the puzzle. Start this puzzle by moving the ball in the center of the second row from the top.
- Hint 2: No more hints to be had here! Instead, here's a little fun fact. Did you know that peg solitaire is actually known as brainvita in India? Oh, and just so you know, Hint Three is also trivia.
- Hint 3: Fun-fact time! The first evidence of peg solitaire can be traced back to the court of Louis XIV.
Jump the center ball in the second row from the top left, then jump the leftmost ball in the lowest row up. Jump the leftmost ball in the top row down, then jump the rightmost ball in the bottom row left. Jump the lowest ball up, then jump the leftmost ball right. Jump the left ball in the bottom row up, then jump the leftmost ball to the right. Jump the lowest ball to the top, then jump either balls over the other to solve the puzzle.
Puzzle 105[edit]
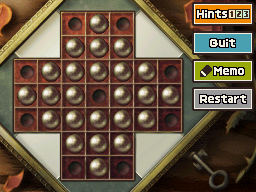
- Name: Disappearing Act 5
- Trigger: Talk to Ray
- Location: Fork in the Road
- Chapter: 6
- Picarats: 60
Description: Hold on to your hats, 'cause this one's going to be rough. Just like before, you can move any ball on the board below as long as it satisfies the following conditions:
- To move, jump your selected ball over an adjacent space occupied by another ball into an empty space on the other side. You can't jump diagonally.
- Once you've made the jump, the ball you jumped over disappears from the board.
- To complete the puzzle, you must remove all balls from the board except for one.
OK then, give it a try!
- Hint 1: Remember all that stuff we told you about thinking out this one on your own? ...OK fine, you can have one more hint, but this is seriously the last one you'll get. We strongly recommend that you not start of this puzzle by moving a ball into the center space. Instead, your first goal should be to move things so you get rid of one of those four balls at the very edge of the shape. But where to start?
- Hint 2: We were only kidding about not giving you any more hints. Start by moving a ball second from either edge in the third row from the bottom. Move this ball down to clear one ball and then across to remove the ball at the bottom of the shape. Then you can move one ball in the third row from the bottom into the space that the ball you used in your first move originally occupied. Then move the ball you used from your first move into the spot that opened up.
- Hint 3: If you follow Hint Two and continue playing a little yourself, you should be able to arrange the remaining balls into a triangular, pine-tree-like shape like the one in Disappearing Act 3. Use what you've learned to finish the rest of this puzzle.
Jump the second from the left ball in the third from the top row left, then jump the second from the left ball in the third from the bottom row down. Jump the second from the right ball in the third from the bottom row right, then jump the second from the right ball in the third from the top row up. Jump the top ball in the leftmost column down, then jump the leftmost ball right. Jump the leftmost ball in the bottom row right, then jump the lowest ball up. Jump the lowest ball in the rightmost column up, then jump the rightmost ball left. Jump the right ball in the top row left, then jump the top ball down. Jump the leftmost ball right, then jump the middle ball in the middle row down. Jump the right ball in the bottom left, then jump the lowest ball up. Jump the bottom ball in the leftmost column up, then jump the leftmost ball to the right. Jump the top ball down, then jump the ball in the center space up. Jump the rightmost ball left, then jump the bottom ball up. Finally, jump either ball over the other to complete the puzzle.
Puzzle 106[edit]
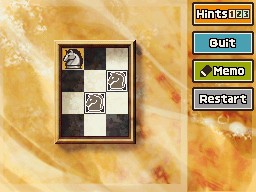
- Name: The Knight's Tour 1
- Trigger: Talk to Gregorio
- Location: Museum Entrance
- Chapter: 4
- Picarats: 40
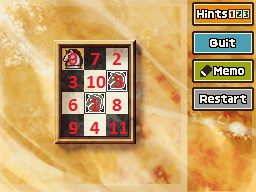
Description: Lead a knight on a trip around the board below. Chess knights move two squares forward and one square perpendicular on each turn. The initial direction can be up, down, left, or right. Move this knight around the entire board, landing on each square only once.
- Hint 1: This puzzle is way more fun if you solve it yourself, so you should keep the hints to a minimum if you can. But if you're completely stuck, your first move takes the knight into the middle column.
- Hint 2: For your second and third moves, you don't have any choice where to put the knight. But after that, you should move the knight to the bottom row.
- Hint 3: If you get stuck after the part of the puzzle mentioned in Hint Two, head to the top part of the board.
Puzzle 107[edit]
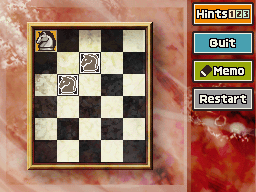
- Name: The Knight's Tour 2
- Trigger: Talk to Gregorio
- Location: Museum Entrance
- Chapter: 6
- Picarats: 50
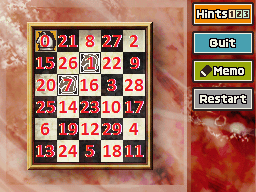
Description: Lead a knight on a trip around the board below. Chess knights move two squares forward and one square perpendicular on each turn. The initial direction can be up, down, left, or right. Move this knight around the entire board, landing on each square only once.
- Hint 1: There are multiple solutions to this one, so before you start busting your brain, try moving things around according to your own set of rules. It beats just shuffling the piece around randomly.
- Hint 2: As a general plan of attack, start by traveling around the perimeter of the board, and once you feel the time is right, head in toward the center of the board.
- Hint 3: This puzzle, a variant of the knight's tour, is a classic...but the depth and elegance of its solution have kept it fresh for generations.
Puzzle 108[edit]
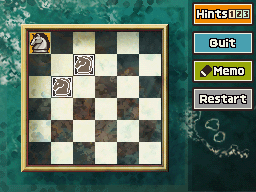
- Name: The Knight's Tour 3
- Trigger: Talk to Gregorio
- Location: Museum Entrance
- Chapter: 6
- Picarats: 70
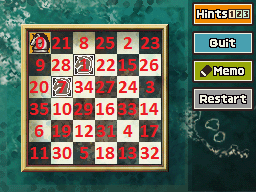
Description: Lead a knight on a trip around the board below. Chess knights move two squares forward and one square perpendicular on each turn. The initial direction can be up, down, left, or right. Move this knight around the entire board, landing on each square only once.
- Hint 1: Sorry, there aren't any more good hints for us to give. Just have fun solving your way through this classic.
- Hint 2: Shogi, often known as Japanese chess, has a piece similar to the knight in Western chess. However, unlike Western-chess knights, shogi knights can only advance down toward the other end of the board. Perhaps Western knights were just more flexible than their Japanese counterparts.
- Hint 3: If you're really stuck, take a break by setting a smaller goal. You could try getting stuck in the fewest number of moves possible, or move the knight so that it traces the shape of a letter. Better yet, combine these little games. For example, draw two Ys horizontally, then try to get your knight stuck in as few turns as possible.
Puzzle 109[edit]
- Name: Walking the Dog
- Trigger: Talk to Lila
- Location: West Y-Road
- Chapter: 6
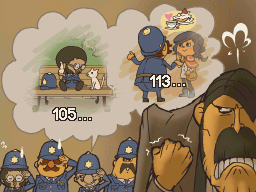
- Picarats: 50
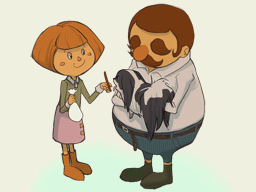
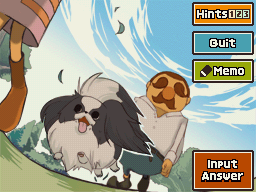
Description: A girl takes her dog out. At first, she carries her dog for ten seconds, but then her dad steps out. At this point, the girl sets her dog down and keeps walking. The dog immediately runs over to the dad, and upon reaching him, he turns around and runs back to the girl. The dog keeps doing this until the dad catches up with the girl. The dog runs at five feet per second, the dad walks at two feet per second, and the girl walks at one foot per second. How far does the dog run by the time the dad catches up to his daughter?
- Hint 1: Wordy problems like this one often have a trap buried somewhere in them. Don't get caught up in the wording. The dad walks at two feet per second, and the daughter walks at one foot per second, so for every second that passes, the distance between the two shrinks by one foot.
- Hint 2: The father sets out ten seconds after his daughter. The daughter walks at a rate of one foot per second, so she's already ten feet ahead of her father when he starts walking. Using what you've heard from this hint and the last one, you should now know that the father catches up to his daughter in 10 seconds.
- Hint 3: The dog runs at a rate of five feet per second. The dad catches up to his daughter in exactly 10 seconds.
Puzzle 110[edit]
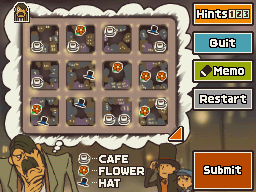
- Name: Chelmey's Route
- Trigger: Talk to Chelmey
- Location: Hotel Lobby
- Chapter: 4
- Picarats: 35
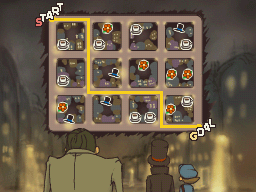
Description: Use what the inspector remembers to find the path he took through town. "Well, only one turn I made was at an intersection with a cafe on it. Oh, and I also passed in front of one hat shop. Oh, and one flower shop too. And I didn't walk any farther than necessary." Now that you've heard his recollection, can you trace the route the inspector took through town?
- Hint 1: The inspector says he took one turn on a block with a cafe, but that doesn't mean he had to turn in the direction of the cafe he saw. Instead, what he's essentially saying here is that he was only able to turn once at any intersection with a cafe.
- Hint 2: Begin by heading right from the starting point.
- Hint 3: When you reach the goal, you'll be coming at it from the left.
Puzzle 111[edit]
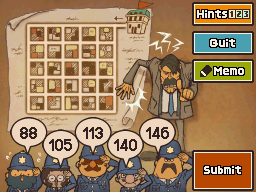
- Name: How Many Turns?
- Trigger: Talk to Barton
- Location: Hotel Lobby
- Chapter: 5
- Picarats: 50
Description: Chelmey sent his squad out to investigate an incident. Before leaving, he said this: "I want you to search the entire area shown on this map. Take any route you want, but report how many times you turned in the process. You're free to turn left or right, but U-turns are strictly forbidden!" The bobbies completed their shift and returned to report their turns. Judging by their reports, though, it seems at least one man wasn't telling the truth. Mark the liars with an X.
- Hint 1: If one of the bobbies had said he turned a total of 1,000 times during the course of his investigation, the inspector would have no reason to doubt the bobby was telling the truth.
- Hint 2: With U-turns forbidden, there's a certain logic you should be able to find in all this confusion.
- Hint 3: Leaving the station and turning an odd number of times, regardless of the number, will land you on a vertical street. Conversely, turn an even number of times after leaving the station, and you'll end up on a road that runs horizontally across the screen.
Puzzle 112[edit]
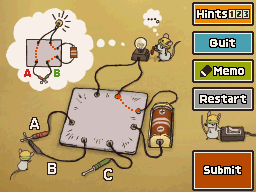
- Name: Turn On the Light
- Trigger: Talk to Duke
- Location: Museum Gate
- Chapter: 5
- Picarats: 40
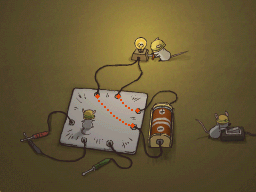
Description: The board shown on the left is wired to the underside so that holding contact points A and B together turns the light on. Now look at the picture on the right. This light has three contact points: A, B, and C. No matter whether you hold contact points A and B, B and C, or A and C together, the light stays on. In that case, how must the wires be connected on the underside of the board? Draw the solution that requires the fewest number of connections. The dotted red line indicates a known wire.
- Hint 1: "No matter whether you hold contact points A and B, B and C, or A and C together, the light stays on." This might make you think that the electricity has to run through all three of these connections, but at the same time, the positive and negative signals need to be isolated from each other, which makes things more difficult. Read the conditions you have to meet again as carefully as you can.
- Hint 2: You might be tempted to construct something resembling a proper wiring job, but that won't do the trick here. Be flexible in your thinking about what will get the job done!
- Hint 3: You only need to draw one wire!
Puzzle 113[edit]
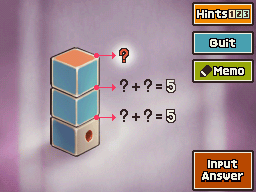
- Name: A Stack of Ice
- Trigger: Talk to Hopper
- Location: Northeast Path
- Chapter: 5
- Picarats: 30
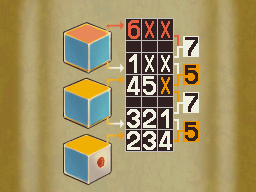
Description: You've stacked three dice in a column. At the points where two dice touch, the faces that are touching add up to five. If one visible face of the bottom die is showing a one, what number must be on the top face of the top die? In case you were wondering, each die is identical, and all sets of opposing faces on each die add up to seven.
- Hint 1: At the two points where two dice touch, the sum of the two faces making contact equals five. If that's so, then each of these four faces must be a number between one and four.
- Hint 2: The options for the top face of the bottom die are limited. That face can only be two, three, or four.
- Hint 3: Assume for a minute that the top face of the bottom die is four. If so, then the bottom face of the middle die must be a one, which would make the top face of this second die a six. Now you've ruled out one possibility, as this can't be the answer.
Puzzle 114[edit]
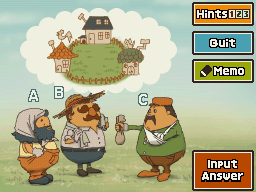
- Name: Fair Compensation
- Trigger: Revealed after solving Photo 001
- Location: Hotel Room
- Chapter: 6
- Picarats: 40
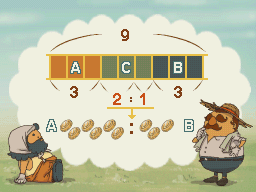
Description: Three houses face a single common field. The heads of these three houses, A, B, and C, decide to work together to seed the field. Unfortunately C injures himself right before work starts, so A and B do all the work together. To seed the entire field, A works five days and B works four. Feeling guilty, C decides to pay A and B for doing his part of the job. To thank them, C pays them a total of nine coins, divided up according to how much work each person did. Can you figure out how many coins A and B received?
- Hint 1: It's tempting to think that the answer is to pay each man a coin for each day he worked, resulting in a total of five coins for A and four coins for B. But then that wouldn't be much of a puzzle, would it? Remember, the original agreement was that each man would do an equal share of the work.
- Hint 2: Simply put, A and B are getting paid for doing the work C was supposed to do. When considering your answer, don't factor in the days A and B were supposed to work according to the agreement.
- Hint 3: The coins should be distributed based on the number of days each person worked to cover the three days C was supposed to have worked. A did two days, B did one.
Puzzle 115[edit]
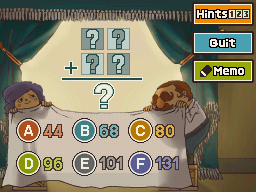
- Name: Tricky Digits
- Trigger: Talk to Krantz
- Location: Hotel Lobby
- Chapter: 4
- Picarats: 40
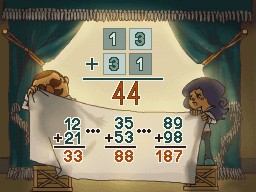
Description: Two cards sit on a table. Each has a different single-digit number written on it. When set side by side, they form a two digit number. Then, by flipping their order, you can make another two-digit number. Adding the total from these two two-digit numbers gives you one of the totals shown below. Which one is it?
- Hint 1: Once you see the pattern that runs through this puzzle, it's not very difficult to solve.
- Hint 2: 15+51=66 34+43=77 53+35=88 So is the pattern clear yet?
- Hint 3: Isn't it funny how adding a two-digit number to another two-digit number with reversed digits always gives you a sum that's a multiple of 11?
Puzzle 116[edit]
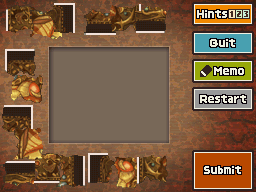
- Name: The Torn Photo
- Trigger: Get the last photo scrap
- Location: Broken Gate
- Chapter: 5
- Picarats: 60
Description: Professor Layton and Luke have finally hunted down all 16 pieces of that peculiar photo. Reassemble the pieces to reveal the contents of the image! Rotate a piece by touching the side and spinning it around. Be careful not to reassemble the picture upside down!
- Hint 1: When you get right down to it, this photo is essentially a jigsaw puzzle. Give yourself a leg up on this puzzle by building the outside edges of the puzzle first. The white rim around some pieces of represents the edge of the photo.
- Hint 2: Once you place every piece containing a portion of the edge, you only have four more pieces to deal with. Stay sharp, though. The pattern on these four pieces can make it hard to identify where they need to go.
- Hint 3: When assembled properly, you should be able to see an ominous-looking goat head in the middle of the photo.
Puzzle 117[edit]
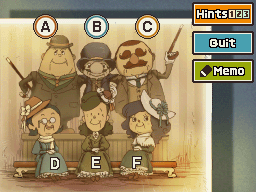
- Name: Three Couples
- Trigger: Talk to Narice
- Location: West Y-Road
- Chapter: 4
- Picarats: 30
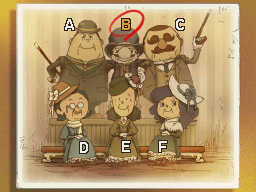
Description: A yellowed photograph shows three couples. In the photo, no man is standing directly above his spouse. Of the three women, two are sisters and are sitting next to each other. The elder sister's husband is the man without a mustache. Everyone in the picture is wearing a hat, save the husband of the younger sister. The woman unrelated to the other two is sitting in front of the younger sister's husband. So, can you find the man in this bunch who is married to neither sister? Choose from A, B, or C.
- Hint 1: There's no need to decipher the relationships of every person in the picture. Just focus on finding the answer to the question at hand.
- Hint 2: Who's married to the eldest sister? Using the clues you've been given, you should be able to find the answer to that question almost instantaneously.
- Hint 3: While we're on the subject, finding the husband of the younger sister should be a breeze as well. With those two men identified, this puzzle is as good as solved.
Puzzle 118[edit]
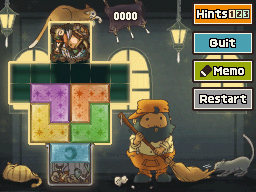
- Name: Garbage Disposal (US) / Cleaning Up 2 (UK)
- Trigger: Revealed after solving Photo 002
- Location: Garbage Heap
- Chapter: 5
- Picarats: 80
Description: Use your stylus to move the trash to the bin at the bottom of the screen.
- Hint 1: Feeling like you just can't clear a path, no matter what you do? First, take one of the two L-shaped blocks closest to the bottom and move things around until you can slip that block into one of the gaps to the far left and right at the top. Choose the gap that lets you fit the wider side of your L-shaped block flush against the wall.
- Hint 2: Continuing from where Hint One left off, your next goal is to move blocks around so that the blue block in the trash can swaps places with the remaining L-shaped block in the bottom row. Make sure you drag the L-shaped block in question all the way down into the trash can.
- Hint 3: Next, take the L-shaped block you tucked away in the corner in Hint One, and bring it back down to its original position. Then take the two L-shaped blocks that sat on top at the beginning of the puzzle and tuck them away in the gaps located in the upper left and right. Once these two blocks are out of the way, you can finally drag that hunk of trash out of its hole at the top of the screen. Now all you've got to do is get that trash down into the garbage can!
Puzzle 119[edit]
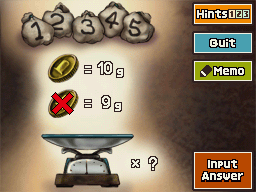
- Name: The Fake Coins
- Trigger: Revealed after solving Photo 005
- Location: Watchtower 1st Floor
- Chapter: 4
- Picarats: 30
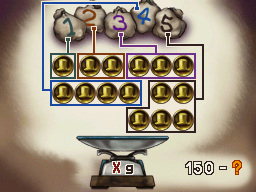
Description: There are 10 coins in each of the five bags below. One of these bags is filled with fake coins that are lighter than the real ones. A real coin weighs 10 units, but a fake coin is 1 unit lighter. If you're using a scale that can register up to 200 units, what is the fewest number of times you could use the scale to find the one bag filled with fake coins?
- Hint 1: The bag of fake coins contains ONLY fake coins, each of them one unit lighter than a real coin. So you could take one coin out of each bag and weigh them each in turn, using the scale five times. But that wouldn't make for a very interesting puzzle, would it?
- Hint 2: Think about how to accomplish your goal in less than five weighings. If you tried to weigh all the bags at once, you would go over the scale's measuring capacity.
- Hint 3: Hint Two had the idea of weighing all the bags at once. There are 10 10-unit coins in each of the five bags, for a total of 500 units. But one bag contains fake coins, so that weight is actually less than that. Perhaps the key to solving this really is to weigh all the bags at once, in a sense?
Puzzle 120[edit]
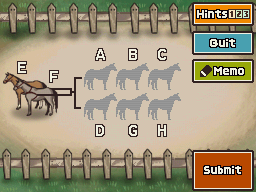
- Name: Tug of War
- Trigger: Talk to Lila
- Location: West Y-Road
- Chapter: 5
- Picarats: 30
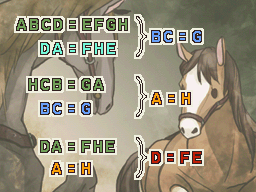
Description: Teams of horses are participating in tug-of-war matches. All teams are drawn from an eight-horse stable. The first three matches end in a draw. If you want the fourth match to result in a draw as well, which horses should be put on the team pulling against E and F? Tap your picks. Here are the previous matches that ended in draws:
- Match 1: A B C D vs. E F G H
- Match 2: H C B vs. G A
- Match 3: D A vs. F H E
- Hint 1: There's no need to do any complicated calculations. The same horses compete several times, and since a tie means the teams are equal, think about what might happen with different matchups.
- Hint 2: You can think about the results of the first and third matches in the following way: A B C D = E F G H, D A = F H E If you make some substitutions, you come up with the following: B C = G
- Hint 3: Take the information from Hint Two and the results of the second match together to infer the following: H C B = G A, B C = G Making a substitution, we get: H = A Use this to make a new team.
Puzzle 121[edit]
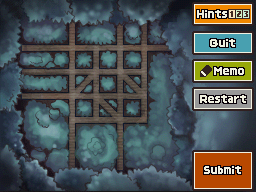
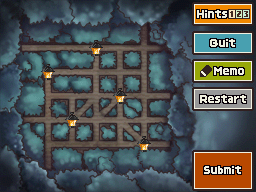
- Name: Light the Forest 1 (US) / Light the Way 1 (UK)
- Trigger: Inspect the lamp on the ground
- Location: Dark Forest 1
- Chapter: 6
- Picarats: 20
Description: Use lamps to light up the dark forest paths! For each lamp, assume its light reaches to the end of any straight road. Use the fewest lamps possible to light all the paths. So where should the lamps go?
- Hint 1: The fewest number of lamps you need is four.
- Hint 2: The straight paths are easy enough to contend with because a lamp will light an entire straight path end to end. The problem is the diagonals. So think about how to light all the diagonal paths first.
- Hint 3: You need to place lamps at the end of three diagonal paths, and the last lamp will go on one of four possible corners.
Puzzle 122[edit]
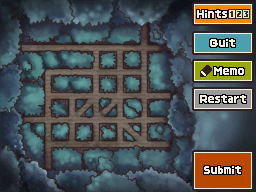
- Name: Light the Forest 2 (US) / Light the Way 2 (UK)
- Trigger: Check the leftmost lamp
- Location: Dark Forest 1
- Chapter: 6
- Picarats: 30
Description: Use lamps to light up the dark forest paths! For each lamp, assume its light reaches to the end of any straight road. Use the fewest lamps possible to light all the paths. So where should the lamps go?
- Hint 1: The fewest number of lamps you need is five.
- Hint 2: The diagonal roads need three lamps, so think about those first. Make sure they don't mess up your placement of lamps that light the horizontal and vertical paths.
- Hint 3: The two lamps not being used to light diagonals will have to go on T and L intersections.
Puzzle 123[edit]
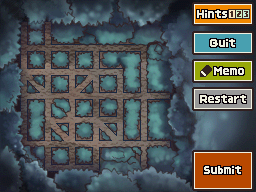
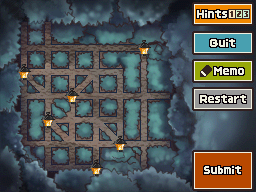
- Name: Light the Forest 3 (US) / Light the Way 3 (UK)
- Trigger: Check the lamp on the ground
- Location: Dark Forest 2
- Chapter: 6
- Picarats: 40
Description: Use lamps to light up the dark forest paths! For each lamp, assume its light reaches to the end of any straight road. Use the fewest lamps possible to light all the paths. So where should the lamps go?
- Hint 1: The fewest number of lamps you need is six.
- Hint 2: There are six horizontal paths and six vertical paths, so you know you need at least six lamps just to light all of them. Use that as your starting point.
- Hint 3: The top-right corner definitely needs a lamp.
Puzzle 124[edit]
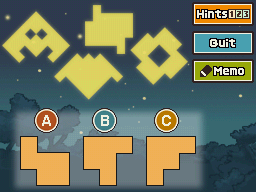
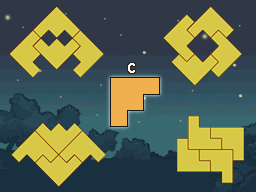
- Name: UFOs Spotted
- Trigger: Revealed after solving Photo 003
- Location: Seedy Alley
- Chapter: 5
- Picarats: 30
Description: Four UFOs were spotted in the night sky! It looks like there are four distinct shapes floating in the sky, but each of these is actually made up of four identical parts. Which of the following is the base part used to make all of these shapes?
- Hint 1: Use the Memo function to try creating the UFOs using each possible part.
- Hint 2: Try to make the UFO on the right with each of the parts. That's a good place to start.
- Hint 3: Each UFO has a certain kind of symmetry.
Puzzle 125[edit]
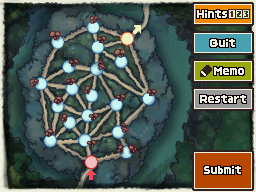
- Name: Forest Mushrooms
- Trigger: Check the red mushroom
- Location: Dark Forest 2
- Chapter: 6
- Picarats: 50
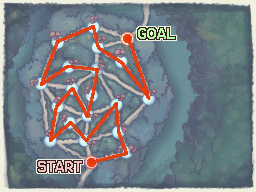
Description: Collect all of the mushrooms in this forest as you pass through. Each circular clearing on the map contains mushrooms. You don't want to spend too long in this creepy forest though, so find the quickest route through that visits each clearing only once. Stay on the roadways.
- Hint 1: Go right first!
- Hint 2: You head to the goal from the right.
- Hint 3: Don't give up! Hints One and Two should shorten the course for you significantly. Also, you don't need to use every path.
