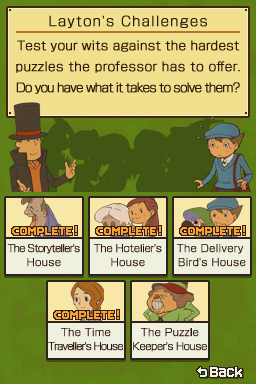
Layton's Challenges is a set of puzzles only accessible from the Bonus tab and has special requirements to be unlocked. These puzzles are harder than anything else in the game, so you will need every bit of your puzzle-solving skills to find the solution.
Caution! This guide contains information about each puzzle including all three hints and the correct answer. If you do not want to see the solution to a puzzle and spoil the fun of figuring it out, scroll down carefully. The answers are hidden within the spoiler tags, so don't peek in them unless you're really stuck!
The Storyteller's House[edit]
This house is unlocked by finding all the stickers for the picture books and completing all 3 of the books.
Puzzle 154[edit]
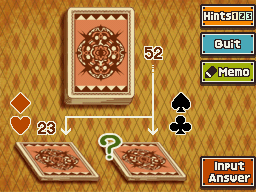
- Name: A Stacked Deck
- Picarats: 50
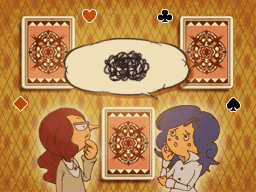
Description: There are 52 cards in the deck below--26 black and 26 red--and no jokers. After shuffling the deck and randomly cutting it in two, you count 23 cards in the stack on the left. So, what's the difference between the number of red cards in the left stack and the number of black cards in the right stack?
- Hint 1: Don't let the fact that this is a number problem confuse you. You should be able to figure out the answer using basic arithmetic if you can figure out what to look for.
- Hint 2: The quickest way to answer is to try out some placeholder numbers. There are 23 cards in the left pile. Pretend that there are 10 red cards and 13 black cards. There are 52 cards in a deck, so there are 29 cards in the other pile. Try to divide the piles up like so.
- Hint 3: Continuing on from Hint Two, you can calculate the color of the cards in the right stack based on how many red and black cards are in the left stack. So, subtract 10 from 26, and you get 16 red cards. Then take 13 from 26, and you get 13 black cards. You now know the difference between the number of red cards in the left stack and black cards in the right! Now try a different set of numbers to see what you get.
- Super Hint: Keep plugging in different numbers. If the left stack has five red cards and 18 black, the right stack will have 21 red cards and eight black. Now compare this result with the one from Hint Three. Look at that! The difference is the same no matter how many of each color there are!
Puzzle 155[edit]
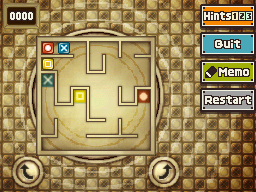
- Name: Three More Blocks (US) / Block Parity (EU)
- Picarats: 60
Description: Maneuver the three colored blocks into the matching goal squares on the board. All three blocks must be in place at the same time to complete this puzzle. To move the blocks, rotate the board 90 degrees left or right by tapping the arrow buttons below.
- Hint 1: If you just keep rotating the board, you'll solve it eventually, right? Actually, no. If you don't plan ahead, you can get stuck. But if you do think ahead, it's much easier than you might expect!
- Hint 2: If you're not careful, a block might get trapped somewhere and make the puzzle impossible to solve. If you think you're completely stuck, just reset the puzzle.
- Hint 3: The trap you need to avoid is the space next to the red goal square. If a block ends up in here, you'll have to reset the puzzle and start over.
- Super Hint: If you're trying to move the blocks out from the starting quadrant all at once, instead try moving them to the other side of the board one at a time. If you can figure this out, the rest shouldn't be too hard.
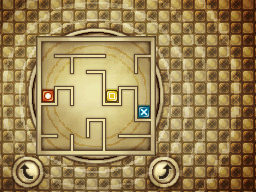
Puzzle 156[edit]
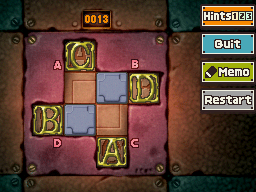
- Name: ABCs ... and Ds
- Picarats: 50
Description: Slide block A into slot A. Slide block B into slot B. Slide block C into slot C. Slide block D into slot D. That's all there is to it! Well, that and you only have 13 moves...
- Hint 1: The shape you're moving the letters around in is completely symmetrical, and there are only two blocks in the way, so you should be able to solve this puzzle with a regular, systematic series of moves. You can start over as many times as you want, so think about the most efficient way to move the letters into place and see what works.
- Hint 2: You'll run out of moves if you try to maneuver the letters into place one by one. Think about how you can rotate all of the letters into position while making your moves.
- Hint 3: Here's part of the solution: Move the lower blue stone over to the right, and slide the C all the way down. Now move the upper blue stone into the A slot, and slide the D all the way left... Can you figure out the pattern now?
- Super Hint: Continuing on from Hint Three, put the lower blue stone into the B slot and move the A all the way up. Now you can slide the C into its slot. Then slide the B all the way right, and you can slide the D into its slot. You're halfway done! And the rest looks pretty easy, right?
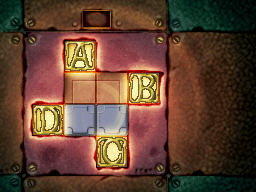
The Hotelier's House[edit]
This house is unlocked by obtaining every toy car course and completing them.
Puzzle 157[edit]
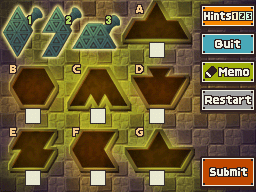
- Name: The Crazy Keyholes (US) / The Curious Keyholes (EU)
- Picarats: 50
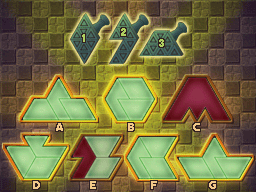
Description: To open the door, you need to combine the three stamp-like key pieces (1, 2, and 3) so they form shapes that can be inserted into all the keyholes (A through G) that will accommodate them. The key pieces can be rotated left or right to fit together, but they can't be turned over. Check off all the keyholes that will work.
- Hint 1: Don't forget about the Memo function! You can use it to draw in the shapes.
- Hint 2: The most important thing is how you use key piece 2.
- Hint 3: You can probably tell just by looking at it that C won't work. Perhaps surprisingly, B does work! Remember, you can rotate the key pieces left or right, but you can't flip them over. Be sure to consider how each key piece can be rotated before trying to combine all three together.
- Super Hint: C doesn't work. A, B, and G all work. Of the remaining three--D, E, and F--one doesn't work. Which is it? You know, that z-shaped one is pretty suspicious...
Puzzle 158[edit]
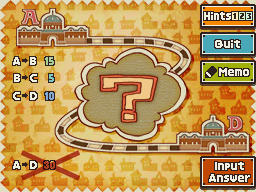
- Name: From A to D
- Picarats: 40
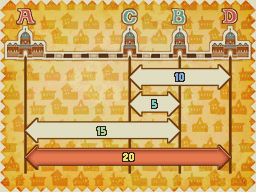
Description: It takes 15 minutes to travel from station A, the first stop on the line, to station B. It takes five minutes to travel from station B to station C. It takes 10 minutes to travel from station C to the last station, station D. However, it doesn't take 13 minutes to travel from station A to station D. Given that this is a straight railway line with no branches, how many minutes does it take to travel from A to D?
- Hint 1: It's impossible? Well, the conditions are all true, so there's no funny business going on there. Be flexible in your thinking and see if you can figure it out.
- Hint 2: You need to reverse your thinking!
- Hint 3: Station B must come after station A, right? Well, no, actually. That's just the order of letters in the alphabet!
- Super Hint: In order to fulfill the conditions of this puzzle, the order of the stations must be A to C to B to D. With this knowledge, you should be able to figure out the time it takes to get from station A to D.
Puzzle 159[edit]
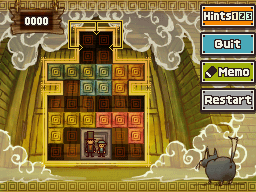
- Name: Impassable Gate 2
- Picarats: 70
Description: "Well, well. Can you make it to the top of this gate again? You may think you've solve this puzzle before, but think again!" This time it's much more difficult.
- Hint 1: There are multiple ways to solve this puzzle. Here's one example: First, move the yellow block above Professor Layton and Luke up and to the right so that it's mostly on top of the red block. Then move Professor Layton and Luke over to the left. Start from here and see how far you can get!
- Hint 2: Continuing on from Hint One, move the red block down to the bottom and then the yellow block back on top of it. Now move the blue block down and over to the left on top of Professor Layton and Luke.
- Hint 3: Continuing on from Hint Two, move the red block up and then the yellow block up, and slide Professor Layton and Luke to the right under the red block. Now move the blue block down to the bottom and over to the right against Professor Layton and Luke.
- Super Hint: Continuing on from Hint Three, move the yellow block over to the left wall and down on top of the blue block. Then slide the green block down as far as you can, and move the brown block up into the exit square. Now move the green block back to where it started. See if you can figure out the rest.
The Messenger's House[edit]
This house is unlocked by getting all the errands for the parrot and finishing them.
Puzzle 160[edit]
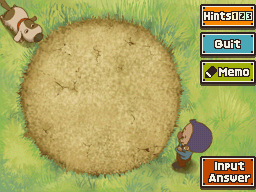
- Name: Dirt Patchwork (US) / Plot Patchwork (EU)
- Picarats: 50
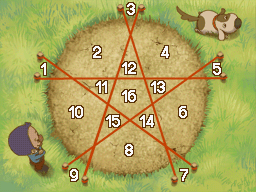
Description: You found a nice, round patch of dirt that you'd like to divide into as many different garden plots as possible. You have five ropes to work with. Each one must be stretched in a straight line across the circle, but the ropes can cross each other as often as you like. Using only these five ropes, what is the maximum number of sections you can divide the patch of dirt into?
- Hint 1: The five ropes would simply create six sections if you weren't allowed to cross them. But you're allowed to cross the ropes, so you can create a lot more spaces.
- Hint 2: If you stretch a rope across the patch of dirt from top to bottom and another from left to right, they'll cross in the middle and divide the patch into four different sections. And that's just using two of your five ropes!
- Hint 3: With your five ropes, you can divide the patch of dirt into more than 10 different sections.
- Super Hint: Use the Memo function to draw a star in the middle of the circle using five straight lines. Make sure the points of the star are within the circle and the lines creating each point cross and extend out into the grass so they create one more space within the circle. Now count each section. Well, how many are there?
Puzzle 161[edit]
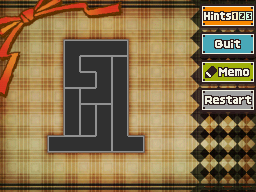
- Name: Black Hat, White Hat
- Picarats: 50
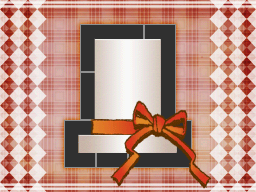
Description: The black top hat below is made from six blocks. Using the same pieces, make a white top hat in the same spot! The pieces can be moved and rotated with your stylus, but you can't flip them over.
- Hint 1: This puzzle might look familiar, but you can't flip these pieces over. For starters, think about what a "white top hat" looks like.
- Hint 2: If you move all of the blocks outside the frame, the frame itself becomes a white top hat! See how that works? Now all you have to do is put the blocks around it to frame it in.
- Hint 3: So you know what you need to do, but you don't know how to do it? Well, such is life sometimes. Here's a hint: you can fit the two pieces with 180-degree bends around each end of the hat's brim.
- Super Hint: The short piece with a 180-degree bend goes around the left side of the brim. The long piece with a 180-degree bend goes around the right side of the brim. The rest should be no problem now!
Puzzle 162[edit]
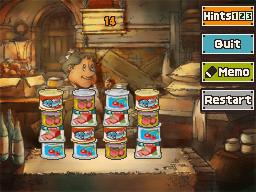
- Name: Cluttered Cans 2 (US) / Tinned Trouble 2 (EU)
- Picarats: 50
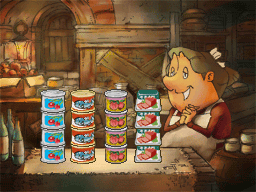
Description: Four canned-food products are randomly stacked up. You need to rearrange them into stacks of the same product. However, if you want to move a can that has cans on top of it, you have to move them all at once. Also, you can't have more than six cans stacked up at a time. Sounds easy, right? Oh...one more thing. You have to do it in 14 moves or fewer.
- Hint 1: There are several ways to solve this puzzle, so start moving those cans around and see what you end up with. It shouldn't be too hard to get to a point where a few more moves will do it.
- Hint 2: The 14-move limit definitely makes things a little tricky. And don't forget that you can't stack up more than six cans at a time. Also, don't get carried away stacking up the same type of can every chance you get, because it's going to cost you moves in the long run.
- Hint 3: Instead of stacking up the same type of can every chance you get, it's better to think about what type of cans you should stack in each row. Whenever possible, you want to move as many cans together as possible at a time. Of course, sometimes you have to move just one can at a time.
- Super Hint: From left to right, think of the stacks as the first, second, third, and fourth. Move the fish from the fourth stack to the first stack. Move the peaches from the second stack to the fourth stack. Move the ham from the third stack to the second stack. Move the fish from the third stack to the first stack... You can take it from here!
The Time Traveler's House[edit]
This house is unlocked by clearing every puzzle in the main story, Puzzles 001-153.
Puzzle 163[edit]
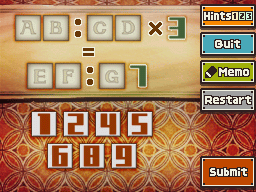
- Name: Time Times Three
- Picarats: 60
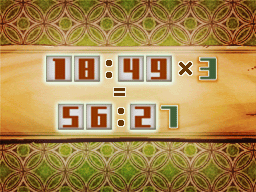
Description: Create a valid equation by placing a number (1, 2, 4, 5, 6, 8, 9) into each box (A, B, C, D, E, F, G). In this puzzle, the two digits to the left of each column are minutes, and the two digits to the right are seconds. Sixty seconds will roll over into a minute, and you can't exceed 60 minutes.
- Hint 1: For starters, what do you know for sure? Well, you know that the answer times ends in seven and the top time is multiplied by three, so the number that goes in box D must end in seven when multiplied by three! There's only one that will work. It's an odd number.
- Hint 2: Nine times three ends in seven. So the nine goes in box D. Two times three is six, so what does that tell you about what number goes in box A?
- Hint 3: If the number in box A is greater than one, the lower value will exceed 60 minutes, which isn't allowed. Therefore, the one must go in box A. If you think carefully about the rest, you should figure it out. Here's another hint, though: the five goes in box E.
- Super Hint: Here's your last hint: The one, four, eight, and nine all go in the top time. The rest can be calculated from there.
Puzzle 164[edit]
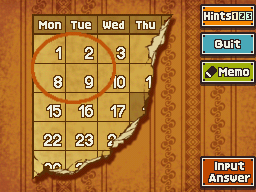
- Name: Calendar Conundrum
- Picarats: 60
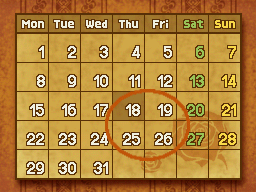
Description: Somebody tore this calendar page in half! Rude. Anyway, the puzzle must go on. When added together, the four circled days equal 20. The smallest of the four numbers is one. Assuming you had the entire calendar page to work with, and you circled a square of four numbers that added up to 88, what would the smallest of those four numbers be?
- Hint 1: Are you trying to reproduce the entire calendar page on a piece of paper? You could find the answer that way, but there might be an easier method...
- Hint 2: This is a calendar page, so there is a specific order to the way the numbers are arranged. If you can find a pattern between the numbers next to each other and above and below one another, you might discover a very unique way to solve this puzzle.
- Hint 3: On a calendar, numbers to the left and right of each other differ by one. Also, numbers above and below one another differ by seven. Using this pattern, there's a relatively simple calculation you can use to solve this puzzle.
- Super Hint: The lower-right number of the four numbers in a square that you're looking for is 26.
Puzzle 165[edit]
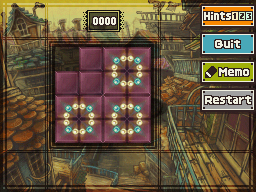
- Name: One Big Necklace
- Picarats: 80
Description: You have three identical bracelets that you'd like to make into one big necklace. Rearrange the tiles below into a shape that connects all of the bracelet pieces in one continuous loop.
- Hint 1: Before you start moving things around willy-nilly, think about what kind of large loop shape you can make with the pieces available.
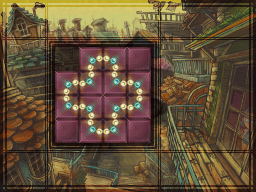
- Hint 2: Combine the bracelets into the shape of a large plus sign (+).
- Hint 3: The three blank tiles and one empty square go in the four corners when the necklace is complete. Even the shortest solution takes quite a few moves, so keep at it, and don't give up!
- Super Hint: Try sketching out where each tile will go when the necklace is complete. Once you figure this out, it shouldn't take you too long to maneuver the tiles into place.
The Puzzle Keeper's House[edit]
This house is unlocked by clearing every other house.
Puzzle 166[edit]
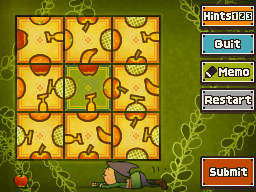
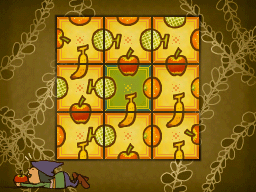
- Name: Perplexing Produce
- Picarats: 80
Description: Line up the four types of fruit below by rotating and rearranging the tiles with your stylus. The center panel cannot be moved.
- Hint 1: This puzzle sure looks fun, but it's really hard. It's even hard to give hints for. For starters, don't stress out if you can't figure it out at first. Just keep at it.
- Hint 2: The panels all look so similar that it's hard to figure out where to start. First, just try temporarily placing panels that match up around the center. By the way, the correct panel that goes above the center panel doesn't have a banana on it.
- Hint 3: The correct panel that goes to the left of the center panel doesn't have an orange on it. The correct panel that goes to the right of the center panel doesn't have a melon on it.
- Super Hint: The correct panel that goes below the center panel has all four types of fruit on it. The top, of course, is a banana. The left is the lower half of a melon. The right is the upper half on an orange, and the bottom is an apple.
Puzzle 167[edit]
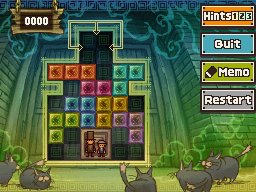
- Name: Impassable Gate 3
- Picarats: 90
Description: "You might have figured it out twice before, but this time you will never solve the Impassable Gate!"
- Hint 1: The solution involves too many moves to list in one hint. For starters, just move the blocks around for a while and think about your options. Like the other two gate puzzles, the horizontal three-square bar is the key.
- Hint 2: See the small two-square horizontal bar? It's magenta. You need to figure out how to maneuver that block down to Professor Layton and Luke's level.
- Hint 3: Once you've figured out how to move the magenta block down toward the bottom, some space will open up at the top. You'll then be able to move the red block down to the middle and the light blue block up into the top square. Now move the red block back up to where it started.
- Super Hint: You've got the light blue block stashed up in the top square and the red block also up near the top. Now organize the blocks at the bottom so that you can move the red block back down and switch it with Professor Layton and Luke's block. This way, you can move the two fellows to the top. This puzzle is designed to be very challenging. Don't give up!
Puzzle 168[edit]
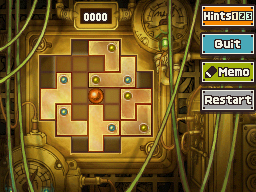
- Name: The Time Machine
- Picarats: 90
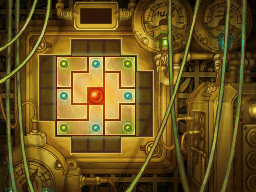
Description: This is the time machine's ignition mechanism! In order to prevent accidents, however, a complicated security procedure has been incorporated into the device. To start the time machine, assemble the blocks into a square with the red orb at its very center (and in the same exact position as it is below).
- Hint 1: Think about how the pieces will fit together to make a square before you start moving them around. You won't get very far if you don't plan ahead.
- Hint 2: Use the Memo function to figure out the correct placement for each block. There are four small L-shaped blocks. Three of them form corners of the square.
- Hint 3: The T-shaped block goes on the right side of the square, slotted into two small L-shaped blocks. The Z-shaped block goes near the center with the red orb right underneath it.
- Super Hint: The small L-shaped block in the bottom left goes one square above its starting position. The large L-shaped block goes directly below it, forming the bottom-left corner of the square.
