| Map Name | Initial Coordinates |
|---|---|
| mine2 | (-895 800 -337) : 0° (facing north) |
Level objective[edit]
The objective for this level is to "Activate mine machinery to gain access to [the] Drilling Area". You will complete the objective in a single pass through this level, but you will have to come back here briefly from the Drilling Area to use the elevator to move between otherwise unconnected parts of that level.
Strategy[edit]

Although on the small side, this level presents several challenging combat situations, mainly because of Gladiators in combination with other Strogg. The speed and accuracy with which they can fire their Rail Guns together with the instantaneous travel of the projectiles mean that sniping from cover is the best strategy. Ammunition, health and armor are barely adequate so you really want to win your fights fairly efficiently. The way to accomplish the objective is clear, but you can do that and leave a large part of the level unexplored. Inside a secret area is an alternate way to get to the Drilling Area level and you will have to figure out whether to take this or not.
Walkthrough[edit]
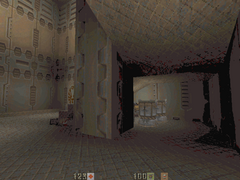
When you enter this level, a wide hallway leads straight ahead and an opening leads to a large room on the left with a lava floor. The balcony around this room is actually an elevator. Go over and press the button. You will receive the message "Mine machinery inoperative". You must activate the mine machinery before this elevator will function.
The Mine Machinery[edit]
Take a few steps down the wide hallway, but stop well short of the turn to the right. Save the game at this point because you're likely to take damage until you get the hang of the next bit. Face to the right, standing on the spot. Now, strafe to the left until you hit the end wall and then strafe back to the right to return to cover. The Gladiator in the next room will probably get off two shots, but because you're moving he's likely to miss. OK, so, if you do this a few times and fire at him as you strafe you can kill him without getting hit. Grenades are a good weapon as there are more to pick up nearby. The Gunners up on the ledge to the left of the room can be a complication. By staying in the cover of the hallway and crouching, you may be able to hit them with Rockets before or after you dispose of the Gladiator. There is also a decent chance that they'll hit the Gladiator with their Grenades, in which case new combat possibilities open up.

When things look clear, go out into the room, but don't relax because there is a third Gunner down the steps under the ledge. Kill him and follow the hallways where he stood, looking out for Guards hiding around corners. When you see the hallway open up into a new room, expect another Gladiator. Backpedal and strafe from side to side to avoid his shots and use a weapon that will take him down quickly, such as the Chain Gun or HyperBlaster. You now come out onto an elevated walkway. Below you can see Berserkers, exploding barrels and a Chain Gun. Either snipe at the Berserkers from above or go down the stairs with your Super Shotgun. Keep a lookout for Guards coming from around the corner (and see also Secrets, below). In this Walkthrough, we are not going to jump down the vertical pipe, but if you want to make your own way you can do this.
Equip the HyperBlaster, go through the doorway behind the partition and begin to cross the long bridge towards the tunnel. If you stay on the right side of the walkway you will avoid fire from two Guards down below. You won't however, be able to avoid the Guards charging at you from the other end of the tunnel, nor the Gladiator on their heels. This is why you have the HyperBlaster ready. Press on, either killing the Guards below or avoiding them. There are no surprises for a while, just deal with yet another Gladiator and two Berserkers as you come to them. You will hear the galumphing of Mutants, but they are below and cannot get to you.

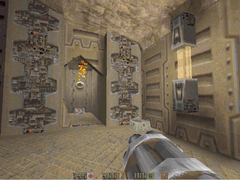
Finally, you'll see ahead of you a wall with two buttons on it. To the right is drilling machinery. It's obvious what to do, pressing the buttons is going to start the machinery, except that maybe that's not the only thing that will happen. Skip the rest of this paragraph to take the risk, but consider saving the game. Press the left-hand button first and receive the message "1 more to go". Go down the steps towards the mine drill and look to the right where there is a Health pack. Stand in that corner and you'll find that you're hidden from all the suspicious wall panels and alcoves near the buttons. OK, now we're ready. Go back and press the second button to receive the message "Sequence completed!" and immediately run back to the hidden corner. The mine machinery starts up, but something else did happen! With a weapon in your right hand you should not have much trouble taking out the three Gunners that have appeared. Again, Grenades are good because there is a plentiful supply, but there are Cells for the HyperBlaster as well.
Your field computer will update your secondary objective to "Return to elevator shaft. Proceed to Drilling Area". The elevator shaft is the large room on the left when you entered the level. You can retrace your steps unopposed, but see Secrets, below, before you leave this area. At the elevator, press the button to go down one level and take the exit there. However, at this point you have not fully explored the level and have as few as 20 of the 29 possible enemy kills. To remedy this, rather than retracing your steps, continue below.

Cleaning up The Lower Level[edit]
Go back to the walkway above the flooded lower area where there are two Mutants. Kill them from the safety of the walkway and drop down, being sure to land in water to avoid fall damage. Collect some ammunition and find the start of the walkway in the lower area; there is a Quad Damage underneath. Equip the Super Shotgun and get up on the walkway. Follow it through several tunnels and open areas, killing the Guards as you meet them (see also Secrets, below). Eventually, you will arrive at a cave-like area where two Berserkers will attack you ("Trespasser!"). A Gunner is hiding around the corner to the left. Take the lift platform in this area and you will find yourself on the ledge where the Gunners stood above the first Gladiator in the level. Crouch and drop to the floor and from here it's just a few steps to the elevator shaft.
Secrets[edit]
This level has three (3) secrets:
- When you go down some stairs into a room with three Berserkers, some exploding barrels and a HyperBlaster, look underneath the stairs. Stand back and shoot the two barrels there to reach Combat Armor and some Rockets. Take them and get the message "You have found a secret".
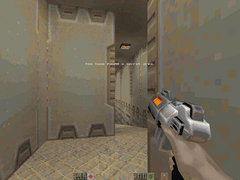
- When you activate the mine machinery by pressing two wall buttons, the Gunners that ambush you come out of places that were previously sealed off behind walls. After killing them, walk directly away from the buttons to where you entered the area from the right and look instead to the left. The broken wall periodically emits sparks and behind it is the beginning of a narrow passage. Shoot the rear wall to make it slide up so that you can enter and receive the message "You have found a secret area". Down a ramp you will find three Armor Shards and an Adrenaline. On the left is a hole in the rock wall with a ladder down to a cave. Mine carts rise from under one wall above a pool of water and travel up through a hole in the roof. If you jump in one of the carts and ride it up it will take you to an alternate way to get to the Drilling Area. Get out of the cart at the top onto one of the rails that the cart travels between and from there drop onto a light fixture on the wall and then down to the floor to avoid fall damage. There are Cells, Shotgun Shells and some health to pick up. From here you cannot go directly back to the main part of the Borehole level. If you have unfinished business, you'll have to come back via the Drilling Area. If you decide to take this exit, you'll effectively play half of the Drilling Area level backwards, which is actually slightly easier than playing it forwards.
- In the second half of your journey to the mine machinery control buttons, you will notice a lower level flooded with water and a walkway. If you drop into the water at the right place and dive down, you will find an Adrenaline. When you take it you will receive the message "You have found a secret". To find the right place from the upper level, drop into the vertical pipe from the room at the bottom of the stairs where there are three Berserkers, exploding barrels and a HyperBlaster. To find the right place when you have already gone down to the lower level, explore the walkway until you see the vertical pipe extending above you. As always with Adrenaline, wait until you have completed all the fighting so that you can restore your health to maximum.
- Gallery : Secrets in the Borehole level.
-
Shoot the exploding barrels under the stairs.
-
Secret Combat Armor and some Rockets.
-
After a Gunner ambush, look for this passage.
-
The secret passage leads to an alternate exit.
-

Enter the water here to find the secret Adrenaline.


