| Map Name | Initial Coordinates |
|---|---|
| base3 | (1688 1412 -785) : -180° (facing south) |
Level objective[edit]
According to your field computer, the objective of this level is to locate the communication center. That turns out to be a room in this level. In that room you will be able to accomplish the objective of the unit, which is to establish a communication link to the command ship. Since you can't climb up the sewer pipe to go back to the Installation, expect to have to find another way out.

Strategy[edit]
Taking into account the Weapons that you have at this point, this may be the hardest level of the game for new players. Even if your preferred strategy is to charge in with guns blazing, consider holding back in this level to preserve health and armor. You'll very likely lose all the armour you bring in from the previous level and there are only a scattering of Armor Shards to replace it. There is enough health around if you are careful, but not enough for you to be foolhardy. Save the game often. When entering new areas, look all around quickly and pull back to take stock. You will meet new Strogg types, the Gunner, who is tough to kill and throws a rain of Grenades at you, and the Parasite. On the plus side, there is adequate ammunition, particularly for the Machine Gun. One last word ... watch out for a booby trap.
Walkthrough[edit]
Leave the sewer pipe through which you came from the Installation. You'll be standing on a grid over deep water. If you look between the bars, you'll see a dead Marine. Maybe he has dropped something useful nearby that you should swim down and collect. So that you aren't subjected to a surprise attack while doing this, you'd do well to check through the doorway first. The next room contains an Enforcer, three Light Guards and more water. The steps going down seem like an invitation to explore and you will find two holes down there that both let you go deeper, under a submerged floor (see Secrets, below, if this isn't a big enough hint).
Parasites[edit]
Go up to the closed door from the second room so that it opens. In the next (the third) room, stairs lead around a central column to a mezzanine level above. In the floor in front of you is a ramp leading down to a very dark area. Have your most powerful weapon ready because as you approach a Parasite will run out. If it gets its health-draining tube into you, it can cause a lot of damage quite quickly. If you keep at a sufficient distance, you can kill it with continuous Machine Gun fire. Getting close enough to use a Shotgun is risky. The fighting will probably wake up other Strogg in the area, including an Enforcer on this level and Guards up above. Go up the stairs and continue along the obvious path, fighting more Enforcers and Guards. Whenever there's a walkway above you, there are probably enemies up there.
You will come to a room with a large cylindrical tank. At the bottom is a narrow walkway with a wall button at one end and a open hatchway at the other. Through the hatch you can glimpse an Adrenaline. To the sides of the walkway is an unpleasant-looking green liquid. A moment's thought will reveal what's going on here. Pass the tank for now and continue fighting your way forward to an outdoor courtyard. If you approach the door on the opposite side and slightly to the right you will get the message "You need the Blue Key". So, it's going to be the doorway up the steps to the left.

Before going through, take an especially good look into the room. Try to figure out what is going to happen when you go in and decide how to proceed. If you can't figure it out, save the game first. Eventually, take the elevator on the right side of this room, fighting Guards as they appear. Continue around the walkway, which takes you back to the tank room. Kill the three Light Guards in the room just beyond this point, then come back to the corner of the walkway. Below you is a stack of two crates with an Environment Suit on top. These are very useful so never pass one up (you can carry more than one and you get to pick when to use them). Line yourself up so that you are right at the corner and the suit is directly ahead. Move straight back a good distance, but don't fall through the gap on the inside of the walkway. Now, either walk forward and jump just as you reach the corner or run forward and let yourself fall. Both will land you on the crates to collect the suit. If you walk and don't jump, you'll fall short. If you run and then jump at the edge, you'll overshoot. Consider saving the game so that, if you fail, you don't have to walk around and take the elevator up again.
Getting the Adrenaline[edit]
Now it's time to think about that large cylindrical tank. You need to decide a) what to do and b) when to do it. An adrenaline is always most useful when your health is really low. So, if you're not in poor health now, consider coming back to this later. As for what to do, a perfectly viable option is to ignore the tank and hang on to the Environment Suit for later use. You can restore your health with regular MedKits and one extra health point throughout the game isn't really such a big deal. The second option is to play this the way it was intended. Crouch and drop down to the walkway, grab the Adrenaline, come back to the wall button and activate the suit before pressing it. Swim up in the poisonous liquid as it rises and climb out. You have full health including one extra maximum point, but no Environment Suit. The third way is to get the adrenaline but keep the suit by just taking the damage. If you don't activate the suit, you'll lose about 25 armor points and five health points if you're smart. To be smart, as soon as you press the wall button, jump up onto the top of the button to delay contact with the poison and then sort-of run up the wall as it rises. That's a lot of armor to lose, and you won't be able to replace it in this level. The really smart thing to do is to kill all the enemies without picking up any armor, which will probably use up all the armor you brought from the previous level, then get the Adrenaline without using up the Environment Suit. If you jump on the button as mentioned you'll lose about 27 health points which you can easily pick up again. Grab all the Armor Shards lying about just before you leave the level.
The Blue Key[edit]

Take the elevator and go around the walkway again. Past the Light Guards you killed earlier, you'll meet an Enforcer in an alcove to the left. If you feel like testing your skills, skip the rest of this paragraph, but consider saving the game at this point. If you're still reading, what's going to happen is that you'll be ambushed by two Parasites and you have your first encounter with Grenade-spewing Gunners. Start by advancing past the dead Enforcer to stand in the next corner with your back to the wall and looking down a long passage. Kill the two Guards that come out at the far end. Turn around and advance carefully and backwards along the passage until the wall where you were standing explodes. Immediately, run past the explosion back to the tank room. Deal with the Parasites as before by staying far away and using the Machine Gun liberally. There is plenty of ammunition for this weapon; go back for it if necessary, but, as always, only pick up what will benefit you. If you pick up a box when you're already holding 180 rounds, only 20 of the 50 will count and the other 30 will be totally wasted. With the Parasites out of the way, advance again and you will find a large window to the communications center, which is guarded by two Gunners and a Guard. If you continue past the window and around, you can go in through the door that you can see on the left of the room and fight them on equal terms. However, absent a death-wish, it's much better to shoot out the window and kill them from the relative security of the passage. If you stay back, the Grenades thrown by the Gunners will bounce back into the room and, at minimum, kill the Guard. Watch out for the Gunners' machine guns and either run forward for opportunistic Shotgun blasts or stick with your own Machine Gun.
When the coast is clear, drop down into the communications center or walk around to the door. Go to the end of the room where there's a computer console with three screens. Press back the keyboard and watch the communications dish outside rotate to point up and away from you. At the same time, the Blue Key will rise up from under the floor just to the right of the console. Take the key. Your field computer has changed your secondary objective to "Use blue key-card to enter alien bunker installation".
Returning to the Installation[edit]
Retrace your steps to the outdoor courtyard. If you came into the communications center through the window, go out through the door to pick up the Health and check out the wonderful sunset view around there. You will meet new opposition in the form of two Gunners in the corridor, one Gunner in the room below the elevator and three Fliers outside. To get down to ground level without taking fall damage, drop onto the crates either in the elevator room or the tank room. In the courtyard, go over and open the Blue Key door. Your field computer will change your secondary objective to "Locate unit exit and kill all resistance". Beyond the door is a hallway and a room with a lift platform to a door which is marked, in English, "Installation". OK, well there's the unit exit.

The "resistance" consists of an Enforcer, three Light Guards, two Shotgun Guards and a Gunner. Most are easily dispatched, but the Gunner is up by the exit and from there he can do a lot of damage with his Grenades and Machine Gun. The safest approach is to snipe at him through the doorway from outside the exit room. It will take 18 hits with the Blaster to kill him. You also have a good chance if you rush in and immediately spray him with Machine Gun fire.
Before leaving, go back around the level to collect any supplies you may have missed. If you allow yourself to use the Quad Damage power-up (but they make things too easy for good players) don't miss the one on the mezzanine level in the third room. Jump onto the barrel nearby. If this got exploded in the fighting, you'll have to climb onto the crates a little further away and execute a running jump. Look for health and ammunition under stairs and shoot any exploding barrels because sometimes they hide useful things. If you didn't take the Adrenaline, now's your last chance (actually, that's not true; you can come back anytime before leaving the unit). If you're trying to make all the enemy kills and you're one short of the 48 for this level, you might have missed the parasite in the second dark ramp in the floor of the third room. Finally, take the lift platform up and go through the door to the Installation.
Secrets[edit]
This level has two (2) secrets, although it's hard to see how you could find the first and fail to find the second:
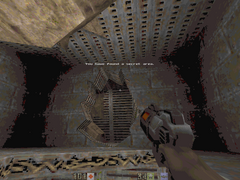
- In the second room that you come to after starting the level, start down the steps into the water, then turn to the right and dive down through the small, jagged hole in the floor of the water pool. Swim in the direction away from the steps through some underwater tunnels and come up in a dim, ruined room to receive the message "You have found a secret area". Although there is a Rebreather in the second room, which you should take on your return, there is no need to use it now if you don't dally underwater. There is nothing but rubble in the room that you come up into, but if you step through the hole in the wall you will find some dead Marines, a MedKit and some ammunition for the Machine Gun. Retrace your steps to return and continue the level.
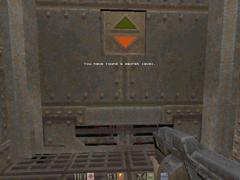
- If you found the first secret, you probably noticed the elevator near the dead Marines. Go in and push the button to receive the message "You have found a secret level". The elevator will take you to the Lost Station. Play through and return the way you came to continue the Comm Center level.
- Gallery : Finding the secrets in the Comm Center Level
-
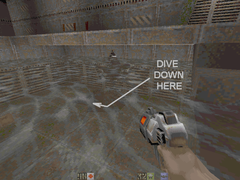
Swim down through this hole, not the larger one.
-
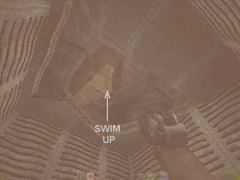
Follow the underwater tunnels and swim up.
-
There's nothing in the secret area but a broken wall.
-
Through the hole there's a room with an elevator.
-
The elevator takes you to a secret level.


