| Map Name | Initial Coordinates |
|---|---|
| space | (256 2296 -424) : -90° (facing east) |
Level objective[edit]
The objective for this (secret) level is to shut down the Strogg communications space station. To do this, you must first find and disable the power core. This will deactivate force fields in doorways and give you access to the area in which the communications dish is installed. Then, you detach the dish from its moorings and watch it float out into space and explode.
Strategy[edit]
Although unusual in several ways, this is not a difficult level. The path that you need to take is obvious and what you need to do at various points is either given to you in messages or is easy enough to figure out. Health, ammunition and armor are not as plentiful as in other levels, so you may want to hold back a bit with the guns-blazing approach.

The main way in which the level is unusual is the low gravity, which is about one-eighth normal. So, if you jump or step off a walkway, you seem to float and fall only gradually. You can maneuver in the air (perhaps you have some kind of jet pack), but you can only change course gradually so your ability to dodge enemy fire is much reduced when you are airborne. On a solid surface, however, you can move normally (magnetic boots?), so it is best to do your fighting standing on the ground. All the Strogg in this level are of the types that fly. Some are simply waiting in plain sight in areas as you come to them, but others attack from within the structure of the satellite overhead or to one side. Either keep a constant lookout or advance in stages, then retreating to see what happens, and so flush out any enemies that were in hiding. Due to the low gravity, the Grenade Launcher acts very strangely. Either avoid using it or practice before doing so.
Walkthrough[edit]
The matter transporter in the Outer Hangar level will take you to the lower level shuttle bay in the communications satellite. The transporter is blocked by a force field and you cannot get back in, so you must explore to find another one. The bay door is open and if you get too close to it, beyond the line of diagonal red stripes, you will be launched into the vacuum of space and die. So, go over to the computer console and press back the keyboard. Now that the bay door is closed, you can collect Health, ammunition and a Power Shield from just inside.
To the Power Core[edit]
Take the elevator beside the computer console up to the middle level. Flyers and Icarus lie in wait for you. The tall hallways provide hiding places for enemies up above. Go past a large, six-sided opening on your right that is blocked by a force field. Continuing, turn left and go through a door. Be ready for Technicians and Icarus on the other side. Through the door and to the right, a walkway curves left around a tall eight-sided structure which houses the power core. (See Secrets, below.) As you advance, you will meet a large number of Flyers but you can retreat and use the structure for cover as you fight them. The way ahead is through another door on the right. However, as you approach the door, stand where the Flyers were and look up. There are pipes above you and above the pipes there is an Icarus and a Technician that you will be meeting soon. If they spot you, they may attack now, but that's OK. Draw them down and use available cover. Even if they don't see you, if you have a clear shot at either of them try to take them out now. Then, go through the door.
Take the elevator behind the door to the upper level. As you step out through the elevator door at the top, be prepared for a large group of Flyers directly ahead of you. If you did not deal with them from below, the Icarus and Technician above the pipes will be on your right flank.

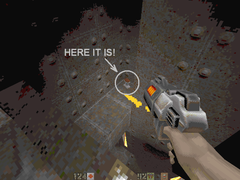
Rushing forwards and emptying the Chain Gun into the Flyers might be the best thing to do here. The tall eight-sided structure is to your right and the hallway continues around its far side. Follow this all the way, turning to the right in front of the door that you will meet. You will come to a floor button and see a recessed panel in the wall. Step onto the button and the panel will split and slide sideways revealing some kind of display screen. You receive the message "Destroy the computer panel". Well, that's easy enough; shoot it! You will then receive the message "Core Disabled. Force fields offline". Step back and watch the liquid level visible through the windows in the eight-sided structure gradually lower. Then the lights will go out in this area and everywhere you have previously been (but not where you need to go next). If you want to explore further with the lights on, don't shoot the computer panel until you need to get past the force fields. However, it is easy enough to see with just the emergency lights.
The communications dish[edit]
Go back and through the door in front of which you previously turned right. On the other side there will be Technicians above you and a Flyer and an Icarus not much further on. Continue along the passage and fight another Icarus and another Technician. After a right turn, you will come to an opening on the left that is ringed by pale yellow lights. This is one of the paths that was blocked until you disabled the power core (the other is the large six-sided opening on the middle level). You can go past this door to clear the upper level shuttle bay first and then come back, especially if you need the Body Armor in there, but this walkthrough assumes that you deal with everything in order.
Go through the opening into a passage and around a corner to the right. You will enter a large round room that is open to space and with the communications dish suspended from the roof. Don't spend too much time looking around as a Hornet Boss is rising up from the darkness below. If you can circle strafe, this is the most effective way of dealing with this enemy. Run sideways around the circular balcony and shoot repeatedly until he goes down. The Rocket Launcher, BFG10K and Hyper Blaster are effective, but there are plenty of slugs nearby to replenish your ammunition after the fight, so the Rail Gun may be best. It will take 14 slugs to kill the Hornet Boss (hard difficulty). Don't be too concerned about falling off the balcony. If you do, maneuver to the wider platform below. An elevator will take you back up, but you may be more vulnerable to the Hornet's rockets when you emerge so an alternative is to continue your attack from that level.

As well as the elevator, steps from the lower platform go down and out through the six-sided opening to the middle level, so this is how you would go around again to pick up anything you left behind. If you can't circle strafe, retreat and use the corner of the passage for cover.
With the Hornet Boss out of the way, go back to the circular balcony. Looking up, you will see four floor buttons high above you. How can you press floor buttons on the ceiling? It turns out that you can just about reach them by jumping. So, stand directly under each in turn and just jump straight up. When you touch the first you will receive the message "3 more to go...". Then it's "2 more to go...", "1 more to go..." and finally "Sequence completed!". Watch the communications dish detach from the roof, drop slowly down and through the hole below and finally explode. Your field computer will show "Objective complete. Return to the hangar."
The Upper Level Shuttle Bay[edit]
Go back out of the dish room by the way you came in and turn left to continue along the hallway. After a couple of turns, you will come to the door to the upper level shuttle bay (see Secrets, below). Inside, expect to fight an Icarus, a Technician and two Flyers. Close the bay door, again by pushing back the keyboard of the computer console, to retrieve the ammunition and Body Armor without getting flung into space. At the end opposite to the bay door is another matter transporter. This was blocked by a force field until the communications dish was dispensed with, but now it is accessible. Step in and be transported back to the Outer Hangar level on the surface of Stroggos.
Secrets[edit]
This level has two (2) secrets.
- When you first encounter the structure that houses the power core, look over the edge of the walkway to see a ring of support struts. An Adrenaline is on a strut on the far side that you cannot see from the walkway. You can jump from strut to strut, but it's easier to get onto the bulge in the structure and walk around until you can just drop down. If you mess up and fall, you will drift out into space and die, so quicksave before you try this. When you get the prize, you will receive the message "You found a secret item". Jump back up onto the bulge and from there up to the walkway.
- When you get to the door into the upper shuttle bay, go to the right-hand edge of the walkway and look down. It is very dark down there, so use your Blaster to create some light. You will see an Adrenaline on a support strut. Drop down and maneuver to reach it and receive the message "You found a secret item". Then jump back up to the walkway. If you miss the strut, you will fall safely to the middle level and can make your way up again either following your original path or taking a short-cut through the six-sided opening and the dish room.
- Gallery : Both Secrets yield an Adrenaline
-
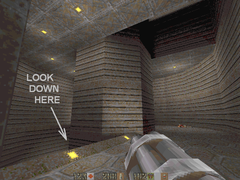
The structure housing the power core.
-
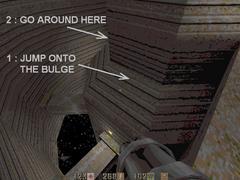
Navigating the support struts.
-
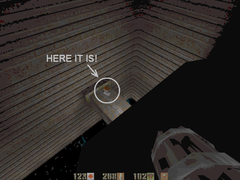
The first secret Adrenaline.
-
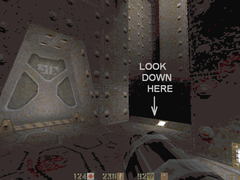
At the upper shuttle bay door.
-
The second secret Adrenaline.


