| Map Name | Initial Coordinates |
|---|---|
| fact2 | (128 -479 -145) : 90° (facing west) |
Level objective[edit]
The objective of this level is to shut down all seven machines that are doing horrible things to your fellow Marines (and the resulting body parts). To do this, you follow a circular route, arriving back at your starting point, and then return to the Receiving Center.
Strategy[edit]
This is an enjoyable level with an objective that is easy to understand and follow and more meaningful than usual. Take a moment to watch each of the machines before you shut it down. There are no new Strogg types and you will mostly meet Guards, Enforcers, Gunners and Gladiators with one Tank and a few Parasites and Flyers. The Gladiators provide the most difficult combat, but you should be able to deal with them comfortably by this point in the game. You will probably be bringing the Rail Gun from the Receiving Center to give them a taste of their own medicine. Follow the strategy you enjoy most. There is adequate health and ammunition, plus three Flak Jackets and eleven Armor Shards to top up your armor.

Walkthrough[edit]
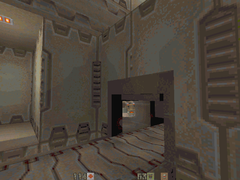
Look out for Guards to both the right and the left. Climb the curved staircase ahead of you to press a button and turn of the lasers that block your way on the right, but first pop some Grenades up onto the balcony to take out the Gunners standing there. Drop back down. If you approach the closed door (to your left as you entered), you will receive the message "This door is opened elsewhere". You will come back this way to return to the Receiving Center. Go in the other direction.
The Organic Material Liquifier[edit]
Along the passageway that was blocked by the lasers you will first meet a Gunner. At the bend, hold back, crouch and look up to the elevated walkway in the wide and tall room ahead. Pick off the three Guards up there before advancing. Now take note of the square depression in the floor ahead. When you step into the room, this will explode and a Tank will come up on a lift platform from below the floor. Rain Grenades on his head as soon as the floor breaks open, then retreat to cover in the passageway and either finish him off with the Grenades or switch to some other weapon.

Wait for a platform to rise out of the poisonous pink liquid on the right side of the room and jump quickly onto it. Turn to face back into the room so that you can a) hop off onto the walkway and not get killed by the spikes in the ceiling and b) be ready to fight a Gunner. Cross to the room that the Gunner came out of and press the two wall buttons on either side of the opening, receiving the messages "1 more to go..." and "Sequence completed!". See Secrets, below, before leaving this area.
Through the door, shoot the Light Guard who is standing beside a button on a pedestal. It is tempting to press the button. When you do so, you'll get the message "Organic material liquifier deactivated" and the machine ahead will cease operation, which is good. On the other hand, a Gladiator will appear from around the corner to the left and a bridge will rise from the pink liquid linking where he is to where you are, which is not so good, although you can deal with it. If you want to be a little clever, pop a Grenade over the gap so that it bounces around the corner to flush him out and follow up with some Rockets. Then press the button. Note that your field computer will not count this as one of the five goals that you are supposed to achieve, although it clearly is a machine shut down. Again, see Secrets, below, before continuing.

The Strogg Bio-Assimilation Tank[edit]
Trundle on over to where the Gladiator appeared from to find a door, which will open on your approach. There are Guards on the other side, but also a Parasite, so have the Chain Gun ready. Take a look around the next room, which contains machinery, and look for the button that turns it off. Also think about whether you'll just be able to saunter out of the room after pressing the button or whether more Strogg might appear to punish you. This theme will repeat for the rest of the level. Here, the button is inside the largest of the tank-like structures, so enter via the sliding panel around on the far left of the room. Notice, on your way, two similar sliding panels next to cracked glass panes on the face of the raised ledge where you entered. Press the button to receive the message "Strogg bio-assimilation tank deactivated". The floor will shake around a bit but, again, the goals on your field computer is unchanged at 0/5. Two Machinegun Guards and a Gunner will be waiting for you outside and the suspicious sliding panels will now be open. The exit door, up on the ledge to the left, will now also open on your approach.

The Bio Processing Control Unit[edit]
After some steps down, a door opens onto a long, straight hallway and another Parasite. Towards the other end, two Flyers rise up on a lift platform from under the floor. If you run forward, you can dispatch them at close range with the Super Shotgun before they are able to do much damage. The door opens into the next machine room, which contains a running conveyor belt. Beyond the belt are Light Guards, which you can pick off first, then around to the right is a Gladiator, who needs some Rockets in his face to round out his day. Jump across the conveyor belt, go around the pillars where the Guards were and then jump back to reach the machine's control button. Press it. The conveyor belt stops and you receive the message "Bio processing control unit deactivated". This time (and hereafter), your field computer acknowledges your noble act and now the goals panel reads 1/5. See Secrets, below, before taking the lift platform up to the exit door.

The Ionization Catalyst Chamber[edit]
The door to the next machine room is down a couple of steps. Inside you will find yet another Parasite, three Flyers and a Gunner. If you like to charge in and spray ammunition around, save the game first as you may be unhappy with the amount of damage you take before all of the enemies are down. Otherwise, stay outside the door and pick off first the Parasite in the open area straight ahead and then the Gunner on a raised platform to the right. Run inside to entice the Flyers down from the alcove in the ceiling and then run back out. Now you can pick off each of the Flyers in turn using the doorway for cover. Take the lift platform up to where the Gunner stood and find the control button on the rear wall. Press it to get the message "Ionization catalyst chamber deactivated." Although the blood-covered conveyor belts stop, the sounds of machinery and the groans of turtured Marines will not. Your goals panel reads 2/5. Three machines to go.

The Emulsifying Flesh Press Unit[edit]
The exit from the ionization catalyst chamber has two doors at the end of a short passage, one on the right and one on the left. They now both stand open. Four Enforcers are just beyond and two of them are likely to come to get you. Either drop down to fight them or use the height of the raised platform to advantage. The other two can be found in the hallways on the other side of the two doors. These hallways quickly converge at the next machine. Supervising the Marines and body parts that drop into the press rollers you may find a Machinegun Guard. He does, however, have a habit of falling into the rollers himself and may be gone by the time you arrive. Press the control button which is on a pedestal near the machine to get the message "Emulsifying flesh press unit deactivated". The rollers will stop and you can safely collect the ammunition near them.

The Bio-Compression Chamber[edit]
Turn and walk directly away from the control button. Around a corner to the right you will find that a lift platform has come down to collect you. Step on and ride it up, but have the Super Shotgun ready and face the back of the lift because the exit is that side and an Enforcer will be waiting at the top. At the tee intersection turn right, then right again and through the door to the next machine. Inside the room, three Light Guards are probably listening to their iPods because they don't react to your arrival until you start shooting. After taking them out, it's worth watching the machine operate for a few cycles. You don't know those guys personally, do you? Pressing the control button results in the message "Bio-compression chamber deactivated". If you're short on Bullets, explore behind the machine where you will find a couple of boxes.

The Enemy Processing Unit[edit]
Return to the tee intersection, but be ready for a Gunner on the other side of the door. Collect the Armor Shards from the alcove in which he was hiding. On the other side of the tee, a platform, which previously was at the bottom of the tank, has risen and you can use it to cross to a door on the other side. You'll need to jump because there are large gaps. Through the door stands another Gunner and behind him a tunnel leads to the right. There are three Guards along there and you can either go after them or just wait for them to come to you and blow them away as they round the corner. At the other end of the tunnel is the seventh and final machine. Just as you leave the tunnel, look for another Guard below you on the left. Don't miss the pack of Rockets tucked away where he is standing. Press the control button to receive the message "Enemy processing unit deactivated", but turn around at once because a door in the tunnel behind you will open and there is a Light Guard behind it.
Go to where the Guard stood and look for a small, semi-circular lift platform. Step on and take it down with a weapon in hand suitable for the Shotgun Guard at the bottom. Two pipes continue to disgorge blood and severed limbs, but there's nothing you can do about this. Press the wall button to open the door and go back to the room into which you first came in this level. Your field computer updates to read "Objective complete" and "Return to Receiving Area [sic]". Go back over the circular route past the machines to pick up any items you left behind and return the way you came to the Receiving Center.
Secrets[edit]
This level has three (3) secrets:
- Above where you fought the Tank, a Gunner comes to greet you from a room on the other side of the mezzanine area. The wall over the doorway to that room bulges out to form a narrow diamond-shaped pocket. Look up into the pocket and you will see a small red light (or perhaps it's just a button). Shoot it with your Blaster and you will immediately get the message "You found a secret". Go back across the mezzanine to find the secret, which is that a wall panel on the left has moved away to reveal an Adrenaline in an alcove.
- Above where you fought the Tank, to enter the room with the first machine you have to press two wall buttons, which opens the door. Just inside the door, look down to your left. Below the walkway is a pool of poisonous pink liquid, but if you move to the very edge you can see an alcove underneath. It is difficult, but not impossible, to drop down there without touching the liquid, but it is more likely that you will land in the liquid and take a little damage before you scramble out. When you enter the alcove you receive the message "You found a secret" and can take the Quad Damage that is there. Follow a tunnel to come out behind the Guard's position at the machine's control button.
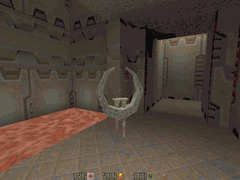
- After shutting off the conveyor belt of the bio processing control unit, walk onto it and crouch to enter the machine where the belt emerged. In an alcove on the left, you will find a Power Shield. Take it and receive the message "You found a secret".
- Gallery : Secrets in the Processing Plant level.
-
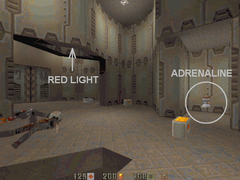
Shoot the red light to
slide away a wall panel. -
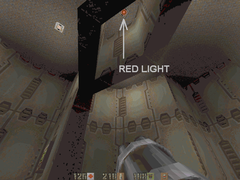
This shows exactly
where the red light is. -
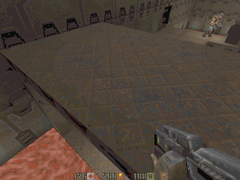
You're likely to take damage getting down to this alcove.
-
The reward is only
a Quad Damage. -
Get onto the conveyor
belt and look inside.


