| Map Name | Initial Coordinates |
|---|---|
| fact1 | (-495 192 46) : 0° (facing north) |
Armament[edit]
Starting the Factory unit, you should have the Blaster, Shotgun, Machine Gun, Super Shotgun, Chain Gun, Grenades, Grenade Launcher, HyperBlaster and the Rocket Launcher. In this unit you can add the Rail Gun to your collection of weapons by finding one or both of two secrets.
Unit objective[edit]

The primary objective for the Factory unit is to shut down the alien processing plant. This is achieved by shutting down each of the machines in the Processing Plant level.
Level objective[edit]
The objective for this level is to find the entrance to the Processing Plant.
Strategy[edit]
Use your favorite strategy in this level. Combat is of normal difficulty and there are no traps that you can't survive with normal caution. Watch your back, expect the worst and dodge furiously when you meet a Gladiator. You will meet a new Strogg type, the Brain. It does not have a ranged attack, but puts up an energy shield to absorb part of your attack damage. Keep some distance and just pound away with your chosen weapon. Health and ammunition are in adequate supply and if you're short on armor you'll find a Flak Jacket, 4 armor shards, and a Combat Suit (the latter in a secret area). You have two chances to add the Rail Gun to your armament by finding secrets, one of which is a secret Level. You will leave this level to play through the Processing Plant, then return at same place and continue. If you're fast, you can bypass the greater part of this level, refer to the Walkthrough, below, for details.

Walkthrough[edit]
The elevator from the mines brings you to a large storage room. Through a doorway straight ahead, you can see a Guard facing away from you. There are actually two of them out there; just walk up to one of them and blow him away, then turn to deal with the other. You are now in a hallway with various doors and openings. At one end are two doorways barred by red lasers and a door that announces "This door is opened elsewhere" when you approach it. Next to that door is a red pipe leading down with a cover that rises when you press the wall button nearby. If you want to drop down there now, skip to the next section.
At the other end of the hallway is a door that opens for you. If you prefer to explore fully before taking any irreversible actions, like dropping down a pipe, you'll want to look on the other side. The area beyond extends both to the right and the left. You can certainly rush in and deal with whatever happens, but to play it safe pop a Grenade against the far wall so that it bounces around to the right. From the fountain of gore, it appears that someone was lurking there. In fact, it was only a Light Guard, but better safe than sorry. Now you can direct all your attention to the left, from which direction you'll be attacked by two Gunners. Retreat through the door for cover and use more Grenades or whatever weapon you prefer.
To catch what happens next, go back through the door again but stand just inside and take a look around. Save the game. There are two small lava pools and an opening into another area, from which the Gunners came, that is split in two by a large pillar. You want to go to the near side of the pillar, in between the pools, but be sure to look out into the next area. You'll see a Shotgun Guard on the far side of a large lava pool crossed by a bridge. In the middle of the bridge is a box of explosives. The Guard shoots at you, his shots appear to set off the explosive box and the bridge over the lava breaks in two. This now becomes a dead end until you can find another way across. There is a moving platform system that will bring you back, but you can't use it to get to the other side of the lava pool. So, it's back to the pipe and drop down.

Let's replay that (or, skip to the next section if you prefer). Restore the game that you saved before the Guard shot the explosive box. Equip the HyperBlaster. This time, as you make for the gap by the pillar, keep going. On the run, take out the guard, being careful not to hit the box. Jump up onto the bridge and run across. On the other side, turn to your left and open fire on the Gladiator along the corridor. Dodge to and fro and try to kill him before he hits you. OK, now you can explore. The box exploded and broke the bridge even without being shot by the Guard. There are other boxes and if you shoot them (stand well back) you'll gain access to a side area, but it's full of lava like the pool under the bridge. Along the corridor you'll see the contraption with platforms that you can ride back to the other side of the lava, a laser pit with pillars on rectangular tracks (but the pillars are not moving) and, right at the other end, a level exit. This is the entrance to the Processing Plant that you're looking for. You can go there now and either skip over the greater part of this level or use the platform contraption to return to it when you get back. You can also use the contraption now and do things in the order that the level designer almost certainly intended. Make your choice. Once again, either a) play through the Processing Plant and then exit the unit, b) play through the Processing Plant and afterwards explore the rest of this level or c) go back and explore the rest of this level now. The level designer probably didn't intend for you to be where you are now, so option c) will be closest to his intent.
Turning off the Lasers[edit]
Unless you decide to bypass most of the level, as described above, you'll at some point be dropping down the red pipe. As you do this, face the rear wall of the alcove and as soon as you hit the water down below scramble out onto the platform ahead of you. Hop up into the red pipe, run forward and take out the Flyer that is approaching. If you want to make all the enemy kills, return to the water and you'll see that there are Barracuda Sharks swimming in the water. Shoot them from the safety of the platform, the Blaster will work fine, but stay back from the edge and their long teeth.

At the end of the red pipe you will come to a room with a lava pool. Finding the way out from this room is an easy puzzle, so skip the rest of this paragraph to try by yourself. Kill the Guard below the pipe and drop down to where he stood. Press the wall button and the bridge pivots down so walk across and take out the Gunner around the corner. Next, operate the lever but be ready for another Gunner to come from the side corridor on the left. The lava drains so that you can go down into the pool and press the wall button there. Look up as you do so and you'll see the cover hinge down from the pipe next to the one by which you entered. Go back up the steps, around through the side corridor and take a lift platform up to the cover. Step fully onto the platform because if you stand on the edge you'll hit your head when it rises. Jump up into the pipe and climb the ladder that you find there.
At the top of the ladder you will hear the characteristic sound of a new Strogg type, the Brain. As you can't see them, they're clearly behind you, but don't turn until you're off the ladder or you will fall. There are two of them, slow and lumbering, and they can't hurt you unless they get close. Keep your distance (which is easy) and shoot them again and again with the Super Shotgun. They will put up a green energy shield which absorbs some of the damage but eventually they will go down. Only when the Brains are taken care of explore beyond the room at the top of the ladder. You will find a narrow dead-end passage patrolled by a Gladiator. Kill him and press the wall button there. If you look through the windows in this passage you will see out into the final room of the level; on one side there's the exit and on the other a long flight of steps leading down. When you reach that room, you might like to figure out where you are right now. Return to the top of the ladder in the red pipe and you'll see that lift platforms are now moving up and down and will carry you over the top of a wall. If you need armor, choose the middle one and collect the Flak Jacket, otherwise use any of them.

The room on the other side of the wall directs you to the left, but see Secrets, below, before continuing. Beyond the door is a bridge suspended over another pool of lava. Go ahead and cross the bridge if you like surprises. Actually, no, you don't get dunked in the lava. Listen. What's that sound? Under the slightly recessed panel in the floor just beyond the door there is a Berserker sharpening his spike. When you take a couple of steps onto the bridge, he will rise up behind you. In case you think the solution is to walk backwards, another Berserker will emerge from an alcove in the wall on the other side of the bridge. You can deal with them both if you are prepared and use the Chain Gun. There are three handy boxes of bullets on the bridge.
Beyond the bridge is a door that opens when you press a wall button. This is the door that would not open when you explored on arrival. Through it is the hallway where you shot the two Guards. If you press the button and quickly go through the door you will be able to see the lasers go off.
Finding the Entrance to the Processing Plant[edit]
After the trip to turn off the lasers, both of the doorways that were originally barred are now passable. They both lead to a small outdoor area. Take care of the Berserker lurking out there and have a look around. You are on a walkway above a pool of very pleasant looking water. Beyond the turn in the walkway is a waterfall. There isn't actually anything to do out here other than look for secrets. Before reading about them below, try to find at least one by yourself. The other you'll probably need help with.

Go back into the building and walk the length of the hallway, past the red pipe on the left, the room into which you first entered on the right and to the door at the far end. If you have not yet explored behind this door, refer back to the early part of this walkthrough or just watch out for a Light Guard and two Gunners. You reach a broken bridge over a lava pool but there is a shallow area to the right where you can safely cross. Turning off the lasers (or something else you did on the way) also drained away some of the lava! Kill the Shotgun Guard on the other side.
You can cross by dropping down, walking over and jumping up on the other side, but (unless you ran over the bridge before it collapsed) there will be a Gladiator along the corridor to the left. An alternative is to drop down through the large hole to a lower level (crouch to avoid fall damage) where you can pick up some ammunition and take a lift platform up to a side room. From here you have more choices in how you engage the Gladiator. Clear away the exploding boxes to break down the bars blocking the doorway to the side room.
The entrance to the Processing Plant that you're looking for is at the other end of the corridor. After playing through that level, you'll be able to cross the laser pit that you can see on the left. If you're doing things out of order and the pillars are already moving, then just continue with this level as described in the next section.

Returning from the Processing Plant[edit]
When you get back, your field computer will update your secondary objective to "Find entrance to Power Station" (although, there is nowhere with precisely this name). You'll discover that the pillars in the laser pit have begun to move sporadically around their rectangular tracks with a clacking sound. Before crossing the pit, go back to the part of the level you've already visited to collect any items that you left behind. (If you ran over the bridge before it collapsed you'll need to go back if you want to score all the enemy kills and/or find the secrets.) How to cross the laser pit is obvious, but timing your jumps and reaching the second pillar from the first is tricky. Have the Super Shotgun in hand as you land on the other side because a Machinegun Guard will suddenly appear from under the floor.
Through the next door you will first meet two Icarus, then an Enforcer down in the curve of the staircase and finally a single Flyer. Use a Shotgun or the HyperBlaster as you'll be able to pick up replacement ammunition for these weapons. Walk around the tank-like structure with red buttresses to find the level exit, step in and press the button to move ahead to the Power Plant in the Reactor unit, but first, see Secrets, below.
Secrets[edit]
This level has four (4) secrets:
- After fighting the Brains and the Gladiator and using the lift platforms to get over a wall with a Flak Jacket on top you will see three wall panels facing you in the next room. The middle one is fairly plain and the other two look like some kind of machinery. Go up to the one on the right, then back away and you'll see that the one in the middle has dropped down. Enter the room behind the panel to receive the message "You have found a secret area" and collect two packs of Rockets, two packs of Bullets and a Combat Suit.
- In the outdoor area that you can reach only after turning off the lasers, drop down from the walkway into the water. Enter the low doorway underneath to receive the message "You have found a secret area" and find health, Grenades and (oh joy!) the Rail Gun. The only way back is to go past the Rail Gun. A ramp drops down, but watch out for a Parasite up above.
- Also in the outdoor area, jump to the top of the waterfall. This isn't easy; you need to keep to the left of the walkway, start your run some distance back and jump at the very last moment. If you keep falling short, save and reload the game rather than walking around again through the secret area under the walkway. A "manly" alternative to plain jumping is the rocket jump. Run along the walkway but a little before you get to the end face straight down, jump and fire a Rocket when you reach the peak of your jump, continuing to hold down the run and forward controls. The Rocket must hit the walkway; it will do no good in the water. The boost in height will take you clear over the top of the waterfall into the pool behind. Done reasonably well, the rocket jump will cost you about 16 health points, which you will quickly regain, and 26 armor points (at Combat Armor strength) which may be a more serious loss. When you succeed, pause, save the game and then step into the deep water behind the fall. A new level will load and on the screen you will see the message "You have found a secret level". Why save the game at the top of the waterfall? Because you only have 30 seconds in the secret level before being transported back to the walkway. If you try to get to the level a second time, you'll just sink in the water.
- Just before you step into the unit exit, turn around and look at the next-to-rightmost buttress of the tank-like structure. It has a pocket in it. Take a look in the pocket and you'll see a pulsing, glowing button. Shoot it with your Blaster. Go back around the tank to discover that the end is now open and you can walk inside. You'll get the message "You have found a secret area!", but the rewards are meager, just some health and Shotgun Shells which you probably don't need.
- Gallery : Secrets in the Receiving Center level.
-
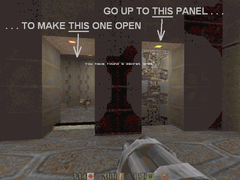
The secret area in the
three panels room. -
The secret area under the outdoor walkway.
-
Drop into the deep pool behind the waterfall.
-

Shoot this glow button to open a secret door.
-
The secret area in the tank-like structure.


