| Map Name | Initial Coordinates |
|---|---|
| ware1 | (-2751 -575 46) : 0° (facing north) |
Level objective[edit]
The objective for this level is "Collect the 4 power cubes to restore power to the Warehouse". In addition, you will complete the unit's primary objective by sending the "logistical train" crashing into a closed door.
Strategy[edit]
This is another level that presents no great difficulties, so go about it in whatever way results in the most fun. Finding the Chain Gun at the beginning gives you a weapon that can take down Gunners and Berserkers easily, but don't use it all the time because it chews up ammunition at an alarming rate. There is plenty of Machine Gun / Chain Gun ammunition (and Shotgun too), but you'll run out if you use the Chain Gun in every encounter. The room in which you find this weapon can be trouble for the rush-ahead-and-see-what-happens player as you can be set upon from many directions at once. Try to end this level with high health, armor and ammunition in preparation for the Warehouse.
For players interested in level design, there is a lot to criticize here. A Gunner explodes before a crate drops on him, the front of a crate rises as if it were a wall panel and the whole idea of plundering Power Cubes loses steam after two cubes and the remaining two are just there for the taking and have no effect on the level.
Walkthrough[edit]

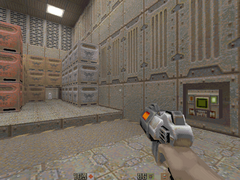
You begin the level in an outdoor area with a conveyor belt overhead carrying crates into a building in front of you. Pathways run ahead and to your left. Everything seems quiet, but the Strogg are only waiting for you to step forward. Skip the rest of this paragraph to play your own way. Equip the Super Shotgun and move out and to the left to take out the first Guard. If you want to shoot from cover, keep running in this direction and take out the second Guard. Use the crates for cover as you fire at the remaining enemies, but don't hide behind the exploding crate for reasons that should be obvious. If you want to just blast away, then, when the first Guard is down, pull back, turn to your right and clear the other Strogg before going back for the second Guard on the same side as the entrance. Look around and you'll see that a deep canyon separates the building from the side on which you entered.
Go next to the door at the other end of the ledge on the building side. Open it to see what's inside and draw back to cover or just rush in, as you wish. After dealing with immediate danger, you will see a Gunner standing under a suspended crate. Press the button on the post and he first dissolves into bloody gore and then the crate falls and explodes. Very odd. (Sometimes the Gunner is not under the crate but stomping about in the room and you'll have to kill him with the Machine Gun or Super Shotgun.) If you wish, drop down to the floor now, or, go to the very edge of the raised area where you are standing and peer over to see what's under your feet. Hmm, an alcove that you can't see into. And, what do we do when we suspect that Strogg are hiding? The yelling when the Grenades explode confirms our suspicion; if we had just dropped down we would have had a Gunner and two Guards to fight.
There is a door to the left in the far wall and another in the right-hand wall. Neither door will open. When you approach, you get the message "This door is opened elsewhere". A bit of exploration reveals a button and once this is pressed, the door in the right-hand wall opens on your approach. There are Guards to deal with on the other side, one of them in an area so dark you have to light it up with your Blaster or wait for him to shoot at you. When the coast is clear and you go into the next room, the door closes behind you and will not open again. The only way is forward.

The First Power Cube[edit]
This room is probably the most difficult in the level, so don't let down your guard for a moment. More Guards, two Berserkers and a Gunner are hiding in the gloom and will attack unexpectedly. On the plus side, there's a Chain Gun in plain sight, an Adrenaline up on some crates and you'll find Jacket Armor a little further on. Make your way around the stacks of crates to the elevator platform. Press the button to call it down, step on and take it up to the higher level. A laser barrier blocks your exit at this level, but it's not hard to see how to turn it off. Approach the power cube in the alcove to remove it and place it in your inventory. After a moment, the lights in this room dim, those along the walkway to the next room come up and the lasers turn off. Strangely, the lift platform still works, so you can go back for any supplies you missed.
The Second Power Cube[edit]
Go through the disabled laser barriers and along the ledge, turning left at the end to a door. Equip a powerful weapon before opening it. In this room, you will find Jacket Armor. Go into the elevator and press the button but while it is going down climb up on the crates. This is so that in the unlikely event of there being a Berserker waiting for you, he won't be able to reach you and you can pick him off at your leisure. In the next room, both doors refuse to open and the elevator button is blocked by a crate on a trolley so this could be quite a puzzle if it wasn't totally obvious what to do (but, don't waste time climbing up the crates and shooting at the vent). Follow the crate on the trolley through one door, press the button on the other side and the other door opens. Yawn.

Ride the conveyor belt to a door which opens to a kind of train station. Yow! It's the "logistical train"! Show yourself to the two Enforcers patrolling the platform, let then come to you and nail them with the Super Shotgun. Jump carefully onto the train behind the crate and then over to the control room side of the station. If you fall into the area under the rail at this point, you will die immediately. The Chain Gun is good for taking down the Gunner at the controls of the train. Now, the train is facing closed doors over which are one green light and one flashing red light. Should you follow the example of the Gunner and not press the button he was standing by? Good choice, the train smashes through the doors and stops. Your field computer changes from "Destroy Strogg logistical train" to "Primary unit objective complete". A little further along on the control room side, you'll find a button on a post that was previously blocked by some bars. Press it and the second Power Cube will rise from under a hatch nearby. Take it to place it in your inventory and receive the message "Tracks disabled".
The Third Power Cube[edit]
To figure out what to do next, consider the message you've just received and take a good look around from where you collected the second cube. Yes, there's a button below the rail behind where the doors used to be. Drop down, duck under the rail and press it. A ladder rises, so climb up into an alcove where you will find the third Power Cube and some Armor Shards. Approaching the cube removes it and places it in your inventory, but doesn't seem to do anything else; somebody has run out of ideas, here. Oh, well.
The Fourth and Last Power Cube[edit]
Clamber up into the duct to the left of the cube, turn right and follow it to a grill which will open when you approach it. You'll need to drop down out of the duct and take a little fall damage. You're exposed to the Strogg out there while you're doing this, so an alternative is to kill them first from the cover of the duct. This has it's own dangers; in particular you're a sitting duck for the Gunner's Grenades. From the lower level, you can, if you want, return to the train station by pressing a button to open a door. Be sure to do this if you might want to go around the level a second time. Climb a ladder up to where the Strogg were. This will lead you to a large warehouse room which is basically a maze defined by crates stacked two- and three-high. What happens next is precisely what you'd expect, so, actually, it's good fun without much risk of serious damage. Be sure to fully explore if you want to score all the enemy kills (also, see Secrets, below).

Leave this room by pressing the wall button to slide back a panel in the floor. Skip ahead to play on your own. In the room down the stairs are two Light Guards. A wall button to your right as you enter operates the floor panel, but this serves no purpose. The lift platform that looks as if it's going to take you up to the higher level in the room actually takes you to a room below, where you will have to fight a Berserker running about and an Enforcer on a raised ledge. Climb the ladder to where the Enforcer was and press the button on the post to start the two cargo hoists. Take either of them up to the higher level in the room above. If you need Machine Gun ammunition, you can get it from the top of the crates, but you'll have to ride a hoist and jump. Shotgun ammunition and health are easier to collect. At the top, go through the door on the right with the Super Shotgun and blow away the Enforcer there.
The fourth and last Power Cube is just sitting there waiting to be picked up. When you do this, your field computer updates to show "All power cubes collected. Return to Ammo Depot". Also, the door to the next room opens, so be ready to dispatch two Light Guards inside. Look for other Strogg hiding among the crates and climb either ladder to the raised area to press a button on a small post and open the door out of the room on the left. The lift platform inside the door rises as soon as you step on it, so be ready to defend yourself when you reach the top. From there, follow the only available route back to the room with the crate on the hover-pallet.
Although the door you first went through will again close behind you, you can go back around the level again to pick up anything you left behind. This is quick to do because you have created several short-cuts on your first pass. When you have everything and have optionally reviewed the level secrets, below, take the elevator to the raised area and hence to the door that leads back to the outdoor area. Cross the bridge over the canyon and leave the way you arrived, going back to the Ammo Depot.
Secrets[edit]
This level has three (3) secrets:
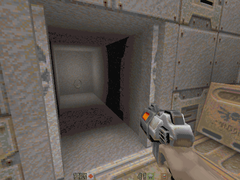
- From where you enter and leave the level, look across the canyon that separates you from the Supply Station building and to the left. A narrow slot running from the canyon floor up to the ledge opposite is a lift platform. Go around to it and stand very close to the edge to call it up. Step on and to make it carry you down stand right at the canyon edge. At the bottom, turn right and go to the corner where you will find a door. This leads to the bottom of an elevator shaft inside the building. There is a Combat Suit for you to pick up. Consider collecting this on the way out and to the Warehouse level, which is more difficult than this level. To continue, just take the lift platform back up. Oddly, many players drop down into the canyon and take fall damage. You may have to do this if you're playing a modified game in which the platform will not come up to you. Other players "trick" the elevator, which is in the first room inside the building, at floor level, and is needed on your way back. Approach the elevator to open the doors and stand on the top edge of the bottom part of the door until the cage begins to lift. As the doors close, inflicting damage on you, you'll have a split second to dive into the elevator shaft under the cage.
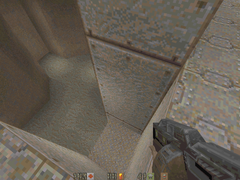
- In the first room inside the Supply Station building, you will see a crate moving erratically around the floor on a hover-pallet. If you can reach the rear of the alcove it occasionally goes into, you will receive the message "You found a secret" and collect a Quad Damage. This can be done in several ways, all of which require jumping skills and patience. Save the game to avoid frustration as you may not succeed on the first attempt. One way is by jumping onto the moving crate from the climbable stack of crates, riding it and then jumping onto the two crates in the corner. Wait for the moving crate to enter and then exit the alcove and jump in before the doors close (you won't get trapped inside). Another way is to push the explosive barrel over to the alcove, using it either to jump up onto the crates as above or to directly jump into the alcove. If the moving crate hits the barrel, it will explode.
- In the large warehouse / maze room that you come to after collecting the third Power Cube, far to the left of the wall button that opens the sliding floor panel, you will find a crate of a different color from those nearby. Shoot it and the front of the crate rises (why not have it explode or just break into pieces, which would be much more plausible?). Inside the alcove revealed there is a Mega-Heath item. Take it to receive the message "You found a secret".
- Gallery : Secrets in the Supply Station.
-
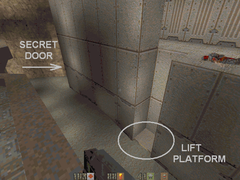
In the canyon, there is a suspicious lift platform.
-
Call up the platform by standing right at the edge.
-
Combat Suit at the bottom of the elevator shaft.
-
Quad Damage in the first room inside the building.
-
The Mega-Health in the warehouse / maze room.


