| Map Name | Initial Coordinates |
|---|---|
| jail4 | (-191 -2423 46) : 90° (facing west) |
Level objective[edit]
The objective for this level is to find the Security Pass and take it back to the Security Complex. You will first have to retrieve the Data CD from Cell Block A and use it to gain access to Cell Block B, where the Security Pass is in the possession of a captured Marine.
Strategy[edit]

This is an easy level for this point in the game and with a simple objective. The only Strogg types that you will meet are Guards, Gunners, Tanks and one Parasite. These present no particular difficulties, so use whatever strategy suits you best. With only one exception, enemies just wait for you to find and kill them rather than jumping out from unexpected places. Your weapons will be a match for them. (You have the HyperBlaster, right? If not, it's an easy secret.) There is no shortage of ammunition and you can get extra by killing the tortured Marines. You may find navigating the level difficult (it is constructed as a maze of walkways and passages), but you won't get into too much trouble just wandering around looking for places you haven't been and things to do that might get you closer to your objective. One thing to bear in mind is that in order to fully explore the Security Complex you will need to go back to it using an exit from this level other than the one you entered by. It's easy enough to find because the Strogg have hired an English-speaking sign painter.
Walkthrough[edit]
Following the only available path quickly brings you to a large hangar-like building with a Tank at the other end. Because he's far away and doesn't come closer, you have plenty of time to dodge his attacks, so any weapon you can hit him with will eventually kill him. For speed, use something that is accurate at long range and highly damaging, such as the HyperBlaster, if you have it. As an alternative, run the length of the hangar, going first to the left and then swinging to the right so that he can't keep his weapons aimed at you. Don't run over the floor button, though. At the other end, jump the gap and take cover around the corner. Now you're closer to him and have a wider choice of effective weapons. When he's down go back to the floor button, step on it and immediately get onto the brown lift platform, which will descend, taking you underground. Well, where did you think torture chambers would be?
The Data CD and Cell Block B[edit]
From the high lift platform, take the slightly shorter tunnel that turns to the right at the end. Follow the tunnel and then the walkways, dealing with Strogg as you meet them but staying at this level. You will pass through a room in which four Guards are apparently planning to turn a dead Marine into tiny pieces of dead Marine. It takes all sorts, I guess. Shortly, you will come up behind a Gunner standing where the path drops down a level. You can hear the characteristic clumping sounds of a Tank, so think about taking care of him before going down (although a lift platform nearby will get you back up). The Data CD is on your right. Press the button to deactivate the force field over the alcove and take it.

Use the lift platform to get back up and retrace your steps until you come through the last door and see the tunnel to your left. Look over the edge of the walkway, watching out for Strogg, and you will see directions painted on the wall pointing to Cell Block B. Drop down and go to the indicated door where you will find a security panel on the wall. It accepts your Data CD and the door opens.
The Security Pass[edit]
Enter Cell Block B, again following walkways and dealing with such Strogg as you encounter. Very soon, you will come to another painted sign reminding you that you are no longer in Cell Block A, Dorothy. Below are four prison cells. You can hear moans of "Let me out", "Make it stop" and "Kill me now". People should make up their mind! Drop down and inspect the two cells to the right, which have holes in the floor. The security panel turn off the force fields. Now, you need to drop down one of the holes. It doesn't matter which one. You don't need to know what is going to happen down there, so skip the rest of this paragraph. You do need to know? OK, well, you're going to be set upon at close range by a Parasite. Once he's in your face, the HyperBlaster is going to be your best defense. But, you can soften him up a bit or maybe even kill him before going down if you know where to put some Grenades. Go into the cell closer to the corner where a grid partly blocks the hole. Stand on the side where the grid is completely missing so that the cell doorway is on your right. Shoot away the grid. With the Grenade Launcher, aim a grenade down the hole to bounce off of the far side near the bottom. You should hear a cry of pain and see the Parasite running about. Finish him off any way you like.

Crouch and drop down into the hole. You land in a watery area with a large pipe at one end. Collect the Rebreather conveniently waiting behind the pillar to the right of the pipe and jump up into the opening. Equip the Super Shotgun, activate the Rebreather and dive into the water in the pipe. Swim along the pipe and emerge into a rectangular tank with ladder-like slots in the far wall. Climb out of the water and kill the two Light Guards. It's slightly more interesting if you can kill the closer one before he gets to the computer. A Marine is shackled to an iron maiden-like contraption. Unfortunately, he has the Security Pass that you're looking for and won't give it up while he's alive. You can shoot him ... yeah, you could do that ... or you could press the box underneath the computer screen to operate the iron maiden. Either way, the Security Pass appears to his right (your left) and your field computer presents the new secondary objective "Grab the passcard and return to the Security Complex". Off we go then.
Back to the Security Complex[edit]
Think about how you got here and you'll realize that you can't go back the way you came, so you'll have to find another way. How about going out of the door? If you don't care about scoring all the enemy kills or finding all the secrets, the simplest thing now is to make your way back to the high lift platform. Just outside the door, look over the edge of the walkway. That's Cell Block B down there. Using your vantage point to kill some enemies first, drop one level and take the left turn on the walkway above the cells. Follow the walkway at this level back out of the door through which you entered the cell block, passing the painted signs and the door to Cell Block A on your left. Keep going until you find a right hand corner and steps going up. These lead to a tunnel back to the lift platform. Press the button to call it down, step on, ride up and make your way back to the Security Complex. You'll probably have missed a third of the kills in this level. You'll also miss enemy kills in the Security Complex because you'll never get to the upper walkway in the room between the courtyard and the pyramid.
If you prefer to make all the kills in every level, you need to take a different exit from here back to the Security Complex. That's really all the advice you need at this point because you can't get into much trouble just wandering around looking for places you haven't been yet. Check out the Secrets section, below, for things to watch out for. If you're still reading, what follows is a reasonable way to complete the level.
Outside the door from the iron maiden room, first go forward and press back the keyboard of the computer you see there. This opens a bunch of doors that would otherwise give you the annoying "opened elsewhere" message. Then kill the enemies below and drop down one level (as above). Instead of following the walkway around the corner, go in the other direction, through a door operated by a security panel. Take a dogleg to the right, go down a flight of steps, ahead through a doorway and down a second flight of steps to a door at your right, where you will have to kill a Gunner. The door will drop on your approach, but the Gunner has a pal in the room beyond so be ready. Inside the room is a huge vat. Take the elevator up to find out what's in it, looking out for the Guards. Well, it's full of molten lava. A Marine is suspended over it in a cage and a floor button is nearby. Before playing with this, make sure you won't be interrupted. There's a Tank just through the opening conveniently marked as the exit. You can quickly take him down with the HyperBlaster held in your right hand using the opening for cover from his return fire. Then, go to the door along the walkway to the right and make sure there's nobody on the other side. If this doesn't bring your kills up to 33, you're just going to have to go back and wander around some.

The Marine in the cage does not look happy, so step on the button to put him out of his misery. When the cage comes back up out of the lava, there's a HyperBlaster in there, presumably a gift from the fried Marine. You'd be nuts to step into a cage over a lava vat just to collect another HyperBlaster, so go ahead and do just that. See Secrets, below, before taking the exit to the Security Complex.
Secrets[edit]
This level has three (3) secrets:
- Right at the start of the level, you encounter a Tank in a large hangar-like building. The far end is open to an outdoor area, but be careful of the gap at the end of the floor. Turn to the right and double back along the outside of the hangar. You will find a HyperBlaster and a pack of Cells sitting there in plain sight. Take the weapon to receive the message "You have found a secret". If only all secrets were this easy!
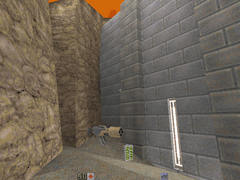
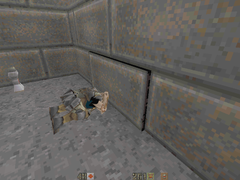
- In Cell Block A, use the security panel to drop the force field blocking the door of the second prison cell from the left. Inside, you will find a protruding block in the bottom course of the rear wall. Shoot it away and crawl through the resulting hole into a hidden chamber containing a secret Invulnerability item. You will receive the message "You found a secret item!". You will probably have to kill the Marine first.
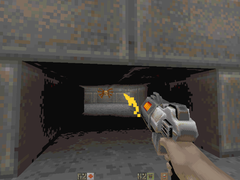
- If you explore the level fully, you will encounter a large rectangular vat filled with molten lava. Make sure that you have an Invulnerability item in your inventory and drop onto the edge of the vat. Peering through the moving surface of the lava, you should be able to make out a cache of ammunition, including a Backpack, and also a Quad Damage. Activate the Invulnerability, dive in and swim down to collect them. You will receive the message "You found a secret area!". Swim back up to the surface and get back out onto the edge of the vat. There is no easy way down, but if the Invulnerability has not run out you can of course just drop to the floor. Otherwise, go to a corner and slide down one of the tapered buttresses on the side of the vat, hoping not to take any fall damage when you hit bottom. If you stay under the lava for a while, you will start making the gagging sounds that indicate that you're drowning, but don't worry, the Invulnerability is preventing that from causing damage as well. If you didn't take the Invulnerability from the hidden chamber (see above), go back for it before leaving the level.
- Gallery : Secrets in the Torture Chambers level.
-
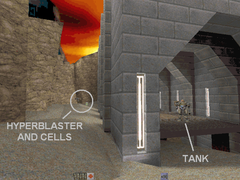
The outdoor area outside the hangar-like building.
-
A HyperBlaster and some cells. Call this a secret?
-
The protruding block in the rear wall of the cell.
-
The Invulnerability in the hidden chamber.
-
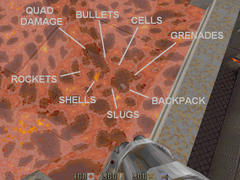
The ammunition cache at the bottom of the lava.


