You will be greeted by a squad of eight Cloud Eyes. After you defeat them, another squad will appear. The Cloud Eyes will fire more vigorously at you than in previous sections. Cannons will appear, followed by waves of Gromas. A Flash Buster can be found on the bottom side of a center platform.
Enter here to collect the Crash Ball
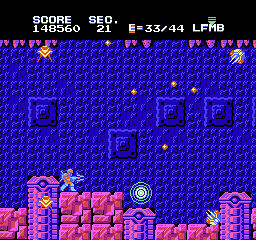
Section 21
In this section, you will encounter a different type of Mensa. These four Mansas will appear in each corner, but they will not home in on you. Instead, they will simply travel in circles. If you remain in the horizontal center of the screen, you can attack them safely. A secret entrance can be found near the bottom of the screen shortly after they appear. Find it and enter it to collect the Crash Ball. (Entering the secret room will also remove enemies for the rest of the section.)
Section 22
Five Mesas will attack you from the outset. You will encounter a Metaleater on the floor which contains a Barrier Shield. After two cannons, you will face two waves of Leagos before the portal.
Section 23
This is a very fast moving section, where you will face just about every type of flying enemy that you have faced thus far, including Leevas, Mesas, Gromas, Leagos, and Kickers. The stage scrolls by too fast to collect any items the enemies leave behind, so you should focus on survival. Stay in the vertical center of the screen to avoid getting swept away by the terrain, and fire rapidly in both directions.
Section 24
You will face three pairs of Crabs in this slow moving section. After the second pair appear, a Metaleater can be found on the underside of a center platform, which contains a Megasmasher.
Section 25
This is the first section which solely contains Gushers. Gushers line the floor and ceiling, belching rocks at various angles. These rocks are difficult to avoid. Do your best to move in close and blast them away quickly, or find a safe spot to avoid getting hurt, and move quickly from safe zone to safe zone.
Section 26
Even though there is no Generator in this section, it is occupied by Rippers. The section splits into three route, with energy barriers place at certain points in along the middle route. There is a secret room entrance on the right side of the first energy barrier. After the paths converge in the middle and split up again, a secret warp room can be found at the start of the lower path. Try not to shoot too many Rippers so as to make the energy orbs they release difficult to avoid.
Section 27
This is an extraordinarily difficult section which should be avoided. You move extremely quickly through the section, which presents energy barriers with gaps at different heights. At the rate that you travel through this section, you will scarcely have time to react to the gaps and adjust your height before you get hit by the barriers. To add to the difficulty, Mesas fly down from the left side of the screen, making it impossible to hang out as far to the left as you might like in order to have enough reaction time. With the stage moving by so quickly, you won't even get a chance to collect the energy that the destroyed Mesas leave behind.
Section 28
This is a typical Vito/Mensa section. The Mansas that you encounter here will go back to homing in on your position, so react quickly to their appearance. The first Metaleater that you encounter will have a Flash Buster. After this Metaleater appears, shoot near the top of the screen to find a secret entrance to an energy restoration station. Enter the left station to recover 10 units of energy. A second Metaleater can be found, which will contain a Megasmasher.
Destroy the Generator
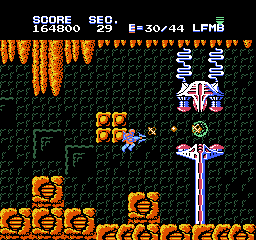
Section 29
The third Generator can be found in this section. After you pass through the line of Rippers, you will find a simple room with a small platform in the middle of the room. If you have a Barrier Shield, it's best to activate it now and simply fire at the core. Otherwise, you can try to use the platform to lure the heat seeking pulses into before resuming your fire on the core. Collect the Power Capsule when you destroy the Generator, and take the bottom portal back to Section 20.
Section 30
You will start out this section being attacked by several waves of Leevas. After a few squads go by, cannons will appear. A Metaleater, containing a Barrier Shield, will appear at the same time Mesas will fly down from the upper left corner. Gromas will come next, along with homing Mansas.
Section 31
A very rare empty section leads to a one-way exit to Section 32.
Face the Zamuza ship once more
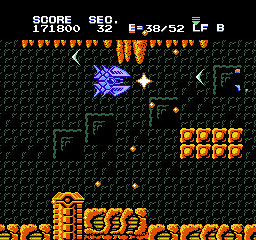
Section 32
After the reprieve of the previous section, you will encounter a reprise appearance of the boss ship Zamuza from Section 19. Its behavior is identical to the first encounter in every way. Use the same strategy against it. This section will continue to scroll until Zamuza is defeated. Then you must proceed to Section 33.
Section 33
This stage is a much more manageable version of Section 27. The speed at which you pass through here is much slower, and you will have enough time to react to the gaps that appear in the energy barriers. Mesas will also appear from the left, but you shouldn't feel the need to remain all the way to the left. In addition, waves of Leagos will appear, but you should have plenty of time to react and shoot at them ad you fly forward. You are given a choice of portals this time, but both lead to Section 34.
Destroy the Generator
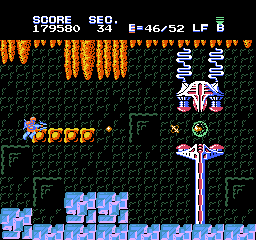
Section 34
Once again, safely destroy the Rippers by flying close to the right side of the screen. The Generator room here has a small flat platform in the middle. If you are using the regular laser or the Megasmasher, you can position yourself to the left of the platform so that the energy pulses hit it and fail to reach you while you fire at the core. This strategy will not work with the Flash Buster or Mega Buster. Otherwise, use a Barrier Shield and blast away up close. Then collect the Power Capsule, and take the bottom portal to Section 20.
Section 35
This section is very similar to Section 26. It has the same setup with three branching paths and an energy barrier that appears at some point along the middle path. However, instead of fighting a stream of Rippers, you will encounter waves of homing Mansas. There are even two secret entrances that appear in roughly the same locations as they do in Section 26. A secret entrance just to the right of the first energy barrier leads to an energy restoration station (take the left station for 10 units.) Another secret entrance appears along the lower path of the second set of branches that leads to a warp zone. A Metaleater containing a Megasmasher appears near the end of the upper branch.
Section 36
You will face Missile delivering Drones in this section. If you have the Mega Buster at this point, you can easily dispatch them by remaining in the middle of the screen and alternating between shooting to the left and to the right as they appear. There is an entrance to a secret room above a platform in the middle of the stage that leads to one of the largest energy restoration stations available. Enter the left station to gain back 15 units of energy.
Section 37
This normal paced section features a combination of Mesas, Gushers, and energy barriers. At this speed, you will have no problem adjusting to the height of the gaps in the barriers. Shoot the Mesas when they are to the right of you in order to collect the capsules they leave behind. Only deal with the Gushers if there are no other immediate threats.
Section 38
You will fly at a brisk pace through a narrow tunnel. Half way through the tunnel, four homing Mansas will appear. Since you have a limited amount of space to maneuver in, it is important to lure them to one location, like the upper left corner, before moving to the opposite corner and attacking them when they are closer together. You must proceed straight to Section 39.
Fight against Balba
Section 39
This section is home to the second boss, Balba. Balba is a large balloon like enemy that hovers around the room in random directions. Like Zamuza, Balba is very well shielded and will only take damage from direct hits to its core. Unlike Zamuza, the core is always vulnerable to attack. However, the random motion of Balba makes him hard to predict. Balba releases mines which also bounce around the room at various angle, and cause one point of energy damage to you every time you get hit by one. When the screen is full of them, it can be hard to target Balba and avoid getting hit at the same time. Having the Mega Buster at this point may not work to your advantage. While you can fire at an off angle and still hit Balba, it's quite difficult, and you won't be able to fire as frequently. It may be more worthwhile to "downgrade" to the regular Megasmasher if you have it available.