| Map | Enemy |
|---|---|

|
Akechi Army |
| Unlock with | |
| Oda Army | |
| # of Tamatebako | |
| 11 |
Incident at Honno-ji (本能寺の変) is the name given to the battle that takes place in the territory of Nobunaga Oda after it has been taken over by Mitsuhide Akechi, following the vassal's betrayal. Thus, this battle acts as a final stage for Nobunaga, Nouhime, and Ranmaru Mori as they seek to take back their land from the treacherous Mitsuhide. This is in contrast to the role that the Decisive Battle of Honno-ji has in most other generals' routes to unification. Regardless, the map is almost identical due to the circumstances in which it appears, though it isn't nearly as difficult; there is only one boss to defeat here as opposed to the three in Nobunaga's map, and the boss fight does not take place in an enclosed area.
Strategy[edit]
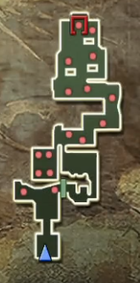
After the anime scene, progress forward and defeat the first squad leader for the first tamatebako. Another squad leader nearby drops the second tamatebako, and his defeat also opens the gate which allows access to the rest of the map. Down the winding path that follows is a red crate that should greatly restore your Basara and a large group of archers. Dodge the flaming arrows and break through their formation to come upon a trio of squad leaders, each dropping an additional tamatebako.
At the split in the path, turn left to find a hidden area where a tamatebako can be found in a crate, protected by numerous squad leaders and ninja. Down the other path are three squad leaders that drop restorative items. The fourth drops a tamatebako. Progressing further down the path will lead to an ambush by two other squad leaders that drop tamatebako, alongside squad leaders that fire arrows from their raised platforms and drop restorative items.
Some other hazards are introduced after the final turn: pillar-swinging soldiers, bomb soldiers, and hammer soldiers stand in the path to Mitsuhide. Approach him to begin the final boss battle.
Boss: Mitsuhide Akechi[edit]

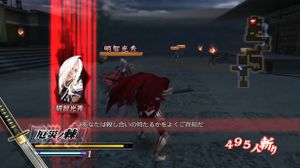
The squad leaders that surround Mitsuhide drop health and Basara, so they can be ignored until the items that they drop are necessary. As was mentioned previously, this boss fight does not take place in an enclosed area. This, coupled with Mitsuhide's slow movement speed, makes fleeing from him in order to pick up some restorative items a viable strategy.
As for actually fighting Mitsuhide, he doesn't pose much of a threat due to the ease with which his attacks can be dodged or blocked, though his health and defense are impressive. Chipping away at his health may take some time, made even more tedious with a skill of his which protects him from two attacks. The two skulls that surround him must be dispatched before you can continue your offense. Defeat him to unify Japan under the Oda Army.
