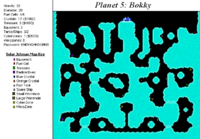
- Gravity: 32
- Diameter: 29
- Fuel Cells: 4/4
- Crystals: 1/1 ($1000)
- Treasure: 3 ($1993)
- Equipment: 0
- Tanks/Ships: 3/2
- Cyberzones: 1 ($2000)
- Warpzones: 0
- Password: KMDWQHKDGBNB
Bokky is another doughnut shaped planet, and this time the large wormhole is in the center, accessible through the bottom. You will need to clear both the right and left sides to get everything. The left side is a bit easier, but has fewer items.
From your ship, fly to the left side of the planet. On the rock formation closest to the left wall is a crystal and under the rock formation is a Radioactives. Rather than taking the items back to the ship, take them down along the edge, past where the Radioactives are and downward into a four-way split. To the left is a small wormhole, so drop the items in and then take the wormhole downward.
Right below is another four-way split, with a fuel cell to the left and down. To the right is a narrow, crystal covered tunnel, similar to the ones found on planet three. On the other side is a crystal near the top center of the room and a spare ship in the lower right corner. You will need a lot of fuel to take the crystal through the tunnel, so switch to the spare ship.
Take the wormhole further down into a twisting tunnel, and if needed grab the fuel tank along the right wall. Further down there will be a split in the tunnel to the left, where there is another Radioactives. At the very bottom is a crystal covered tunnel, which leads to the chamber containing the large wormhole. Since you only have one Fuel Cell now, don't bother going through the tunnel; just head back to your ship and then down the right side of the planet.
Two Fuel Cells can be picked up almost immediately. The first one is below the ship and can be found by following the ledge the ship is on down and to the right. The other Cell is all of the way on the right side of the planet in a trench by the right wall.
Once the Fuel Cells are returned to the ship, follow the path down and to the right of the ship. Past where the Fuel Cell was the path goes up a bit then right until you get to an opening that leads downward.
Past the opening there are three paths; the one on the right leads to a treasure chest in the lower right corner and a bonus zone in the upper right corner. Like the bonus zone on planet 1, the wormhole disappears quickly and leads to an area where you must dodge rocks and mines while grabbing crystals. The path on the left leads to the last Fuel Cell, and straight downward leads past a fuel tank and eventually to another crystal covered tunnel. To the left of the tunnel is a small wormhole and going through the tunnel leads to a large vertical cavern, with another crystal tunnel in the lower left.
Going through the vertical cavern lead to a long horizontal tunnel which connects to the other side of the planet. In the upper right corner is a spare ship, and in the middle is a vertical shaft leading to the large wormhole. The shaft is guarded by two extremely powerful battleships that can only be hit from behind.
On the other side of the wormhole is a long tunnel with a single 90 degree turn at the end. There is one drone ship that fires missiles and is exactly like the others in the level. After taking out the ship, grab the Piece of the Golden Warpship at the end and take it back.
Intermission: Store #3[edit]
In stock:
- Homing Missiles
- Anti-Gravity
- Time Bombs
- Multiwarhead Missiles
- Titanium Bullet Pack
- Super Shields
- Efficient Engines
- Super Mapping Device
The Super Mapping Device is a must have, but aside from that you should try to have one of each item if possible.