Stage 41[edit]
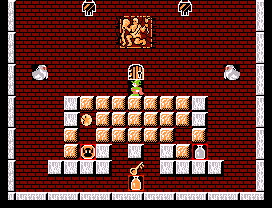
- You will be in immediate danger at the beginning of this level. Demonheads will spawn from the left/right mirrors, and head towards the opposite side. Yeah, you're in the middle.
- Stay in the center, jump the pair of demonheads as they cross. As you land, run left.
- Drop to the level below (not the floor), break a few blocks to your right, and step out of harms way.
- Create a trap by extending the platform you're standing on all the way to the left wall. This will take a few trips back and forth.
- Break the block directly under the left spawn mirror so that both sets of demonheads now fall into the trap.
- Clean up the goodies, climb up the right side, exit.
Note: Drop into or walk into the exit from above in order to be able to immediately jump for the next stage. You will need to jump and clear a block left or right and land to access the Mighty Coin (200k) and 2 50k Jewels in the next stage, otherwise these items are immediately inaccessible.
Stage 42[edit]
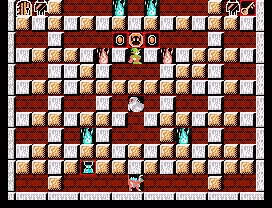
Easy - Prepared Route:
- Instantly spawn jump, moving left or right, clear a block and land (collecting a 50k jewel).
- Face the center, place a block and clear it to reveal the Mighty Coin.
- Place a block below the Mighty Coin (200k) (Where you spawned) and cross it to clear the opposite block for another 50k Jewel.
- Clear the center block for a Bell.
- Go for the key and leave the stage.
Hard - Unprepared route:
- Drop to right side of ghost and up through right side stairs.
- Make a path down the right side and across the bottom, avoiding the dragon with timing.
- Ascend the left side to the lower left flame and destroy brick under upper left flame.
- Descend back down left and across the bottom, retrieving the hourglass.
- Back up the right side to repeat the process with the right flame.
- Across the top to the door, laying stones above the upper flames.
Stage 43[edit]
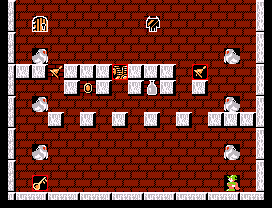
This board will require precise timing and patience.
- Get key by breaking the lone brick on the left
- Make your way up to first level of gray bricks
- Manipulate the timing of the middle pair of ghosts by spawning bricks. They should cross each other's path exactly under the gray bottle. You can time the ghosts by placing one block (in the path of the ghosts), under the fairy bell and then one directly to the right of it.
- Do not disrupt the timing once established; use your jumping ability as the only way to avoid ghosts.
- Make your way under the grey bottle by paving the way with bricks. At the instant you arrive under the grey bottle:
- destroy the brick that got you there so the pursuing demon falls into the gap;
- jump into the air so the middle pair of ghosts passes through harmlessly
- Make your way to the right side of the screen for the final ascent.
- Avoid the demons and make your way to the exit door.
Another option is to build blocks below each of the rightmost three holes before following the above instructions. This makes it a little easier because you won't need to turn and blast a block when the ghosts and salamander are upon you. If you are standing in one of the holes you made, you can avoid the salamanders fire by jumping right after he finishes firing, but before he falls in the hole with you.
Stage 44[edit]
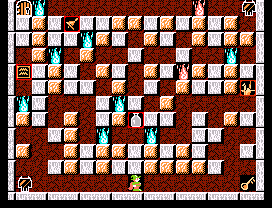
- Destroy the four blocks just above you and to the right, and the block under the blue-flame right above you at the start.
- Move to left, climb and drop blue-flame on left wall down to floor and put a block above it. Be careful not to trap yourself.
- Move up a level and through to the right, dropping everything along the way, including the block below blue-flame above you.
- At the far right finish the rest of the way to the very top.
- Come across, drop down, drop blue-flame, make difficult jump across to left to break block below last blue-flame.
- Fall down the left wall, picking up shrine.
- Hurry back to the top before time runs out.
Stage 45[edit]
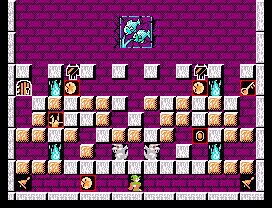
- First, run to the right and remove the two blocks beneath the upper right flame.
- Then return to the basement and head left. Pick the left bell and break the block above.
- If necessary, jump up to lure a gargoyle clearing the path.
- Now lure both gargoyles past the lower left flame. Drop them to clear the path.
- Climb up and remove the two blocks beneath the upper left flame.
- From here, you can either drop the lower left flame, proceed to middle shaft, move upstairs and to middle of top floor, or take a detour and drop the lower right flame, seal the open shaft, and move through the middle shaft to top floor.
- The rest part of getting the key and leave is easy. You may want to trap the demonheads coming out from the right mirror after obtaining the key.
Stage 46[edit]
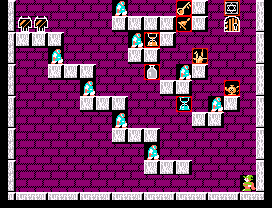
Similar to the Arcade version's Stage 42, although the devil's emblem has been removed. This makes clearing the field much easier.
- First, make a block below the left end of the second lowest platform.
- You will need to make "bat jump"s by making a new block while standing on left half of a previous block, then jump onto new block. Continue until you reach the left border.
- Move yourself upward until you are at the same height of the platform where the leftmost goblin patrols. Beware of salamanders. Once you have reached the position, remove the aforementioned goblin.
- You will want a longer time window to quickly reach the safe zone. To make enough time, move around your standing block to lure the salamander from left mirror move right, and the next salamander from right mirror move left. Once the first salamander has dropped, quickly jump to the solid platform, run to the right, make a block and climb up, turn around and make another block, and climb up. Shall you have succeeded, you will be on an isolated block, and you are on the same height with mirrors. (The block is placed at where the devil's emblem is in arcade version.)
- You can dispose of the upmost goblin and reach the key. But before taking the key, it is better to trap the salamanders by extending your isolated block to both sides.
- Now you can remove other goblins and claim the treasures before leaving.
Note: If you want to collect the Solomon Seal, you must do that before above process. Drop the goblin right below the key for a fairy.
Stage 47[edit]
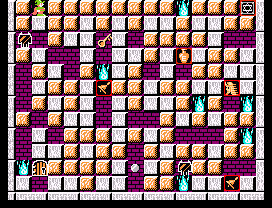
Unlike the arcade version, a few nasty objects have been removed.
- Clear out the path and place a block at three blocks below and one block right to the starting location, so that the demon heads are trapped.
- Return to top floor and move past the key, dig a hole to the right, and drop into the gap to the right of key.
- Clear out the three blocks on your right. You may like to reveal the extra life bottle, but do not collect it now. Instead, drop down from the left shaft, move on to drop the blue flame below the key, and then make a block to cover the flame.
- Continue to move downwards until you have reached the floor. Break the blocks on the right, and make a block right below the position of the silver coin. Then lower the flame below the right mirror, and move to the lower right corner.
- Place a block at the rightmost place, below the blue flames. Then headbutt the block above you, and jump and destroy the block where the lower of two flames is sitting. Then jump to the corner block you have created, but only standing on left edge of that block so that you will not get burnt. Continue to drop the upper flame and reach the flame alone on the left, and drop it.
- If you are able to, collect the extra life and the Cleopetra panel. Once you are ready, climb to the upper right corner. There is a blue flame at the same place of hidden Solomon seal. When you are at the blank area, close your footstep with a block, make another block at the right square, break other blocks above, and do the same half-standing trick as you have just done below. Do not forget the Solomon Seal if you want the true ending.
- The rest path to the key and exit is easy.
Stage 48[edit]
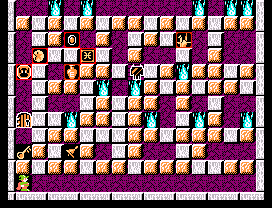
Because of the key location, this room requires 2-cycles. You must place a block on the rightmost edge, 3rd space up, or you will not be able to make the 2nd cycle and enter the open door on one life.
- Start your climb using the 2 blocks at the far right of the screen.
- Place a block in the location mentioned above. You will drop the flame onto this block later on.
- Use diagonal jumps to clear the 2nd flame.
- Drop (as far as possible) the 2 closest flames to your left.
- Place a block under the Kameera Mirror.
- As you move back to the right edge of the screen, drop the flame located directly under a gray block.
- From this point on it's fairly straightforward, but will require another cycle to drop into the open door.
This approach will allow you to obtain all bonus items, but does not allow for a safe return path from the extra life jar.