
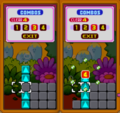
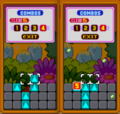
Combos are what it's called when more than 3 panels are matched at one time. These can be in one color group, two groups, or in some cases, even more groups. The important thing is that they happen at the exact same time. You will be notified of having achieved a combo by your character making a sound and a red box appearing with the number of panels matched inside it.
Combos are the easiest way to do things such as stop the screen in a one-player mode, or put a garbage block on your opponent in a vs. mode. They also get you bonus points when there is a score. For general playing, before making a match, always take a moment to look and see if there is a way to make it a combo. 4’s and 5’s aligned vertically are usually really easy to spot and set up, and just that little extra goes a long way if you can consistently find them.
Panel switch combos[edit]
These are the easiest combos to make because all you have to do is switch 2 panels. You can make anywhere from a 4 combo to a 14 combo this way.
1 set of panels[edit]
Note that plain gray panels seen in some screenshots are simply part of the game’s demonstration and can represent any non-matching panels.
-
Complete a vertical 4 combo.
-
Complete a vertical 5 combo.
-
Complete an l-shaped 5 combo.
-
Complete a t-shaped 5 combo.
-
Complete a t-shaped 6 combo with 4 panels vertically.
-
Complete a t-shaped 7 combo with 5 panels vertically.


2 sets of panels[edit]
-
Two matches at the same time make a 6 combo.
-

They do not have to be perfectly lined up.
-
Two horizontal matches take up a whole row.
-
One vertical and one horizontal match.
-
A 4 combo created at the same time as another match makes a 7 combo.
-
This can happen with the other match being horizontal as well.
-
A 5 combo created at the same time as another match makes an 8 combo.
-
Two 4 combos together work as well.
-
Horizontal matches can be included.
-
An l-shaped combo can be made with another match for 8 as well.
-
T-shaped combos are similar with another match.
-
A 5 combo can be paired with a 4 combo for 9.
-
L-shaped or t-shaped combos combine with a 4 combo.
-
The 6 combo can be put with another match for a 9 combo.
-
The same applies with a horizontal second match.
-
Two vertical 5 combos together make an impressive 10.
-
A 5 combo with an l- or t-shaped combo work just as well.
-
Even 2 t-shaped combos (or 2 l-shaped, or 1 of each) can be put together.
-
The 7-combo can also be combined with a vertical...
-
... or horizontal second match to make a 10 combo.
-
The 6 combo paired with a 4 combo works similarly.
-
The 6 combo paired with a vertical 5 combo makes an unusual 11 combo.
-
L-shaped or t-shaped combos also work with the 6 combo.
-
Using a 7 combo with a 4 combo can also work.
-
Two 6 combos together are, of course, a 12 combo.
-
A 7 combo and a vertical 5 is another way.
-

This is the highest you can make with the regular t- or l-shaped combo.
-

Putting the 7 and 6 combos together is how you might get a 13 combo.
-

The ultimate simple combo - 14 made with two 7 combos!


Panel drop combos[edit]
These combos are caused by either dropping the final piece into the combo, or by removing a panel that then causes others to fall and make a combo.
-
Drop one of the middle panels in to make a horizontal 4 combo.
-
Remove a block in the middle as another way to make a vertical 4 combo.
-
Dropping the center of a horizontal 5 combo in is also easy.
-
The t-shaped combo can be vertical if you drop the cross panel in last.
-
You can drop one in to make a t-shaped combo with 4 horizontally as well.
-

Removing a block can also cause multiple matches to be formed at once.
-
The 7 combo can also be made with 5 horizontal panels if you drop the middle one in at the end.
-
While not frequently found, removing a block can potentially create very large combos.


Other combos[edit]


Another way to get a combo, and one which often happens accidentally, is by matching multiple vertical sets when the next row gets added to the bottom of the screen. If you want, you can purposely cause these to occur. As you start to see the next row, change the panels around so that additional matches will be made.


A similar method is by using Garbage blocks. As your garbage blocks are changing into panels, the bottom ones change first, and so you can use the time it takes for higher blocks to change to organize your panels underneath so that when the converted garbage blocks finally fall, multiple matches are made.
You can also sometimes make combos within a chain.
-
Creating a horizontal 4 combo is easy with a chain.
-
You can also line up multiple matches.
-
If you are either good at planning, or just really lucky, you can make lots and lots of matches within your chain.


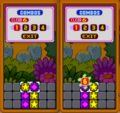
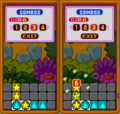
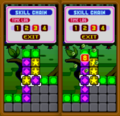
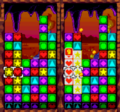
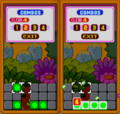
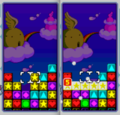
In creating a skill chain, you can create unusually large combos with even just one set of blocks, such as the pictured 8 and 9 combos. Even larger are possible, though frequently take a lot of setup time.
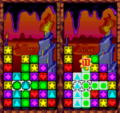
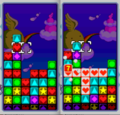
Finding combo opportunities[edit]
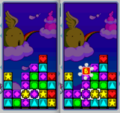
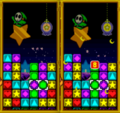
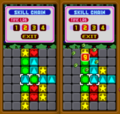
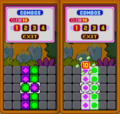
Now that you know the different types of combos, how do you go about finding them? These images will walk through the process where some matches are improved to become better combos.


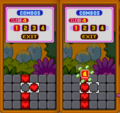
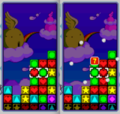
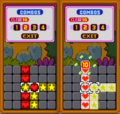
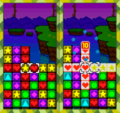
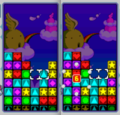
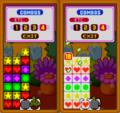
In the first image, switching where the cursor is could make a match. But look at the rows above and below: there’s an additional green block close by in both rows! Switch those over first, and then you can switch for the 5 combo. In the next image, the purples create an interesting array where 3 and 4 are obvious, but a few switches makes the 5 possible. The main thing to remember when going for these simple vertical 5 combos is that the middle panel will be the last one to switch.


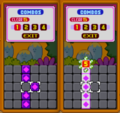
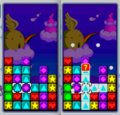
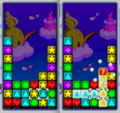
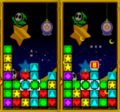
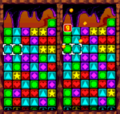
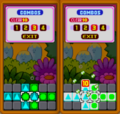
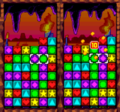
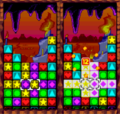
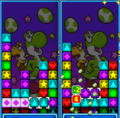
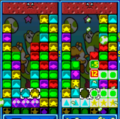
In this next image, there are a number of greens and yellows together in the bottom right corner. Instead of creating the green match and then the yellow, move a yellow panel over so that you create both matches together. With the next image, the blues and reds in the bottom left could happen together if the middle red panel was where the yellow panel is amongst the blue, but be careful! If you just tried to move it over, you would form the red match before you got there. Instead, move one of the other reds out of the way temporarily so that you can move the middle red to the correct location, then continue. And, now that the next row has appeared, you might as well move the bottom blue into place to increase the 6 to a 7.


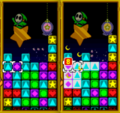
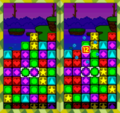
If you find 3 panels of the same color in the same horizontal row, there is often a good opportunity for an l- or t-shaped combo. Check the rows above and below for additional panels you can line up. If your stack can handle it, you may even raise it a few rows if that might give you additional panels to add to the combo.


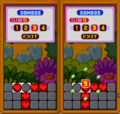
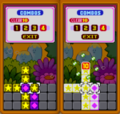
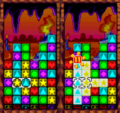
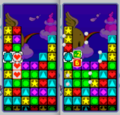
Next, all that would need to be done is slide the purple panel over to make the horizontal match. But there are a lot of green as well, so instead, slide a couple of those over to let those match at the same time. In the next image, there are a number of reds, so you can start to organize those into a combo. But look a little left and right... there are plenty of yellow panels as well. Line them up, keeping in mind the center panels will switch last, and there’s enough to create a 10 combo!


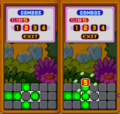
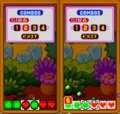
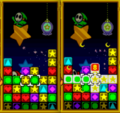
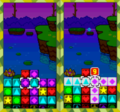
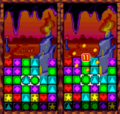
Sometimes filling a gap with a panel is useful to help create a combo. Here, you could just drop the red panel down to make the match, but there’s another already in the row on the right. There’s a gap, however, so switch one of the other panels over first to fill the gap. Now you can slide the fourth red over, and get ready to drop the upper red panel in for the combo. In this final image, the blues are about to become an l-shaped 5 combo. Doing so would put two green panels right on top of each other, so let’s see if that can be increased. The greens in the next two rows up are difficult to get over there without messing up the blues, but look even higher up, and there are a couple greens that can easily be dropped down. Add one green panel to the bottom as well, and we’ve increased the combo to a 10.