Upper Levels[edit]
Upon entering the Ancient Shrine, walk forward and talk to the skeleton, who says that four statues must be talked to in the Shrine in order to progress. On the landing above him is a save tile, ignore it for the time being. Go back down and then right across the sandy area, stepping on the switch, the door will then lock and five Sand Worms will appear, use the Earth Scroll to kill them. Go back and use the save tile to restore Mana, then go through the lower left door.
First Statue[edit]
In this room are three spiked balls on chains that try to hit Alundra, as well as three levers. If Alundra keeps moving and uses the Iron Flail or Bombs to hit the levers, he will suffer no damage as the spiked balls with harmlessly travel past him, exit through the right and go up the stairs.
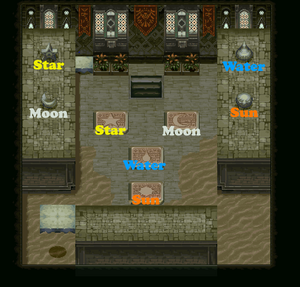
The puzzle in the next room will be a common staple of this dungeon, there are four stones, two on each side of the room, carved in the shapes of a star, a sun, a moon and a water drop. These have to be placed on the corresponding tiles on the floor in order to complete the puzzle. For this room, kill the enemies with either Bombs or 10 hits with the Iron Flail and then use the tile on the left to climb up, once up there, throw the two stones down, making sure they don't land on their respective tiles. Jump down and throw the stones in such a way that they form steps to the area on the right, throw down these stones, then put the stones on their respective tiles, as shown in the diagram on the right.
After doing this, the tile at the bottom left will begin to move and a statue will appear at the bottom of the room. Get back up to the top left area, ride the moving tile at the bottom left to reach the statue, and then talk to it, it will speak and then heal Alundra. Exit through the stairs at the top of the room.
Second Statue[edit]
If you wish to pick up some Herbs, go through the leftmost and rightmost doors. For the leftmost room, use the stone patch near the pillar to jump onto the raised stone area and then jump over to the chest which contains Herbs. For the rightmost room, use the stone patch to jump onto the stone ledge and walk around, getting towards the bottom right area of the room, go through the door there, at the bottom left of that room is a chest with Herbs inside.
After that, go back to the balcony with the save tile and head through either of the doors. There is another stone and tile puzzle to solve, after doing so, exit through the now open door on the left. In this next room, stepping on a tile with an open eye causes both the top and bottom doors to shut, forcing Alundra to leave through the right door to reset the room. For now, exit through the top door.
In this room is another stone and tile puzzle, the two things to keep in mind for this room is that Alundra should use one of the stones on the ground level to get the two stones on the high levels and that the Sun Stone is hidden behind the bottom right plinth. Also, try to place the stones so that at least one of them allows easy access to the middle plinth. After solving the puzzle, jump up to the middle plinth and talk to the statue, exiting through the bottom door.
Third Statue[edit]
Back in the eye tile room go as near to the bottom-right of the room as possible, picking up the barrel there. At this point go back around the room, going to the tile three down and one right from the lower firespitter. Place the barrel on the open eye tile and use it to jump over to the other closed eye tile. Exit through the door.
Head up all the steps and go through the left most door. In this room, use the Sand Cape to get under the gap just in front of the door. If you wish to get the herbs, go through the left opening, jump onto the stone ledges to get to the chest on the right, then open it. After that, go up the stairs at the top right.
In the next room, use the Sand Cape to dodge all the enemies and get to the upper middle part of the room. Pick up the rock and throw it into the middle-left chamber, where the stone patch is. Use the Sand Cape to get there and then use the rock as a stepping stone to get onto the ledge, then the stairs into the next room.
In the next room, kill all the Sand Worms and a barrel will drop into the room. The lever in this room causes the gate to open for roughly seven seconds. This means that Alundra must place the barrel so it settles in between the stone floor and the ledge, jump up to the ledge using the barrel and throw a bomb so it hits the lever. After this, place the barrel so it is between the stone floor and the steps to the gate in the North, use it a stepping stone once again and exit the room.
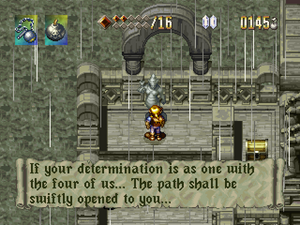
Exit through the next room and ride the tile down, the chest next to Alundra contains a Gilded Falcon, after that, talk to the third statue.
Fourth Statue[edit]
After talking to the statue, jump down and then head up the staircases once again, but this time, go through the right door. In this room dodge the enemies and exit through the top door.
This room contains three Sand Worms, two barrels and some quicksand that leads to the previous room. There are two solutions for this room, the first is to kill the Sand Worms and place the two barrels just above the quicksand, one slightly on top of the other, and then jump over the quicksand and exit. The other solution just involves hugging the lower wall and just exiting through the door.
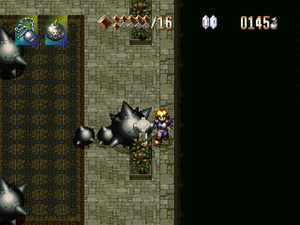
Head South and jump down one level, going through the door straight above Alundra once he lands. Go up the steps, dodging or killing the enemies and walk through the hole in the wall. Pick up the two pots just below the rock, let it roll down, and then exit through the Southern door. Back outside the shrine, follow the path and go through the Southern door.
In this room are three homing ball and chains and a pushable pillar at the North of the room, as well as two pressure switches to the South. The pillar must be pushed so that it is on one of these switches. It is recommended to go for the right one purely because only one of the balls can reach that far. Push the pillar as far right as possible, but far enough from the wall so that Alundra is able to still push it left. At this point, get as far to the right of the pillar as possible while still being able to push it down. If done correctly, the spiked ball should miss Alundra, after getting safely past it, push the pillar on the switch and step on the other one, before exiting through the North door.
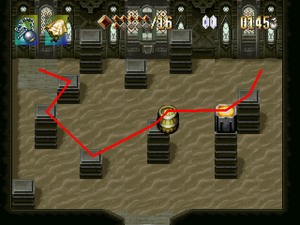
In this room, kill the three bees and a barrel will fall down into the room, pick it up and place it on the right side of the pillar just to the left of the switch. At this point, use the pillars as stepping stones to reach the pillar with the barrel on. Use the barrel to reach the switch and jump on the tile that drops down.
In the next room, hit the lever and two barrels and two spiked balls will fall down, one into each of the holes. While this is entirely random, there are a couple of rules and trends:
- After five 'rounds', only spiked balls will drop.
- The barrels and spiked balls will always drop in positions that are not opposite each other, hence the barrels for one round will never drop in the North and South holes or the East and West ones.
The only advice that can be offered is to either abuse savestates of bring enough herbs to deal with the inevitable damage that will be taken through the spiked balls.
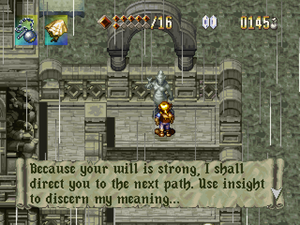
The good news is that only two barrels are needed to reach the elevator from the stone patch on the bottom left.
The next room is another stone and tile puzzle, but it is timed. If Alundra does not finish within the time limit, all non set stones will explode. This means that the puzzle must be solved quickly. The two non-visible stones are hidden by the bushes in between the two visible stones. After finishing the puzzle, a chest falls down containing a key, go up the stairs and open the locked door in the next room.
After this, take the elevator down and talk to the fourth and final statue. Jump down the steps, go left, climb the ladder and then head through the door. Go down the steps, through the door and head South, ending up just outside the entrance to the main shrine, go back inside, save and restore Health and Magic, and then talk to the skeleton in front of the throne, he will explode, revealing the way to the lower area.
Lower Levels[edit]
In this first room, jump onto the moving tile and throw bombs so that they land next to the levers. Once all four levers have been hit, the block to the right of the room will have lifted up far enough to allow Alundra to get under it, do so. In the next room, step on the switch and equip the Earth Scroll, using it to instantly kill the eight Sand Worms that appear. At this point, the gate will open, before going through it, head back two room and use the save tile to restore magic, and then carry on.
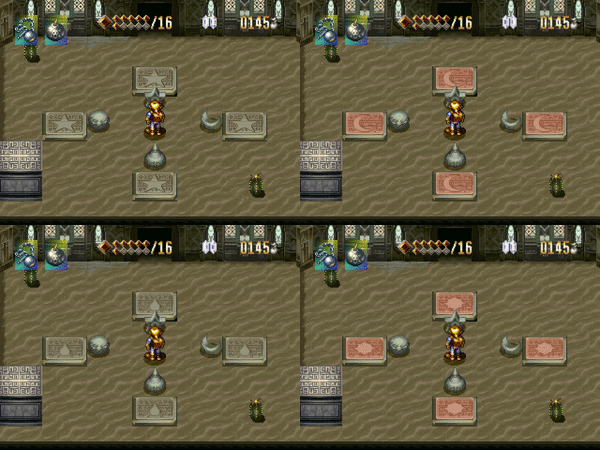
The next room has two Mummy Guardians and a stone and tile puzzle. Kill the two enemies and proceed to complete the puzzle. This one is similar to the ones before, but with an added feature. The tiles cycle through the order Star, Moon, Water, Sun and Star once again. If Alundra throws the stone onto the tile when it is the wrong tile, they all freeze on that position, causing Alundra to have to return to the previous room and reset the puzzle. The only thing to keep in mind when doing the puzzle is to throw the block when the tile is on the symbol before the required one. Completing the puzzle will remove the stone block, allowing Alundra to leave the room.
In the next room, kill the four Mummy Guardians, using the Flail to kill the one on the high level to the left. After doing so, four stones will drop, but with only one tile, which is blank. Read the sign to discover what to do, it says: "The great sun's gaze is held fast by his shimmering reflection on the water. Turning away with regret, he casts a glance upward at the starry sky where brother moon resides." At this point, place the stones on the tile in this order: Water, Sun, Moon, Star. Place them in such a way that the next stone is on top of the previous one, after doing so, the door will open, go through it.
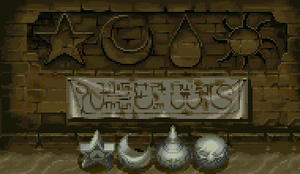
In the next room, jump down the right hole, there is another flashing tile puzzle. Take note of the two murals. The topmost one shows the symbols Star, Moon, Water and Sun, while the lower one shows the word S·W·E·N. This means that the Star must be placed on the Southern tile, the Moon on the Western one, the Water Drop on the Eastern one and the Sun on the Northern one. If Alundra makes a mistake or completes the puzzle, exit through the warp tile at the South of the room. At this point, jump down the left hole, which features the same murals, with the only difference being the letters being N·E·W·S, do the same as the previous puzzle but with the Star being placed on the Northern tile, the Moon on the Eastern one, the Water Drop on the Western one and the Sun on the Southern one. After doing this, take the warp tile back to the upper level.
Jump down to the middle of the room and face the Shrine Guardian, after defeating him, the door at the bottom left will open, go through it. The next room features another room with a switch, four pressure pads and four holes, however, Alundra must get two barrels in six tries, and only one barrel falls per go, due to the randomness of this, only the same advice can be offered as before, abuse savestates and bring Herbs to deal with the damage taken. Once the second barrel has been taken, place them so they cover the two left or right pads, and then walk quickly between the other two, they will both eventually trigger and Alundra can exit through the right door.
This room features a narrow passsageway with several holes, they lead to a room below with several Mummy Guardians, in order to leave that room, go up the stairs at the Northwest of the room. for the upstairs room, Alundra must go through the maze, which is almost entirely linear, jumping on switches and getting under the blocks that raise upwards before they fall back down, eventually he will reach the bottom right corner of the room, which is blocked by a last switch, go under there and proceed to the final room.
In this room, talk to the man in front of the throne, who will force Alundra to undergo a Test of Strength. After the fight, talk to the skeleton and open the three chests. They contain a Sword, which is an upgrade of the Dagger, Long Boots, which allow Alundra to treat sand and shallow water like normal terrain and a Life Vessel. Go right and take the warp tile out of the Shrine, Alundra will end up in the Desert of Despair, on the raised plinth where the tornadoes appear.
With the Long Boots, Alundra has total freedom in the Desert, go North one screen and begin to climb up the cliffs, hanging to the right side of the screen, past the halfway point is a chest containing 30 Gilder. From there, use the pillars to jump to the left and jump up those cliffs, at the top is a chest containing a Gilded Falcon. From there, head back South one screen and go to the West of the next room, use the Sand Cape to go under the hole and exit from the West. On the next screen, go North and open the chest, which contains another Gilded Falcon.
At this point, go back South, cross the bridge, exit the next screen via the South and then go East, heading through the Warp Gate in order to activate it. Leave the Warp Gate and go further South, towards the Swamp, go to the swamp and jump on the middle platform, which has another chest containing a Gilded Falcon, to the Northwest of there are two ledges, at the top of the second is a chest containing 30 Gilder. After getting the chest, exit through the Southwest exit, opening the chest which contains a Life Vessel, leave that screen and go through the exit just above it, which has another chest containing a Gilded Falcon.
Exit the screen from the Northwest exit and go West another screen, from there head South towards Nava's Hut, jump down onto the beach and begin to head East, the chest above the rock contains a Strength Tonic, at the East of the screen is the Coastal Cave.