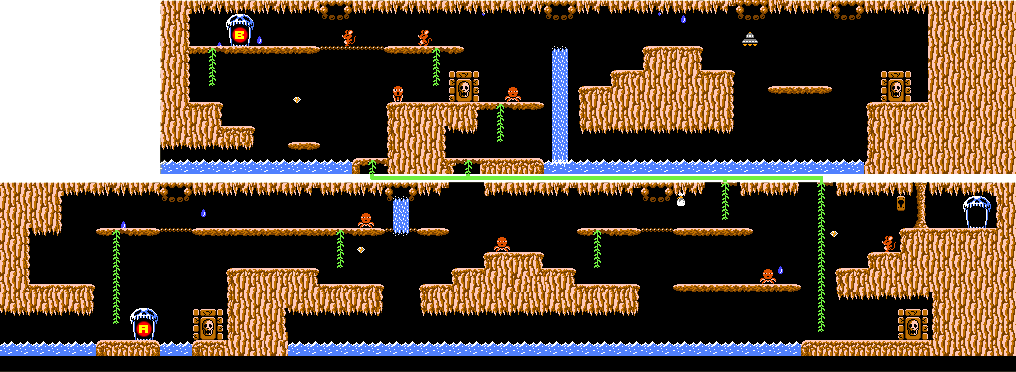
You've arrived at the last stage before you reach One-Eyed Willie's ship. Water abounds here, in the form of drops and gushing waterfalls. It's important to keep your cool here and not feel pressured into making mistakes. Maintain a good search strategy and find the fifth Goonie Mikey!
Maps[edit]
Part A[edit]
Part B[edit]
Part C[edit]
Walkthrough[edit]
By now, the stage setup should be fairly familiar. One large region with two separated back regions. Your starting point will differ depending on how you got here. If you came from Passage B, you'll begin in the middle of the lower portion of part A. If you took the warped here from Stage 3, you'll fall in from the right side of the top portion of part A.
Assuming you came from the passage, start by heading left to skull mouth A. When you reach it, take a moment to open the skull door to the right before passing through to part C, a very dangerous place. To start out, you must jump over two puddles to your right. But the ceiling is very low and it will prevent you from jumping high. So you must jump from the very edge of the left side in order to clear the water, or you will lose a life. Once you make it safely past the two jumps, the hard part is over. Climb up the vine and open the door at the top. Then make your way all the way across to the left to find another door. Once you've opened both, head back to skull mouth A and return to part A.
Once you're back in part A, travel far to the right and ignore the vines that take you to the top section. You'll find a skull door below the stage lock. After you open it, climb up to the top portion of part A with the nearby vine. Continue to climb up the next vine and open the door to your left. Then make your way far to the right to find another skull door. Return all the way to the left and approach skull mouth B. Pass through it to reach part B.
Part B is similar in many respects to part C, only you aren't forced to make the difficult jumps on the bottom if you don't want to. From the skull mouth, head right until you reach one skull door. Then proceed all the way to the right to find a second. Return to the skull mouth and pass back through it to part A. In order to reach the exit, you must take the vine on the left side of the wall, not the right. Climb down and drop one level to the right. Jump across the gap and past the right vine and you will reach the exit lock.
Items[edit]
- All levels: Fire a slingshot bullet
This stage features an unusual reveal mechanism. It's not enough to press a particular button. You will need a certain item in order to make hidden items appear. Both items bags contain equipment that you had the opportunity to collect earlier, so it's possible that you may not be able to find the bags if you already possess the items they contain.
Raincoat[edit]

If you missed the raincoat the first time around, it can be found to the left of the two vines that lead to the top portion of part A. You've never needed protection from water more than you'll need it in this stage, so be sure to find and collect it.
Armor[edit]

The armor is incredibly useful, and if you happened to warp from Stage 3 to this stage, then you haven't had a chance to collect it yet, so make sure you find it now. It is located very close to the water below skull mouth B in part B of this stage. Then you won't have much to fear.
UFO[edit]

A strange UFO can be made to appear in the top portion of part A, near the right end. If you perform the proper action, it will arrive on the left side of the screen and float to the right. Unlike the Vic Viper from the fourth stage, the UFO is relatively easy to catch for 5000 points. Miss it, and you'll only earn 1000.


