When you begin a new game, you start out by flying through Corridor 0, the entrance to Naju. In the beginning only a few small green asteroids fly past you. Then a series of blue asteroids will form a circle in front of you. When the circle is complete, they will all become red and fly toward you at once. Orange diamond shapes will fly down from the top of the screen and nearly reach the bottom before flying back up. The next enemy to join the fight will be a set of blue orbs that are incredibly difficult (but not impossible) to kill. You lack enough fire power to make a serious dent in the blue orbs, so avoid them. Finally, a set of red jet fighters will travel straight from the top of the bottom.
The best strategy is simply to hold down and fire constantly. Whenever you kill anything, there is a chance that an item capsule will be released. However, in order to capture what it contains, you must be able to shoot at it long enough to make it open, and then fly over the contents. When you are traveling very fast (fast enough to have a single large burst of fire coming from your engines, as opposed to two small afterburners) you may find it very difficult to stay in front of the capsule long enough to open it. Do your best to preserve your health until things slow down so that you can collect energy restoring items.
After your speed slows down, you will be presented with four pairs of gun turrets that appear on either side of a central alley. The turrets are protected by hatches that open and close, and they can only be damaged when the hatch is open and the turret is exposed. Each turret fires a slow small bullet that you can destroy with your own gun fire. Sometimes, destroyed bullets will create item capsules. When you're past the four turret pairs, you will reach the corridor boss: Naju's defense grid, a massive array of small and large turrets, whose hatches open and close. The small turrets are destroyed quickly by your gun fire, but the large turrets take a substantial amount of damage to destroy. All the while, every exposed turret will be firing bullets at you.
Throughout the fight, your own gun fire must be able to fire past the bullets that are being shot at you. They will occasionally create items, some of which will appear right on top of the turrets, both functioning and destroyed. Capsules that land on active turrets become concealed by the animating graphics, but they are still present. Be careful when attempting to collect the items contained in the capsules. There's also a good chance that your score will extend beyond 30,000 while fighting this boss. This initiates the first automatic health increase, extending your energy meter from 8 to 9, and restoring all damage in the process. When the last turret is destroyed, the corridor is complete and you will enter the main area of Naju.
You begin in the very center of the Naju labyrinth, in what is referred to as Area 0. Every other area can be accessed through Area 0, but you must first obtain the correct keys to access them. Your ultimate goal is to reach Corridor 1 and obtain the key that leads to Area 1, but first you should do a little exploring in order to power up the Guardian. In this first room, you can read the message left by an unknown author, who describes the fate that befell his home "star" (planet more likely) Naju, when evil races invaded it in an attempt to take it over. This person tried to initiate the self-destruct sequence and left the message for anyone who happens to find it in case he failed. From here, shoot the left door until it opens, and head through it. Destroy the enemy creatures that you encounter and travel west until you reach room X8 Y12 which contains a set of yellow pyramid blocks arranged in a giant W (for west), and travel north one screen. (Optionally, you may wish to visit one screen to the east first before traveling west, and collect the Rapid Fire item from X12 Y12.)
X8 Y11
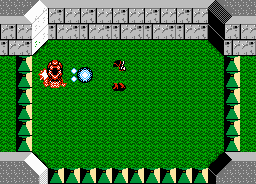
This room is patrolled by four four-legged robotic machines, two red and two blue. The blue ones travel slower than the red ones. Destroy them, and then open the item capsule in the middle of the room to discover the first Red Lander. Collect it to increase your chip maximum from 50 to 100, and to gain the ability to fire the small spread of three bullets per shot. Then travel north two screens.
X8 Y9
Five orange bats occupy this room. They each start in one of the upper corners, and fly into the center before traveling back to the lower portion of their original side. These bats take a lot of shots to defeat, so stand off to one side of the room and fire at them from a safe location. The item capsule in the middle contains the Multi-Bullet weapon. Collect it and press if you wish to activate it for the button weapon. Now travel east for six screens, passing the large N for North, but do not attempt to destroy the black oscillating orbs in one room along the way.
X14 Y9
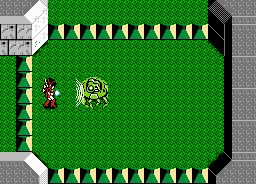
When you arrive in this room, sirens will go off, indicating that if you remain here, you will be trapped in the room with a mini-boss. The mini-boss in this case is a creature that appears somewhere in the room, raises its head, and then sinks back down leaving a weaker enemy in it's place, before reappearing somewhere else in the room. This boss is simple enough to defeat, wait for it to appear, and then let it have it with the full blast of your regular gun as well as the Multi-Bullet weapon. After a few appearances, this boss should sustain enough damage to be defeated. At that time, an item capsule will appear in the middle of the room. Shoot it to reveal a Blue Lander inside. Since you should be well over 30,000 points, this lander should increase your health meter to 10 units. After you collect it, yellow pyramid exits will appear along each wall. Blow up the bottom exit, and travel south three screens to the large E (for East). Then head west two screens.
X12 Y12
When you arrive in this room, destroy the slow roaming creatures that patrol the room here. Then shoot at the item capsule in the middle of the room to reveal a rapid-fire power up. This item will increase the rate at which your gun fires. From here, make sure that you have a full 100 capsules. Open the door above and you can read a message indicating that the large Blue Landers in the rooms beyond will sell you items in exchange for chips. You should first visit the lander one screen north and one screen east of here.
X13 Y10
In this room, a large Blue Lander will sell you the Area Blaster weapon in exchange for 100 power chips. Make the exchange, and your supply of chips will be drained. Your next goal is to purchase the wave weapon from the room below, but before you do this, you'll have to restock your chips. The best way to do this is to return to the room where you obtained the rapid-fire tile, head east one screen, and south one screen.
X13 Y13
You will find an incredibly large collection of item capsules, all of which contain blue chips, in addition to a few exposed blue chips in the shape of a large P. This is a good room to remember if you are ever in need of a quick chip (or energy) refill. However, be warned: you can only collect chips from this room once between corridor visits. The room will reset once you visit a corridor, but until then, you will find nothing but a large collection of worthless yellow pyramids whenever you return to this room.
X13 Y11
The large Blue Lander that occupies this room will sell you the Wave Attack weapon in exchange for 50 power chips. Purchase the weapon, and exit the shopping area. Note that there are more weapons available for sale, but you won't be able to purchase any of them until you obtain more Red Landers. Return to the start screen by traveling one screen west from rapid-fire tile room, and then exit through the bottom door. Travel two screens south to the large "S", and then walk two screens to the west, once again ignoring the black orbs that occupy one screen.
X9 Y14
Take out the bouncing orange creatures that appear in this room. Then shoot the item capsule to collect the weapon it contains. This is the Saber Laser weapon, which produces a beam of energy in front of the Guardian like a sword. With this weapon collected, travel west one screen, and north one screen.
X8 Y13
Once again, you will hear the warning sirens of an upcoming mini-boss battle when you enter this room. If you stick around, walls will form around the edges, cutting off any escape. A large green domed machine on legs will appear. It will follow you throughout the room, at a rather slow pace. To defeat it, get as far away from it as you can and shoot at it with your regular gun and a special weapon like the Wave Attack. If it gets close enough to harm you, simply walk back across to the opposite side of the room, turn around to face it, and continue your assault until it is defeated. When it is, an item capsule will appear in the center of the room. This time, it will contain the Bullet Shield. Collect it and shoot the yellow pyramid that appears above you. Head north three screens (above the room where you received the Red Lander) and go west one more screen.
X7 Y10
Shoot through the yellow pyramids that surround the door on the left side of the room, and then shoot the door open and pass through it.
X6 Y10
You have found the entrance to Corridor 1. However, the gate will not simply open just because you have arrived. For corridors 1 through 10, you must know the trick to opening them. If you visit the message room at X9 Y13, you will learn that in order to open the gate, you must fire at it until it opens. Once it opens, step over the gate to initiate your transformation sequence into a space craft, and take on the corridor. If you successfully beat the boss at the end, not only will you receive the key that opens the door above to Area 1, but you will also earn the Repeller weapon as a prize upon your return to the labyrinth.
This corridor possesses a clear underwater aquatic theme. The first enemy that you encounter in this corridor are thin green fish who travel down the left and right sides of the screen. Once they are low enough to be at the same level as you, they begin to swim across, before swimming back up to the top. Focus on attacking the fish which appear on one particular side, and dodge the fish from the opposite side as they cross (or use the Multi-Bullet weapon to attack them from the side.) Eventually a stationary creature will begin appearing in the middle, and it will fire bullets at you as it passes by. After a few of those creatures go by, a manta ray will fly down the left side of the screen. When it reaches the bottom, it glides back up to the top and then very quickly down to the bottom again. Seahorses appear shortly after that. They behave similarly to the green fish, only they travel across the screen until they line up with you, and then quickly jet up or down. While the sea horses attack, a large stationary plant that fires bubbles all around it will appear.
You'll be attacked by a combination of seahorses and fish until only fish appear. A set of three bubble-firing plants will appear at one point. When the seahorses begin to appear again, they are joined by a new enemy, a red orb that appears from the bottom of the "sea bed" and digs a trench upward along the floor. It fires tiny squids that act like homing missiles at you, which are easily shot down. Destroy the orb while avoiding the seahorse attacks. The fish will return, along with another red orb on the right side of the screen. Four manta-rays will attack, alternating which side they appear from, before you encounter another red orb down the middle of the screen. More fish will appear, along with a pair of bubble-firing plants. Then the enemies will stop appearing, and the warning sirens will indicate the presence of the corridor boss.
The boss of corridor 1 is a gigantic fish known as a Fleepa. This Fleepa is blue, and it starts out at the top of the screen. It swims down to the bottom of the screen in an attempt to bite the Guardian, before swimming back up to the top of the screen. As soon as it hits the top, it immediately dives back down for it's next attack. As it opens and closes its mouth, more of the tiny squid that behave like homing missiles are released. You must shoot at the Fleepa long enough to destroy it, but you don't want to stand still and have bites taken out of you whenever it reaches the bottom of the screen. Shoot at it long enough until you have no choice but to move out of the way. Fly to the left or the right, wherever there is more room to maneuver, and quickly get back underneath it as soon as it retreats enough. Combine your regular weapon with a special weapon like the Multi-Bullet or the Wave Attack to increase your destructive power.
Every now and then, a destroyed squid may turn into an item capsule. However, if the Fleepa is near the capsule, it can be difficult to get a clear shot at it long enough to open it. If you notice an item capsule rising to the top of the screen, lure the Fleepa away from it for a while so that you can get a clean shot at it and collect the contents. When Fleepa is finally destroyed, you will earn the key that will open up the first two areas of the game. You will also earn a special weapon when you return to the labyrinth, the Repeller. When you arrive, shoot the door above you and use your new acquired key to access Area 1.


 if you wish to activate it for the
  button weapon. Now travel east for six screens, passing the large N for North, but do not attempt to destroy the black oscillating orbs in one room along the way.