After collecting the Red Lander in Area 1, you can now afford the third weapon from the cluster of three shops to the east of the starting point. Head to this location to buy an upgrade for the Back Fire gun that you also picked up in Area 1. It's not the most useful weapon in your arsenal, but it has its moments, and the boost in power will certainly help. After you purchase the weapon, make your way back to the entrance to Area 2.
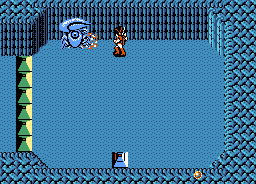
The first room that you arrive in this area is conveniently a Blue Lander who can record your progress. Whether you wish to receive a password or not, this Lander will ensure that you return to this room if you have to die before visiting any other Blue Lander in the labyrinth.
X5 Y15
In addition to the slow wandering creatures that you've seen before, this room introduces a new interesting enemy. The small and fast creatures which dart around the room and track your location may be a pain and a little tough to defeat, but they almost always leave a useful item capsule behind. This makes them a great target for repeat fighting if you are low on health or chips and you are looking for a refill. Continue following the path north and around.
X4 Y15
This is the entrance to Corridor 12. It opens automatically. Hop into the corridor and defeat the boss at the end to receive the Hyper Laser, a weapon which you can only use inside of corridors. Then continue on to the rest of the area through the bottom door.
This corridor won't feature many surprises, but it does move along at a fast clip, making it somewhat difficult to collect item capsules that appear from defeated enemies. It starts out with blue fish, who are quickly joined by bullet firing stalks and manta rays. You can destroy a majority of what appears by remaining on the left side of the screen. Then you will fly through a long, sparse area, devoid of enemy creatures.
The enemies will resume when a cliff wall appears on the left side of the sea bed. Fish and stalks will appear with great frequency for the next few seconds. Fish will continue to appear long after the stalks stop. They are eventually joined by a red orb trench digger. Shoot at it to destroy the small squid it fires at you and to defeat it. When the second red orb appears, the fish will be replaced by manta rays, who continue to appear through the third red orb's appearance. One final set of fish will attack before the boss approaches.
The boss of this corridor is a large Fleepa, just like the one you encountered at the end of Corridor 1. However, this one is red and quite a bit stronger. It takes more hits to defeat, and it releases four squids with every opening of its mouth instead of two. This actually works in your favor to some degree, since it increases the chances that a destroyed squid will create an item capsule. Your strategy for defeating the Fleepa should be the same. Time your movements to position yourself under the Fleepa for as long as possible before you risk taking damage from the collision. Get out of its way and return to your position when it begins to back off. You'll have a few more special weapon options at your disposal this time. Try the Fireball or Repeller as alternatives to the Wave Attack and Multi-Bullet.
After collecting the Hyper Laser, continue south through the bottom door. Ignore the orbs that greet you on the other side, and walk south one screen. Ignore the arrow's suggestion to travel west, and head east instead.
X5 Y17
This is the home of the first boss of Area 2. It's another crab, and the strategy to use against it is the same as before. Lure it to the top of the screen where a majority of its bubbles will disappear harmlessly, and pelt it with firepower. Your reward for defeating it will in fact be improved fire power. You will receive your first offense upgrade. Collect the gun tile to improve the amount of damage your attacks inflict on enemies. When you're finish, shoot the door below and enter the message room to receive a hint about how to open gate 2. Then return to the room with the left arrow and proceed down the hallway.
X2 Y17
Defeat the roaming red creatures and the small yellow slimes in the room, and shoot the item capsule in the center. You will find the next rapid-fire upgrade. In addition to the offense upgrade from the mini-boss, you will find it far easier to defeat a lot of enemies for the time being. Continue heading west.
X1 Y17
There's nothing special about this room, but it contains a door to the south. Beyond this door is a Blue Lander who has three different items to sell for 150 chips, but he will only sell you one of those items. The choice is between another rapid-fire upgrade, a heart, and a Multi-Bullet weapon. The rapid-fire is the obvious choice here. Under no circumstances should you buy the Heart since that is a very common item. There are 2 Multi-Bullet upgrades in Area 4 to Max it out and won't provide much use compared to your other weapons. When you're done shopping, continue west by taking the lower path below the red barrier.
X0 Y15
When you reach this portion of the barrier wall, opt to follow the northern path instead of following the barrier east.
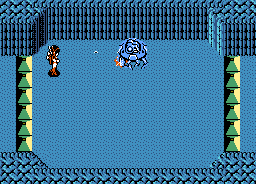
X1 Y14
The second mini-boss awaits you here. It is another blue version of the domed boss that follows you around relentlessly. However, this one isn't quite as fast as the speedy dome you faced in Area 1. Instead, this one returns to the speed of the original dome, but it fires at you more frequently. You can choose between either strategy of facing it and pelting it with attacks until it gets too close, or using the Back Sider weapon and attacking it as it follows you around the room. Either way, when you defeat it, shoot the item capsule in the middle of the room to reveal a Red Lander. This should be your third, and will increase your maximum chip capacity to 200. At 200 chips, you will gain the ability to fire a triple bullet that is more spread out than before. Of course, once your chips sink below 200, you will revert back to the closer triple shot, so keep your chips high if you wish to retain this wider shot. Exit through the right yellow pyramid and follow the path east.
X3 Y14
This room is occupied by the oscilating black orbs that travel left and right or up and down. In the center of the room is an item capsule that contains a Blue Lander. Provided your score is above 100,000, this lander should increase your health meter from 11 to 12. While your firepower is improving, it will still take such a substantial amount of effort to destroy these orbs that you're better off ignoring them. Follow the path south, and back around to the west, on your way to Corridor 2.
X2 Y15
Destroy the bouncing balls that occupy this room, and open the door to the south. Enter through the door to reach the entrance to Corridor 2.
X2 Y16
If you visited the clue room below the first mini-boss, you would have received a hint which told you to "touch everything" to open the gate. By "everything" they mean the red squares that surround the gate. Each time you step on one, they explode. When all four are destroyed, the gate will open. When you complete the corridor, you will receive the Saber Laser, which will be the first second level upgrade to a special weapon that you didn't have to purchase.
When you arrive in this corridor, you will be immediately attacked by fish. This is very quickly followed up with attacks from appearing seahorses, along with quads of bullet firing stalks. A weapon like the Repeller can help you defeat all of the stalks if you fire it at the correct location. Just as the bubble launching plants appear a new enemy will flash on the top of the screen. These green snake-like lampreys wiggle back and forth as they slowly descend down the screen, firing bullets as they go. They are fairly easy to defeat and should be disposed of quickly.
Lobsters, fish and plants will appear for a while. After they stop, starfish will fly in from the upper corners. Then the level empties out a bit, with the occasional stalk appearing from time to time. Seahorses begin to fill in the slack, and soon enough starfish join in the assault. Starfish appear alone for a short period, before fish and plants take over. Pairs of plants appear at increasing distances until the stage slows down and the boss approaches.
The boss of this corridor appear to be a very large crayfish, and is known appropriately as Crawdaddy. It attacks by sending a near constant stream of detachable claws in your direction. The claws are very easy to destroy and don't pose a very big threat. The boss will bob up and down, in addition to tracking you horizontally. The more you move horizontally, the more it moves. A simple way to defeat him is to stay directly below him and fire your guns and fireball at him rapidly. The slow fireball will destroy its projectiles and powerups will drop from it rather frequently. Alternatively, the Wave Attack should do a good job of clearing away the stray claws. If you arrived with full or near-full health, you shouldn't even have to worry about getting close to dying before the boss is defeated.
For your success, you will earn the key that opens Area 3. You will return to Area 2, and earn the Saber Laser which, as stated above, is probably your first special weapon level upgrade. The Saber Laser should now appear green in your subscreen, and it will do increased damage, but at the expense of more chips per time used. Exit from Area 2 and make your way to the entrance of Area 3, which can be found at X8 Y14 in Area 0.