Many bosses are recurring in the game. Here they are sorted by first appearance in the first quest.
Note: HP is based on weapon damage. Those marked with a "*" requires special methods to defeat it.
| Image |
Name |
HP |
Damage |
Description
|
|
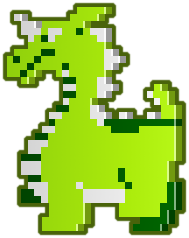
Aquamentus
|
6
|
2 / 1
|
1st Quest: 1 (Boss), 7 (Boss).
2nd Quest: 1 (Boss), 4, 8.
A dragon that shoots fireballs that split in three directions and can only be blocked by the Magical Shield  . Vulnerable to the Sword and Arrows. Can also be killed by two Bombs . Vulnerable to the Sword and Arrows. Can also be killed by two Bombs  . Aquamentus is the boss of dungeons one and seven of the first quest, but only of dungeon one in the second quest. . Aquamentus is the boss of dungeons one and seven of the first quest, but only of dungeon one in the second quest.
|

|
Dodongo
|
1*
|
2
|
1st Quest: 2 (Boss), 5, 7.
2nd Quest: 1, 3 (Boss), 4, 8 (Boss).
Slow-moving rhinoceros boss. Often appearing in groups, they are only vulnerable to Bombs . An effective tactic is for Link to place the bomb directly in front of Dodongo's mouth. Each Dodongo will be defeated after eating two Bombs , but you can also stun a Dodongo if you can make a Bomb go off in it's face. If you do, he will be stunned and temporarily vulnerable to an attack from your sword with just 1 strike; if you kill it this way, you are guaranteed bombs. A single Dodongo is the boss of dungeon two in the first quest, and a trio of Dodongos is the boss of dungeons three and eight in the second quest.
|

|
Manhandla
|
16
|
2
|
1st Quest: 3 (Boss), 4, 8.
2nd Quest: 2, 5, 6, 7.
Four-headed plant boss. Moves slowly at first, and then more quickly as it loses arms. While it is vulnerable to the Sword, it is possible for one well-placed Bomb to defeat this boss in a single strike. A less direct hit will at least sever one or more arms. Manhandla is only the boss of dungeon three in the first quest, but he reappears quite frequently as a monster in several other dungeons.
|
|
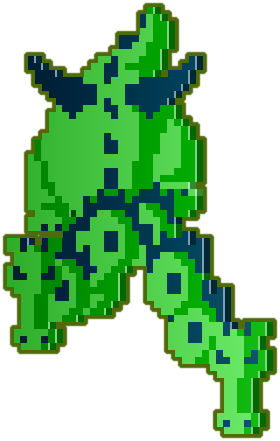
Gleeok
|
10 / 15 / 20
|
2
|
1st Quest: 4 (Boss), 6, 8 (Boss).
2nd Quest: 2 (Boss) 5 (Boss), 6, 7 (Boss).
A recurring underworld boss, Gleeok is a dragon with two, three or four heads. Link must attack each head. When a head takes enough damage it detaches from the body and flies around the room, continuing to attack Link. The flying heads are not vulnerable to attack, so dodge their projectiles and focus on the attached heads. Gleeok is the boss of dungeons four (with two heads) and eight (with four heads) of the first quest, and dungeons two (with two heads), five (with three heads), and seven (with four heads) of the second quest.
|
 
|
Digdogger
|
8*
|
8
|
1st Quest: 5 (Boss), 7.
2nd Quest: 4 (Boss), 8.
Sea urchin boss. Appears as a large yellow circle with an eye in the middle. Blowing the Whistle  will cause Digdogger to split into as many as three smaller parts which can be defeated with the Sword. Digdogger is the boss of dungeon five in the first quest, and dungeon four in the second quest. will cause Digdogger to split into as many as three smaller parts which can be defeated with the Sword. Digdogger is the boss of dungeon five in the first quest, and dungeon four in the second quest.
- In Famicom versions where the second joystick has microphone function, it is possible to shout at the microphone to cause Digdogger to split, just like using the Whistle in other versions.
|
|
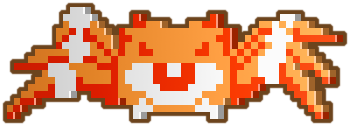
Gohma
|
2* / 6*
|
4 / 2
|
1st Quest: 6 (Boss), 8.
2nd Quest: 5, 6 (Boss), 7.
Crab monster boss. Its large central eye is its only weak spot. He normally keeps the eye closed, but opens it briefly from time to time. That is your chance to attack it with its only vulnerability, the Arrow  . The red Gohma can be defeated with one shot; the blue one takes three. Gohma is the boss of dungeon six in the first quest, as well as dungeon six in the second quest. . The red Gohma can be defeated with one shot; the blue one takes three. Gohma is the boss of dungeon six in the first quest, as well as dungeon six in the second quest.
|

|
Ganon
|
16*
|
8 / 2
|
1st Quest: 9 (Boss).
2nd Quest: 9 (Boss).
The final boss. Capable of becoming invisible and moving around the room. Link must use his judgment and stab at the place where he predicts Ganon will materialize next. After wounding him enough, he will become stunned and visible. Then only a single attack from the special the Silver Arrows  can do him in and allow Link to save the Princess. Without this weapon, Ganon will gain his strength back and continue his assault on Link. The weapon can only be found in the final dungeon, but can Link locate it? Ganon is the boss of the final dungeons, dungeon nine of the first and second quests. can do him in and allow Link to save the Princess. Without this weapon, Ganon will gain his strength back and continue his assault on Link. The weapon can only be found in the final dungeon, but can Link locate it? Ganon is the boss of the final dungeons, dungeon nine of the first and second quests.
|


