Jump to navigation
Jump to search


Objectives[edit]
- Obtain the Whistle.
- Beat a two headed Gleeok.
- Obtain a Heart Container.
- Obtain the second Triforce piece.
Walkthrough[edit]
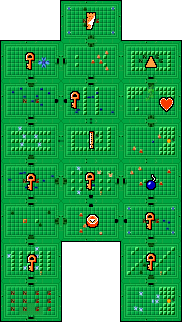
- The entrance to this dungeon can be found where an important shop was once located during the first quest.
- From the entrance, enter the room above and defeat all of the Gibdos to obtain a key. Enter the next room up.
- You can continue up to the next room without fighting, but if you wish to return to the room below, you must defeat the Zols (and Gels if you don't have the White Sword) and push the left block.
- Above the Zol room, defeat the Keeses and obtain a key. Continue on to the next room above.
- Fight the Gibdos and enter the room above. You'll enter a room full of Keeses. Bomb the right wall and go through the passage to obtain a key, and return to the left. Clear the room of Keeses to open the door above, and enter it.
- Defeat the Manhandla to obtain a key. Enter the room on the right.
- Fight the Darknuts carefully, and unlock the door above. Go through the door and avoid the traps while fighting the Zols to obtain the map. Return to the room below with the Darknuts, and enter the bottom door.
- Continue to the bottom of the corridor and push down against the wall. You will pass through the wall and arrive in an unmarked room on the map. Enter the stairwell in the middle of the room to find the Whistle.
In the second quest, the Whistle is more useful for finding secrets in the Overworld than it was in the first quest. However, its warp ability only brings you to the dungeon locations as found in the first quest, making it less useful to reach a specific dungeon.
- Once you have the Whistle, leave the room by pushing against the left wall to pass through an invisible passage. Unlike the top wall, this passage is one way. Enter the room below and unlock the door to the right.
- Defeat the enemies and obtain a key. If desired, you can bomb the bottom wall and go through the passage (thereby skipping the use of a key) and obtain the compass before returning to the room above. Enter the right doorway.
- Fight the Darknuts in this room to obtain a set of four bombs. Travel through the door below and fight the Keeses to obtain a key. Enter the room below and clear the room of all the Zols to obtain another key and open the doors.
- Enter the room below, and fight through the Gibdos to reach the stairwell. Take the stairs to the underground passage which leads you to a room along the upper right side of the dungeon.
- Fight the Darknuts, and unlock the top door to reach the boss of the dungeon.
Boss[edit]
- The boss is a two headed Gleeok. Each head must be stabbed until it starts to fly freely around the room. Once the head is free, it is still a threat, and can not be defeated. The only way to beat Gleeok is to destroy every one of the attached heads.
- Defeat it to earn a Heart Container. Continue on to the room above to obtain the second piece of the Triforce.
Resupply[edit]
- Bombs are one screen south, and medicine is three screens south.
- A fairy pool is one screen southwest.
