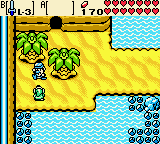
The Maku Tree will tell you that Queen Ambi left her palace, so now is the time to save Nayru.
| Quest items: | Optional items: | Dungeon items: |
Before the next quest[edit]
Now that you have the Mermaid Suit, you can explore the sea bottom around Crescent Island.
During Ambi's age there is a cave in the south-west. Go down to the end and dive in to bypass the blockade and surface on the other side and enter the cave. Talk to the Tokay to receive the L-2 ![]() Iron Shield (in a linked game, if you owned the Iron Shield already, you will get the L-3
Iron Shield (in a linked game, if you owned the Iron Shield already, you will get the L-3 ![]() Mirror Shield instead).
Mirror Shield instead).
During Zelda's age, there is a passage under the north coast of Crescent Island. This is a small maze, so most of the passages are dead-ends. Swim following one wall (e.g. clockwise keeping to the "external" side), and you will eventually reach a cave. Open the chest inside to receive the last ![]() Piece of Heart (last one except if you still have to get one from Gasha trees or Maple).
Piece of Heart (last one except if you still have to get one from Gasha trees or Maple).
Ambi's palace and Zora seas[edit]
Ambi's Palace[edit]
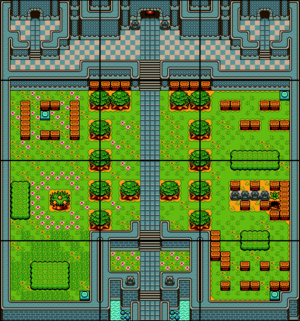
Return to Ambi's age and go to Ambi's Palace. You will meet Ralph again at the palace entrance, and he tells you of a secret path to the palace, since the front door is packed with guards. You need to push four buttons in each corner of the palace garden, but you should hide from the line of sight of the Palace Guards, otherwise they will throw you out of the palace and you have to sneak in again. Once all four buttons are pressed, go east where the four statues moved away to reveal the stairs behind the bush. Go down and dive in the small pond there. Swim through the underwater passage, emerge at the end and go upstairs.
You are now inside the palace. The Guards here won't throw you out, but instead attack you. Move one block away and go west first. After two rooms you can get the ![]() Gold Luck Ring. Go all the way east; if you need healing, then go north to find two Fairies, otherwise just climb upstairs and go through a few rooms. You will meet Veran in the last one.
Gold Luck Ring. Go all the way east; if you need healing, then go north to find two Fairies, otherwise just climb upstairs and go through a few rooms. You will meet Veran in the last one.
Boss: Veran[edit]
This boss needs some preparation. First, equip yourself with Switch Hook and Seed Shooter with Mystery Seeds. Veran is inside Nayru's body, so you cannot attack her directly. You need to shoot her with Mystery Seeds from the Seed Shooter.
Veran will warp around and throw fireballs in all direction. Once you shoot her, then Veran will leave Nayru's body, but you need to drag her away from Nayru, so use Switch Hook on her spirit to move her away from Nayru. After that she will finally take her true form and you can attack her with the sword. Hit her once and she will return into Nayru's Body, so you need to repeat the steps twice to defeat her.
Intermission[edit]
Nayru returns to her sense and Queen Ambi comes in, but Veran takes over her body and calls the Guards. Ralph arrives here, so Nayru brings the three of you to Zelda's age. Nayru teaches you the ![]() Tune of Ages, with which you can travel forth and back in time. The Maku Tree tells that one Essence of Time is inside a Fish.
Tune of Ages, with which you can travel forth and back in time. The Maku Tree tells that one Essence of Time is inside a Fish.
Climb up the Maku Tree to the roof and you can find two ![]() Gasha Seeds there. Do you have a Magic Potion in your inventory? If not, then you can buy one at Syrup's shop for 300 Rupees, swipe one from Maple or get it from a Gasha tree.
Gasha Seeds there. Do you have a Magic Potion in your inventory? If not, then you can buy one at Syrup's shop for 300 Rupees, swipe one from Maple or get it from a Gasha tree.
Using the Tune of Ages, you can now reach two class-4 Gasha spots on Talus Peaks.
Zora Seas[edit]
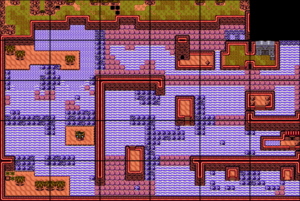
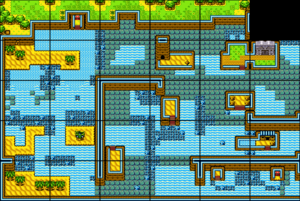
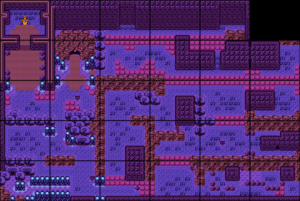
Earlier on, on Talus Peaks, you had to switch between two different time ages to navigate the area. Now, in the Zora Seas, you have to switch between two time ages and also between surface and sea bottom.
 |
 |
 |
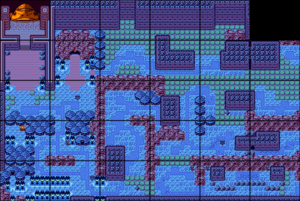 |
Equip the Switch Hook on button A and the Tune of Ages on button B.
During Zelda's age, go to the South Shore and swim in the water to the south-west. Go onshore where you see a hut on an islet. The fisherwoman inside explains that ths islet is drifting from the west to the east through the centuries. Exit the hut and play the Tune of Ages on the west end.
- Ambi's age: Swim west, then north on another islet and play the Tune of Ages there.
- Zelda's age: Dive in and go east (south is a dead-end). Use the Switch Hook on the diamond and surface. Play the Tune of Ages on the isle.
- Ambi's age: Go all the way west, then south and land on the next isle. Play the Tune of Ages just by the stairs or you'll be teleported back.
- Zelda's age: Now dive, go south and use the Switch Hook on the diamond. Go west and you're in Zora Village.
Zora Village[edit]
Four quick explorations of Zora Village, before you continue to the King's palace:
- Zelda's age, surface: get Gale Seeds from the tree; a
 Green Holy Ring from a chest to the north; you can also bomb a wall to enter the Zora graveyard.
 - Zelda's age, underwater: the Zora inhabitants give various information; of more immediate interest, a chest on the west side holds a
 Gasha Seed.
 - Ambi's age, surface: in the south-west corner, plant a Gasha seed in a class-4 spot; then, get the Gale seeds to set a warp point.
- Ambi's age, underwater: just talk to the several Zoras.
Enter the Zora Palace. Go upstairs and give the Magic Potion to King Zora, which will allow him to live for 400 more years. Now return to Zelda's age.
Enter the Zora Palace again and get 200 ![]() Rupees from the chest and go upstairs. Talk to King Zora, and he will give you the
Rupees from the chest and go upstairs. Talk to King Zora, and he will give you the ![]() Library Key. If you save Jabu-Jabu from the polluted seawater, then you'll receive permission to enter his belly.
Library Key. If you save Jabu-Jabu from the polluted seawater, then you'll receive permission to enter his belly.
Eyeglass Library[edit]
Now that you are in Zelda's age, you can use some Gale Seeds, travel to Yoll Graveyard and buy another magic potion (otherwise, you can try your luck with Maple or the Gasha trees).
Leave the Palace and go right twice. Resurface and play the Tune of Ages and use the Switch Hook to go to a cave. Inside is a Red Octorok whose true identity is the Queen Fairy; she needs your help to find Fairy Powder to break the curse placed on her by Veran. Go right twice to find the Eyeglass Island Library. Use the Library Key to open the Door. Now travel to Zelda's age and enter the Library. Get the ![]() Book of Seals from the old man in the back room. Now back in Ambi's age and reenter the back room in the Library. Place the Book of Seals on the pedestal. It give you direction to how to walk in the darkness.
Book of Seals from the old man in the back room. Now back in Ambi's age and reenter the back room in the Library. Place the Book of Seals on the pedestal. It give you direction to how to walk in the darkness.
- Book: 4 east, 2 north, 2 east
- Book: 2 north, 1 west, 2 north, 1 east, 1 north
- Book: 2 west, 1 north, 3 west
- Book: 1 south, 3 west, 1 north, 3 west
- Book: 1 south, 1 east, 2 south, 2 west, 3 south
- Book: 1 east, 1 south, 2 east, 1 north, 1 east, 1 north, 2 east
When you reach the old man, he will give you the ![]() Fairy Powder as a reward. Now return to the cursed Queen Fairy and use the Fairy Powder on her to break her curse. She in turn will cleanse the pollution from the Zora Seas.
Fairy Powder as a reward. Now return to the cursed Queen Fairy and use the Fairy Powder on her to break her curse. She in turn will cleanse the pollution from the Zora Seas.
From the Zora Village Entrance, swim right three times and play Tune of Ages on the small Isle. Dive in to the right and resurface to find ![]() the Whimsical Ring from the chest. Return to King Zora and receive his permission to enter Jabu-Jabu's Belly. Leave the palace and go down, left, and up twice; Jabu-Jabu will open his mouth, so you can enter.
the Whimsical Ring from the chest. Return to King Zora and receive his permission to enter Jabu-Jabu's Belly. Leave the palace and go down, left, and up twice; Jabu-Jabu will open his mouth, so you can enter.
Jabu-Jabu's belly[edit]
Dungeon, part 1[edit]
From the entrance, go north. Defeat the crabs and the Like-Like, and you can obtain the ![]() Compass.
Compass.
Go west; this room requires the dungeon item to obtain the chest. Continue south; swim over the black pits and use the Switch Hook to move the diamonds near the four statues; the 1st ![]() Small Key will appear.
Small Key will appear.
Nothing else can be done on this floor, for the moment. Go back north to the previous room, swim to the yellow area, then press B to emerge. Continue to the west (it is the only possible way), open the chest for the ![]() Dungeon Map. Look carefully at the map: the three floors superimposed make the shape of a fish, that is Jabu-Jab itself; the ground floor is the head, the first floor is the body and the second floor is the tail.
Dungeon Map. Look carefully at the map: the three floors superimposed make the shape of a fish, that is Jabu-Jab itself; the ground floor is the head, the first floor is the body and the second floor is the tail.
From the map chest, continue straight north for three rooms. Push the blocks and continue east. A Pegasus Seed can be useful to dodge the Spinning Blade Traps there. If you go south, the Owl Statue will give you an useful hint about the dungeon structure, but the door is one-way. Take a little tour, get back to the spinning blade traps, but now use the 1st Small Key and climb the stairs to Jabu-Jabu's tail. Follow the only possible path. In the final room, the Owl Statue explains: the red button lowers the water, the blue buttons raise it. Right now, you have to press the red and lower the water.
Dungeon, part 2[edit]
Descend back to the "body" (1st floor). Proceed one room south, where the Owl Statue is; the "golden isle" went down with the water, and you can follow it by jumping in the hole on the right. Use the Switch Hook to reach a chest with a ![]() Like-Like Ring.
Like-Like Ring.
Jump off the ledge and explore the "head" (ground floor) without water. Note that all Baris become red Gels out of the water. One room south, push a block and open the chest for the 2nd ![]() Small Key.
Small Key.
Continue east. Use the Cane of Somaria to open a door and go further east. Climb the first staircase you see. Go north two rooms, then use the Switch Hook to continue west and upstairs. In the "tail" (floor 2), go north again, then use the 2nd Small Key to open the door. Press the blue button, and the water will rise again, but this time you are in a different body part.
Dungeon, part 3[edit]
From the switch room, go all the way south to a deep water pond. Swim across the pond to the "east fin" room (see map). Defeat the enemies and earn the 3rd ![]() Small Key.
Small Key.
Go back one room north and one west, and dive in the deep water. The floating isle floated away, leaving open the path to the chest. Open it for a ![]() Gasha Seed. Downstairs, the mini-boss is waiting.
Gasha Seed. Downstairs, the mini-boss is waiting.
Mini-boss: Angler Fish[edit]
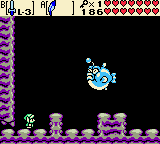
You will need three items for this fight: the Roc's feather, the Seed Shooter loaded with Scent seeds, and obviously the sword.
Use the Roc's feather to dodge the fish's attacks, shoot scent seeds to make it fall, then slash its "lantern" with the sword. Repeat until victory.
Dungeon, part 4[edit]
Climb the stairs beyond the Angler Fish. Upstairs, press A to use the 3rd Small Key on the key block. The chest holds the ![]() L-2 Switch Hook. Use it on the visible diamond.
L-2 Switch Hook. Use it on the visible diamond.
Check the map: there is still one chest in Jabu-Jabu's head (this floor). Get to that room, and you will realize that still the chest is inaccessible. Get on the yellow area, emerge to Jabu-Jabu's body, then go all way north and to the tail to the switch room to lower the water. Backtrack (with the help of the Swith Hook), and you can finally claim the 4th ![]() Small Key.
Small Key.
Time to raise the water again. Go to the east side of Jabu-Jabu's head (with the help of the Cane of Somaria), climb the stairs and go all the way north to the switch room, where you can raise the water.
Another tour to the head, where two unexplored rooms are left (check the map). Swim to the north-west corner, then climb down the stairs. Use the L-2 Switch Hook and the Roc's feather. Climb up to the room and defeat all enemies for the 5th ![]() Small Key.
Small Key.
Now go back to the tail, using a different path. In the room south from the last key, emerge in the "body", then continue south-east. Use the L-2 Switch Hook and continue east, then all the way north. In the room east from the switch room, you can now use the upgraded Switch Hook and cross to the other side. Use the 4th Small Key on the key block and proceed west, then south. You are back in the switch room, where you can further raise the water.
Dungeon, part 5[edit]
From the switch room, backtrack a bit and proceed south to the room with the chest (check the map). Use the L-2 Switch Hook and get the 6th ![]() Small Key.
Small Key.
Go downstairs to the body and check the map: there is only one chest left, in the "west fin" room. Swim all the way there, use the Switch Hook to reach the chest and collect the 7th ![]() Small Key.
Small Key.
Leave the room and dive into the "head" floor. Swim east and north, and descend the stairs.
With three keys in your possession, backtrack upstairs (use the L-2 Switch Hook), to the very end of Jabu-Jabu's tail (check the map), and use the three Small Keys. The two chests there hold a ![]() Gasha Seed and the
Gasha Seed and the ![]() Boss Key.
Boss Key.
How to get to the boss room? First, go on its same floor. Check the map, and go to the room exactly north of the boss. There, dive in the deep water and re-emerge from the other passage in the same room. Use the Seed Shooter (instead of the Seed Satchel) to hear what the Owl Statue says about the boss. Continue along the narrow ledge, all the way to the boss room.
Boss: Plasmarine[edit]
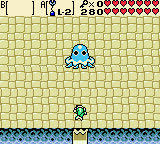
For this battle, all you need is the L-2 Switch Hook. You can also equip a ring that raises defence, because the sword will be useless.
Whenever the boss shoots a energy ball, reply with the Switch Hook, so that the boss will get hit by its own attack. Try and keep aligned horizontally or vertically with it. After a few hits, it should go down.
Obtain the ![]() Heart Container and proceed north to get the
Heart Container and proceed north to get the ![]() Rolling Sea.
Rolling Sea.
- "The mystical song of the sea roars into a crashing wave that sweeps heroes out into adventure."

