Floor 11[edit]

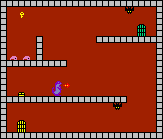
Time: 139, Treasure: Warp
Ishtar's preamble: Time the appearance of the Salamander's fireballs.
Indeed, there is a Salamander on the platform above your starting location. He spits a fireball out at regular intervals, every couple of seconds or so. Run to the right, under the bat, and prepare to jump up to the ledge just as you see a fireball flying above your head. Either land quickly, or fly a little bit higher to avoid the next fireball that's coming, and then quickly jump up to the ledge above the Salamander. From there, jump on top of the column, and then jump out to collect the key, landing back down on the column before you land in the pit with the worms. Finally, jump over to the highest ledge on the right, run below the bat and reach the exit.
The treasure chest behind the Salamander is optional, and contains a warp that sends you to Floor 19. You must carefully time your leap over the Salamander so that you jump over both the creature and any fireball it spits out. Then you must survive the short duration it takes for the warp to kick in, so be prepared to jump over another fireball if necessary.
Quox's warp: You can run across gaps on the ground.
Floor 12[edit]

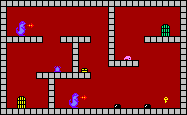
Time: 70, Treasure: Gift
From the entrance, drop down just as the Beholder below you starts flying to the right. Travel behind him, and prepare to jump over both it and the slime ahead as it starts flying back towards you. Collect the key to the right of the slime. If you like, collect the 10,000 point gift from the treasure chest above the slime. Wait for both ravens near the top to start flying back to the left, and then rise up and land to the right of the slime on the upper ledge. Do a low jump over the slime so that you don't risk hitting the ravens and head through the exit.
Floor 13[edit]

Time: 70, Treasure: Barrier
Ishtar's preamble: The Barrier will protect you from one collision.
You start out below a Salamander. Jump up to the ledge with the anemone and wait for the Salamander to shoot a fireball. Then rise up through the gap, and head to the right before the next fireball catches up with you. As you fall, duck into the alcove on the left to collect the treasure chest. It contains a Barrier which will save you from one hit. Wait for the Salamander on the floor to spit a fireball, and then drop down and begin heading to the right. Jump over the two black slimes on the floor, and collect the key. Start rising up to the ledge with the worm before the next fireball arrives. Continue rising up to the right to reach the exit.
Floor 14[edit]

Time: 44, Treasure: Wing
Ishtar's preamble: Don't try to walk on jagged ground.
The setup of this room starts you off below ledge with two slugs pacing back and forth. To the right of this ledge is a patch of ground covered with spikes. Ki cannot land on these spikes or she will lose a life. Jump high over to the ledge with the slugs, and fly far to the right (hold ![]() down to move faster). You should be able to collect the key in mid-air, and land on the ledge with the exit.
down to move faster). You should be able to collect the key in mid-air, and land on the ledge with the exit.
The treasure chest is optional, and the Wing it contains won't really help you much. If anything, it's more challenging to get the chest and survive, then to simply exit the level as soon as you can.
Floor 15[edit]

Time: 58, Treasure: Time Stop
This stage introduces a new enemy and a new item. The new enemy is the orange Beholders. These Beholder behave a lot like the blue ones, except that they pause in the middle of their flight whenever Ki is rising. This means you must make sure that they are out of your way when Ki begins to jump. The new item is the Time Stop item. When you collect it, the enemies (and your timer) will pause for a few seconds, allowing you to move in relative freedom. Do note, however, that if you collide with an enemy while time is stopped, you will still lose a life.
Start out by collecting the key to the right of the entrance. Then run back to the left and begin jumping when the orange Beholder is off to the left side. Be aware that just because a Beholder was moving one way when you started jumping, that doesn't mean it will continue that way when you stop. Collect the Time Stop item from the chest to the right of the anemone, and then make your way up to the exit above.
Floor 16[edit]

Time: 100, Treasure: Candle
Ishtar's preamble: Be wary of ghosts.
This can be a slightly challenging stage if you try your luck and attempt to escape from the floor rather quickly. There is an invisible ghost that paces back and forth along the gap between the entrance and the exit. You can see the spells that it occasionally casts. If you wish to try your luck, you can collect the key, and then jump up through the gap, hugging the edge of the platform to the right containing the exit, while hoping that you don't happen to collide with the invisible ghost along the way. If you succeed, you can advance to the next floor in a matter of seconds.
If you wish to collect the chest below, first collect the key above the entrance, and then drop down to the left column below the first platform. Wait for the acid drips to fall, and then either leap to the next column, or fly all the way over to the chest if you feel capable. The chest contains the Candle, whose magic allows you to see the Ghost. Then wait for the drips to fall again, and leap back to the left. Then, observing the ghost above, time your ascent so that you slip past the ghost and make your way to the exit.
Floor 17[edit]

Time: 85, Treasure: Timer
There's a lot of action taking place on the floor with its variety of enemies, including the first appearance of frogs. As you'd expect, frogs leap into the air at regular intervals. Start by heading to the right, stopping short of the black slime on the ground. Jump up to the first ledge with the frog. Leap over it when it's on its way back down, and collect the Timer in the chest beyond for 60 extra seconds of time. Jump up to the next ledge and, when the second frog is falling back down, leap over the frog and the next black slime until you're safely on the right. Then jump up and collect the key, flying over to the left to reach the exit.
Floor 18[edit]

Time: 164, Treasure: Gift
Another new enemy, the snail, makes their debut on this floor. Snails are a lot like slugs, except they are slower, and have a very tall cone shell on their backs. In addition to the two that wander on the platform above the entrance, there are two acid drips to worry about as well. Wait for the first acid drip to fall, and then jump on to the platform with the snails. Wait for the second acid drip to fall to your right, and jump over both snails, collecting the key along the way. Wait for one more acid drip to fall, and then jump up to the top ledge with the exit, collecting the 10,000 point gift item from the chest along the way.
Floor 19[edit]

Time: 59, Treasure: Warp
You'll find yourself in very cramped quarters with two slugs and two bees moving around near the top of the floor. First run to the right and jump into the alcove to collect the key. When both slugs are moving to the left, jump up to the ledge and wait for the bee to fly over your head to the right. When the bee is on the right side, jump over the slugs to the left to reach the exit.
The treasure chest at the very top contains a warp that sends you to Floor 28. However, the second bee that flies back and forth within the small gap makes it very challenging to reach without getting hit. It's possible to do, but your timing must be perfect. On the bright side, if you do get hit by the bee and it kills you, it won't be there when you return to the floor to try again.
Quox's warp: The silence spell will stop enemies from casting spells.
Floor 20[edit]

Time: 51, Treasure: Lucky Flag
This floor introduces a new enemy, one of the mainstays of the Druaga series: the Roper. However, Ropers aren't particularly difficult to deal with in this game. Despite all of their wriggling, they remain fixed at their locations, so they're easy to account for. Simply jump over the floor bound Roper to collect the key. From here, you can simply jump up to the exit and leave, or jump up to the ledge below the ceiling Roper, and hop over the column to collect the Lucky Flag inside the chest. Once you collect the flag and earn 100 points for every second remaining on the timer, you can exit the floor.