| A | |
|---|---|
| B | |
| C | 
|
| D | |
| E | 
|


|

|

|

|

|

| ||
| Kikura | Nipata | Dopipu | Nomaji | Fire | Pera Skull | Zado Fly | Gaguzul |
|---|
A long trip for a small prize[edit]
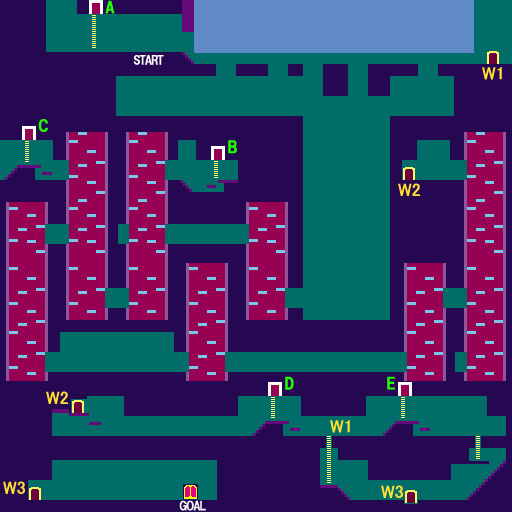
You'll have to make a decision on this stage. It can be completed quite quickly and safely if you manage to jump over the bridge at the very top of the stage and make it to the W1 warp door. However, in doing so you will be surrendering the chance to collect a life extending Jar in door B. If you've been collecting plenty of orange potions throughout the game, then this may well be a worthwhile sacrifice. The path to door B, as well as the trip to warp door W2, the only means of escape, is quite perilous and guarded by numerous Zado Flies and Gaguzuls, two boss-class enemies that you shouldn't tangle with for too long. Ultimately, the choice is yours… unless you happen to fall down one of the gaps in the bridge. Then you have no choice and you might as well collect the Jar.
Recommended route[edit]
Immediately run to the left to find the ladder that leads to the easily accessed door A. Climb and enter the door to collect the third and final Bound Ball. Exit and climb back down and head right until you reach the bridge. While you attempt to cross the bridge, you may come under the attack of some Zado Flies. To reduce the potential of getting hit by them as you cross, you can wait by the steps the lead to the bridge for a Zado Fly to appear. Once it drops and and hits the steps, it will jump back up and fly back to right. At this point, chase after it. Only one Zado Fly may appear as you begin crossing the bridge, but no others will appear. Leap over the gaps and you can safely make it warp door W1.
- However, if you choose to collect the Jar, you can simply fall down the bridge at any time, and drop to the bottom of the large opening. Once you reach the bottom, head to the left and climb up the first shaft. Cross the next hallway to the left, but be on the lookout for a Gaguzul. Climb up the next shaft, and exit to the right at the top, here you will find door B and the Jar. Then return to the previous shaft and drop all the way down to the bottom. Transfer over to the shaft on the left, but watch out for Zado Flies. You don't need to climb up to the top unless you're desperate for the magic refueling Scroll behind door C. Instead climb part of the way and take the first exit on the left, watching out for more Zado Flies. Drop down to the bottom of that shaft, and cross the hallway to the left. You may encounter a Gaguzul and/or more Zado Flies here so be careful. Walk right across the next shaft and keep walking until you reach the shaft to the right. Climb up that and transfer over to the next shaft on the right, and climb all the way to the top to reach warp door W2.
If you arrived by W1, walk to the left to the ladder that leads to door D (watch out for a build up of Nomaji on the steps). If you arrived by W2, walk all the way to the right until you reach the same ladder. Climb up the ladder and collect the Smasher from inside. Then drop down and walk over to the next door on the right, door E which leads to the boss room. Once the boss is defeated and the stage Ball is collected, exit out and return to the left. Climb down the ladder you come to and enter warp door W3. From there, head to the right and reach the exit. Be careful of a possible Gaguzul approaching you along the way.
Boss: Bunyon ×2[edit]

|
HP: 1610 (Large)
|
Power: 350 (Large)
|
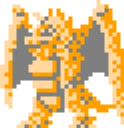
This Bunyon is just like the Bunyon boss from Stage 11. However, this time you must defeat two of them. Finding the Bunyon is easy, but defeating it is another story. As you enter the boss room, you will cross an empty expanse as you move to the left. The Bunyon is very likely to appear behind you to the right. When you see it, you'll need to stop long enough for it to come on the screen and be able to follow you. Once you have it behind you, keep walking to the left until you reach the pillars. The platforms on top of the pillars create a natural barrier that the large Bunyon will have difficulty pursuing you through. At this point, turn around and start hitting the Bunyon with the Flame Sword.
When it breaks up, you have a choice. You can switch to the Flash and use it against the Medium Bunyons first (it may take two Flashes), and the resulting Small Bunyons second, or you can try to hit the Medium Bunyons and break them up into Small Bunyons before using Flash. Either way, it is highly recommended that you use Flash against the Small Bunyons so that you don't end up losing too much health fighting them. Flash will destroy the Small Bunyons instantly.
Once the first Bunyon is completely destroyed, you need to return to the right to find a second Bunyon. Simply lure it back to the pillars on the left and repeat the process. When the second Bunyon is defeated, you will be able to access the stage Ball in the inner chamber.