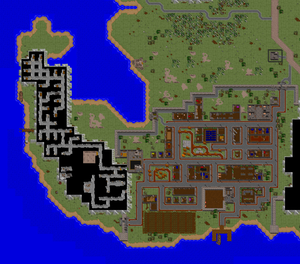
When you arrive at the gate, talk to the guard behind it. Tell him you're Friend (of course) and he'll begrudgingly let you in. He doesn't trust you so sends some Pikemen to escort you to Lord Marsten. If you want to explore before continuing the story run at full speed and they will disappear as soon as they are off the screen. Explore all you want; when you're ready to continue the story just follow the western mountain until you come to a big building built into it: this is the Crematorium the guard was talking about.
Quest: Batlin and Gwenno[edit]
The crematorium[edit]
Go through the curtain at the bottom and you'll find Lord Marsten just below you. Talk to him about all the subjects he offers, especially the Knights' Test, for which he gives you a password enabling you to take it. Also be sure to talk to the other two, Brendann and Caladin. They'll mention an "enchanter" fitting Iolo's description, but refuse to free him until you've proven yourself by becoming a knight.
Dupre now arrives with more suspicious Pikemen in tow and rejoins you. Now head north-east to the prison (139S, 14E) and talk to Iolo. To free him you can go through the Knights' Test or bribe Spektor to get the key. You need to pass this test to advance the plot. You don't need Iolo for the test so if you don't want to pay you can leave him in prison for now.
Knights' test[edit]
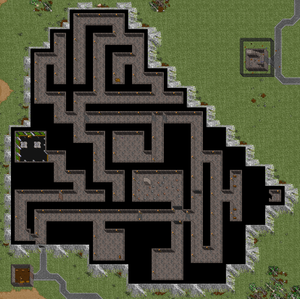
Head north out of Monitor and take north-western roads until you reach a doorway into the mountains (112S, 10W). Talk to Shmed inside the house and give him the password. He'll bring you in (alone) and give you only ![]() Leather Armour and a
Leather Armour and a ![]() Mace. Head north and then dash to the east to avoid the explosions. When a room opens below you head into it. Kill the gremlins and smash the chest for a key. Head back north and to the east and unlock the door. The keys in this test are only used once, so discard each when you're done with it to reduce inventory clutter.
Mace. Head north and then dash to the east to avoid the explosions. When a room opens below you head into it. Kill the gremlins and smash the chest for a key. Head back north and to the east and unlock the door. The keys in this test are only used once, so discard each when you're done with it to reduce inventory clutter.
Head to the east and then north through the double doors. In this room you need to build a staircase out of rocks to reach the key. Snakes will be under some of the stones and will eventually respawn. You can open your inventory to pause the game and build the staircase without interruptions. Now go and open the southern door and get the key. More traps and a Cyclops bar your way, but you can dash in and out of his reach if you're quick.
Head back north and open the right-hand door. Grab the bag (the ![]() Heal and
Heal and ![]() Cure potions will come in handy!) then head southwards, to the east, and finally north. The four chests to the east contain nothing so ignore them and walk through the right-hand wall for yet another key.
Cure potions will come in handy!) then head southwards, to the east, and finally north. The four chests to the east contain nothing so ignore them and walk through the right-hand wall for yet another key.
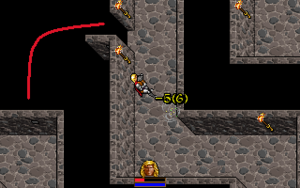
Head north and to the west, unlock the door, and continue on your way. Get the key, hit the switch, and now go west and get yet another key. Head back and unlock the other door. Head onwards through the corridors and grab the claw you see there, then head back to the previous door. Now head southwards. Kill the pikeman (he can only be hit when he's visible) and read the scroll he's carrying.
Now look at the western wall and double-click until you find an opening section. Taking this route is easier. Go through and open the second piece of wall directly below you. Now head to the west and go north.
Did you read the scroll? Use the claw on yourself, then use the bloodied claw on the ashes. A wolf will spawn. Kill it grab the key out of its belly, then pocket the body (you need it for later). Note that you can repeat this process as many times as you wish for easy EXP building without hunting for targets, so carry the claw and ashes with you if you wish.
Use this final key and you'll come to Shmed. He says you should have been dead by now, so decides to finish the job himself (famous last words). Take his stuff if you want, and head back to his little house.
The cloak and the meat[edit]
Take the wolf corpse to Cellia the furrier (139S, 1W) and she'll make a cloak for you. This will take a full 24 hours and you can't proceed with the main quest until you have it. While you wait you could take care of other things, such as solving The Silver Seed or exploring Fawn and the Inn of the Sleeping Bull.
Take the wolf meat to Lucilla at the pub (152S, 13E) and she'll use it for the main dish.
Clan tattoo[edit]
Head to Lydia's tattoo shop (147S, 13E) and get a wolf tattoo. This will show up on your character portrait's left cheek from this point forwards; with this mark Monitorians will speak to you with more respect.
At some point after getting your Clan tattoo you will become poisoned with a strange toxin; it comes and goes, and it cannot kill you unlike normal poisons. Go to the fields and talk to Harnna about Cantra and Healing. She'll give a temporary cure. She says she needs ![]() Varo Leaves for a proper cure and sends you to Fawn to fetch them. Look in her crystal ball to see Batlin chasing her and saying something about a Bane in her. This will become very important later on.
Varo Leaves for a proper cure and sends you to Fawn to fetch them. Look in her crystal ball to see Batlin chasing her and saying something about a Bane in her. This will become very important later on.
Once you come back from Fawn with ![]() Varo Leaves, go back to Harnna and ask her to heal you. Your poisoning is now permanently cured. Ask her about Pox and you'll learn Lydia did it. So go to Lydia's tattoo shop and contront her with the Poison. She will attack you, kill her for 45
Varo Leaves, go back to Harnna and ask her to heal you. Your poisoning is now permanently cured. Ask her about Pox and you'll learn Lydia did it. So go to Lydia's tattoo shop and contront her with the Poison. She will attack you, kill her for 45 ![]() Monetari. 1
Monetari. 1 ![]() Jewelry and 4 Bandages.
Jewelry and 4 Bandages.
The banquet[edit]
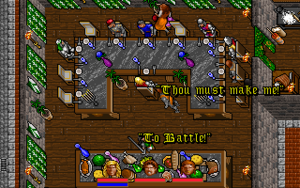
Once you've got all of this done and have picked up your cloak head a block below the inn to find the previously locked banqueting hall (157S, 12E). Double-click on the doors to be taken inside.
During the banquet Flicken asks what the hardest part of the test was. It doesn't matter what you choose to say, one thing will lead to another. Harnna bursts in and announces that her daughter is missing. Luther accuses Krayg of being a traitor, Krayg draws his weapon, and the banquet dissolves into chaos. Once things get back to normal you can ask Marsten to release Iolo if you haven't already released him by bribing Spektor.
Quest: teleport storm[edit]
 Iolo's crossbow[edit]
While in the Crypts you'll no doubt come across a ![]() Crossbow. After you've become a Knight, ask Harnna about "strange Objects" and
Crossbow. After you've become a Knight, ask Harnna about "strange Objects" and ![]() "urn", then go to Caladin with the
"urn", then go to Caladin with the ![]() Urn in Possession and ask him about "missing Urn". He will give you about 200
Urn in Possession and ask him about "missing Urn". He will give you about 200 ![]() Monetari for returning it.
Monetari for returning it.
 Dupre's shield[edit]
You must pass the Knights' Test in order to retrieve the shield. Once you have done so talk to Harnna about the ![]() Plain Shield, then to Lucilla. She mentions Luther's new shield. Talk to him about it and identify it as yours (well, Dupre's) and use all the offensive keywords (learned from Brendann, Lucilla and Cellia). Eventually he'll challenge you to a duel. He offers you a choice of weapons (and comments on your choice of each). You'll need to beat him in order to get the
Plain Shield, then to Lucilla. She mentions Luther's new shield. Talk to him about it and identify it as yours (well, Dupre's) and use all the offensive keywords (learned from Brendann, Lucilla and Cellia). Eventually he'll challenge you to a duel. He offers you a choice of weapons (and comments on your choice of each). You'll need to beat him in order to get the ![]() shield back. Note that if you still have a
shield back. Note that if you still have a ![]() Shield of Monitor on you when you defeat him, Dupre will return it to Luther.
Shield of Monitor on you when you defeat him, Dupre will return it to Luther.
It is also possible to get the shield from Luther without fighting if you use the "Tremor" spell. Luther will drop his entire inventory. If you do this, Luther will give you another one if you defeat him in the arena!
Quest: helm of courage[edit]
Simon's Ale[edit]
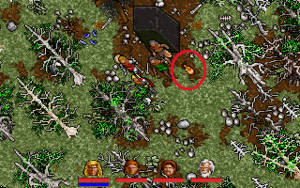
Talk to Simon the innkeeper and try his ale; he loves the stuff, but it causes any of your party to throw up. Now talk to Krayg; he mentions someone sneaking around near a Goblin meeting site (83S, 18W). Go there and you'll find a blackrock monolith. You'll also find a bottle of Simon's beloved Fawnish Ale. Talk to Lucilla in the pub about it if you wish, but she merely identifies it as his.
Go back to Simon and accuse him; he reveals himself as a goblin and attacks you. His body has a key to the Goblin Passages (the other Keys will open the doors and chest in the inn); if you aren't going to do that part of the game right away you can leave the key on his body until you need it (or put it on Keyring obtained in Silver Seed).
Now that you're done with Monitor you can go almost anywhere else on the island. If you want to finish off the story thread of the goblin traitor you'll want to head to the Goblin Passages next; however it is by far the hardest of the immediate destinations, so you might want to do a few other places first, at least until you've got some items and raised a few levels. The next most logical destination is to go to Fawn and get the ![]() Varo Leaves to cure the poison. You'll also pass the Inn of the Sleeping Bull on the way there.
Varo Leaves to cure the poison. You'll also pass the Inn of the Sleeping Bull on the way there.
Inhabitants of Monitor[edit]
It might be useful to know where and when you can meet some Monitorians. People in the field list will only fight or train; if you want to speak with them, you have to meet them somewhere else at a different time.
All locations in Monitors can be referred to one of four East-West roads or the gate in the South-West.
Command of the Leopard[edit]
-
Marsten
Duties: lord of Monitor
Location(s): town hall (Town Hall street, 2nd from North) -
Spektor
Duties: moneychanger
Location(s): town hall (Town Hall street, 2nd from North) -
Andral
Duties: sculptor
Location(s): artist shop (Town Hall street, 2nd from North) -
Standarr
Duties: weapons dealer
Location(s): armoury (Pikeman's road, 1st from North) -
Shazzana
Duties: trainer
Location(s): list fields 12:00 - 15:00, or training hall (Kosric road, 4th from North) -
Harnna
Duties: healer, information
Location(s): farmfield (West Gate street, SW corner) -
Cantra
Duties: prospective knight
Location(s): plot-related
Command of the Wolf[edit]
-
Brendann
Duties: commander of the Wolves and trainer
Location(s): list fields 15:00 - 18:00, or town hall -
Renfry
Duties: undertaker
Location(s): crematorium (Pedigar street, 3rd from the North) -
Krayg
Duties: provisioner
Location(s): provisions shop (Pikeman's road, 1st from North) -
Cellia
Duties: furrier
Location(s): furs shop (Pikeman's road, 1st from North) -
Lucilla
Duties: tavern keeper
Location(s): The Slashing Sword pub (Kosric road, 4th from North)
Command of the Bear[edit]
-
Caladin
Duties: commander of the Bears and trainer
Location(s): list fields 9:00 - 12:00, or town hall or training hall -
Luther
Duties: trainer
Location(s): list fields 9:00 - 12:00, or Andral's (afternoon) or training hall (evening) -
Templar
Duties: knight
Location(s): list fields 9:00 - 18:00, or his home (on Kosric road) or or training hall (evening) -
Flicken
Duties: guard
Location(s): west gate (West Gate road, SW corner) -
Simon
Duties: innkeeper
Location(s): The Sleeping Soldier inn (Town Hall street, 2nd from North) -
Lydia
Duties: tattooist
Location(s): tattoo shop (Pedigar street, 3rd from North)
Shops in Monitor[edit]
Everything in Monitor is paid for with ![]() Monetari. If you need more Spektor (139S, 14E) will convert other currencies into Monetari for a small fee.
Monetari. If you need more Spektor (139S, 14E) will convert other currencies into Monetari for a small fee.
