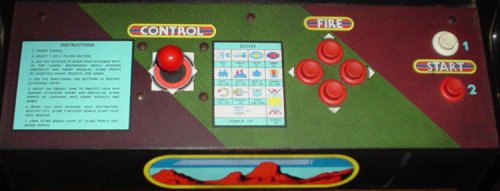
Controls[edit]

- Joystick: Use the joystick to direct your fighter craft through each zone. Regardless of which orientation your craft is in, you can move the ship in eight different directions.
- Fire Buttons: Press the fire buttons to shoot a laser in any one of four directions. You have an unlimited supply of ammo and can fire in many directions at one time.
- 1-2 players: Press either button to start a 1 or 2 player game.
Characters[edit]
Vanguard[edit]


The Vanguard is the only fighter craft equipped to take on the dangers and challenges found inside the Gond's cave. You pilot this craft. It can move in eight directions, and fire lasers in four. While your ship is powerful offensively, it is rather weak defensively. You will lose a life if you collide with any enemy, an enemy's bullet, or if the ship collides with the terrain of the cave. You must also continue to destroy enemies in order to keep your fuel reserves high. If you run out of fuel, you will lose control of the ship and crash. In the Mountain and Stripe Zones, you will encounter Energy power-ups that grant your ship with invulnerability for a limited time if you touch any part of them. During this time, a yellow meter will appear inside the white fuel meter. When it runs out, the invulnerability will end. This is also signified by a change in the music.
Harley & Mist[edit]


Harley and Mists appear in the Mountain and Styx Zones. Harleys move forward with the terrain, never altering their vertical position above the floor, and occasionally launch forward. Mists are a lot less predictable. They will either move forward with the terrain, or they will stay in one horizontal location and bob up and down on the screen. They will never do both at one time. Both Harleys and Mists are capable of firing shots at you. Unlike many video games, your shots do not overpower or cancel out the enemy's. If your laser hits an enemy's bullet, your laser stops and the bullet continues, so get out of the way!
Helm & Amno[edit]


Helms and Amnos only appear in the diagonal Rainbow zones. Aside from the color, they are identical. In the Rainbow Zone, Helms and Amnos first appear in groups of threes. After the second part of the zone is announced, they will appear in groups of fives. Every time you destroy one, another one appears from the top or the bottom of the screen to take its place.
Bases[edit]


Bases only appear in the Stripe zone. They are stationary and do not attack. They are worth a random amount of points every time you destroy one. Shoot as many as you can for a high score.
Garine & Barrier[edit]


The Garine and Barrier are also denizens of the Stripe Zone. Depending on which path you take through the Stripe zone, you will encounter one or the other. If you take the top path, you will encounter five Garines which bounce up and down. You must remove all five to pass through the top safely. If you take the bottom path, it will end with a Barrier. And Barrier is composed of two structures, one on the top, and one on the bottom. Between them lies a field of energy that will destroy your ship. You must destroy one structure or the other the stop the barrier. Doing so is generally quicker than dealing with the Garines, but you must get dangerously close to the terrain, and quickly, to destroy one of the structures.
Kemlus & Romeda[edit]


Kemlus and Romedas are only found in the Bleak Zone. When you first arrive in the Bleak zone, you will be greeted by the Kemlus, circular worms that glide up and down throughout the zone. You may actually touch three of them and be awarded and special bonus for doing so. Attempting to do it more than three times will result in your destruction. Following the Kemlus, the Romedas appear. These are like small living bombs. When you fire at them, they explode. The explosion will absorb your lasers, preventing them from going beyond until the exploision is finished. Romedas are known to occasionally dive bomb toward your ship.
Gond[edit]

The Gond is the ruler of the all the zones that you must pass through to reach him. When you enter his lair, there will be a series of lasers on either side that fire at you in order to destroy you. The Gond is protected by a two layer barrier with openings that move independently. An opening is formed by the barriers very frequently, but you must take your shot quickly or you will miss the opportunity to destroy the Gond. If you take a long time, the Gond will activate a series of beams that fill up the chamber from the bottom, and can destroy you. You only get one chance to kill the Gond. If you fail, you will be sent on to the next round as if you had succeeded, but without the awarded point bonus.
Scoring[edit]
| Harley | 50 |
| Mist | 70 |
| Helm | 80 |
| Amno | 100 |
| Base I, II, III | 100 - 400 |
| Garine | 100 - 400 |
| Barrier | 800 per structure |
| Kemlus | 100 - 400 |
| Romeda | 100 |
| Gond | 1000 - 8000 |
