Act 1[edit]

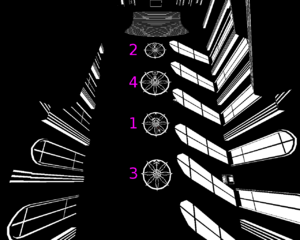
Open the door to the right, and enter the first room. Approach the end, and speak with Gomend. He will instruct you to pray in front of the altar, which may then be used to unlock the elevator.
The order of prayer is the second emblem from the door, the fourth emblem next to the altar, the first emblem from the door, and the third emblems. You may be able to guess the order by looking at the emblems, based on the chevron count. To pray, click on the floor emblems to move on it, and right click to continue.
There are a few clues unlocked in this act:
- An image clue (as monologue) for attempting to use the elevator, and approaching the door on the other side before visiting Gomend and praying. Gives instructions on what you should do.
- A video clue for approaching the dead slave. Only gives background information.
- A video clue for approaching Gomend (required)
Act 2[edit]
You start this act at the elevator doorway. Proceed down the corridor to the end and go through the door. Proceed through the corridor, avoiding the poison gas, and open the chamber door to reach the bridge room. Once you approach the floor emblems, a video will commence which allows you to head outside and instructs you to consult with the stars.
Return to the starting area, and take the door on the right. Armon locked the outer door based on an airlock mechanism, requiring you to close doors behind you before opening the next one. Run down the path to the outside, and you will be introduced to Evil. He will give only limited time for your outside trip (75 seconds, although a clue says it's 45), but this can be reset by re-entering the sanctuary.
Pray on the close smaller emblem, then on the large middle one. This causes a set of four stars to light up, which enables the bridge room mechanism and shows the combination to use. Return to the building and enter the bridge room. Lower the bridge by walking over the emblems with the shown pattern, which always starts at the lower-right emblem and moves clock-wise. Cross the bridge and collect the emblem from...

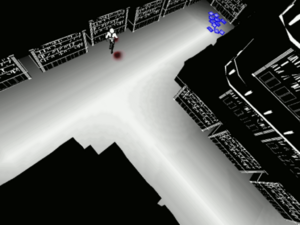
Next, head to the library. It is the path left of the bridge room. When you enter, close the door behind you. There are two secret passages you need to open here. The first is on a shelf left of the entrance, just at the T-junction. Open the book case, and walk along the wooden planks. At the junction, turn towards the wooden bridge, and open the door. Take the sheet in the upper-left cluster, but do not approach the door (it has a spike trap that will kill you). Return to the library, closing the shelf behind you.
The second secret is in the far corner of the library, unlocked only after the first secret. It may be visually obvious, but it is identified with the music abruptly stopping. Open it, and you should go through a corridor which stops at a room with a single book. Collect the sheet there, and open the door marked with the talisman's symbol to continue. This ends Act 2.
There are a large number of clues in this act. To claim them, you need to encounter the event, as well as complete the act.
- Four image clues as monologues, near the starting area by going through the door on the left and approaching each of the four beds.
- An image clue as a monologue, near the starting area by going through the door on the right.
- A video clue, when you reach the bridge room, instructing you to head outside.
- A video clue, when you retrieve the talisman
- An image clue as a sheet, in Livos' chamber.
- An image clue as a sheet, in the library next to the slave. Describes a secret door.
- An image clue as a sheet, in the side secret passage. Unlocks the secret door at the library's corner.
- An image clue as a sheet, at the end of the act. Provides information only.
- An audio-only clue, which is the music track for when you are outside.
Act 3[edit]
The only objective is to enter the combination at the door, which may be done right away. If you don't know the combination, continue reading below.
Run down the corridor until you reach the door on the right. Enter Livos' chamber. Some of the beds in the room are blood-stained and shake. Approaching one will kill, but they can be avoided by hugging the wall. This gives information about what will trigger your hunger. Return to the first library.
If you become hungry (with the soundtrack changing to what is a constant heartbeat), you have 1 minute to find a corpse and right-click it. There's one in the library on the side.
Head to the 4-way junction, and proceed to Pithon's chamber (locatd to the right). Enter, and retrieve the note instructing you to return to the first secret, and that the trap was removed. It also contains the instructions for completing Act 4.
Head to the first secret, and head to the side room. With the trap removed, you can open the second door and retrieve the combination for the gate.
You can now return to the place where you started in the Act. Head to the gate at the end, and enter the following combination: Second left pillar 3 times, first right pillar 3 times, second right pillar once, first left pillar twice. Approach the door and open it.
Evil will now enter the sanctuary.
The following clues are available:
- In the Livos' chamber, at the end of the room.
- In Pithon's chamber.
- In the secret room, which contains the combination.
- An audio-only clue, which is the heartbeat music track played when you are hungry.
Act 4[edit]
This is the final act. You will need to find five blood stains, then jump outside.
The stains are located:
- Near the door from which you invited Evil into the sanctuary
- In the middle of the library
- In the first secret.
- In the room with four beds (left of the elevator)
- Outside, on the farthest emblem.
However, there are two events that will hamper your progress.
When you reach the middle of the library, this activates the hunger trigger, and the slaves' corpses are gone. However, you can find two food sources - either Pithos in his chamber, or Armon in the bridge room, both of which are accessed from the 4-way junction. You can avoid this trigger by walking along the outside path of the library.
The other obstacle is an evil laughter. If you hear it (noted by a disconcerting noise), the progress on this puzzle is reset and you need to head back to the starting area. It usually happens when approaching the fourth blood stain via the main pathway.
When you start, the recommended route is to stand on the first stain, then head to the library, closing the doors behind you. Approach the second blood stain through the outside route. Head to the first secret at the T-junction, and close the door behind you as you go through. Stand on the third stain before the wooden bridge. Proceed to the other end of the secret area and open the door (closing it after going through), to reach the main corridor.
Enter the room with four beds to get the fourth stain. Next, head outside for the final stain.
If you did this correctly, return to the large sigil. You should hear a bell, indicating it is safe to jump on the right-hand side. If not, you most likely heard laughter that reset the puzzle.
The final cutscene starts.