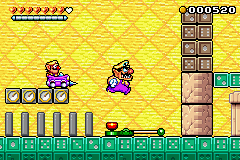
Wario above the Goal Switch of Domino Race. The Dice Blocks are at the upper right.
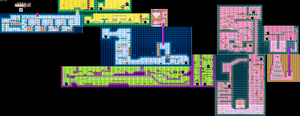
Domino Race: In most of the rooms, Wario must race against given sets of Domino Rows. The race starts by walking pass the Start at the entrance of the room. The objective is to step on the Goal Switch before the domino does. Winning a race will cause a Silver Coin to appear, and break the Dice Blocks nearby, unlocking more treasure, while losing does not cause a stuck. Many Gems, along with the Clock Blocks, are only available during a race. Some of the Gems are also available after pressing the Frog Switch. Notice that you cannot leave the room during a Domino Race.
Room 1: You will see the Key Ghost immediately. However, it is blocked by Frog Blocks. Step on the switch to remove the Dice Blocks and open the path to Door A.
Room A: This is the tutorial of Domino Race. Quickly grab the Gems then step on the switch, in order to unlock two Hearts and 20 Gems. Enter Door B above.
Room B: You will find Clock Blocks during the race. Use them to obtain a Heart and 70 Gems while dodging the two Mini-Warios, then step on the switch to unlock the first Stone Chest. Enter Door C below.
Room C: You can find 400 Gems blocked by Frog Blocks after starting the race. Ignore them and proceed downwards. In the shaft below, collect 480 Gems on the left, then at the floor, dodge the Malletape and move to the right. Before stepping on the switch, collect another 440 Gems above. The switch will release another Malletape and a tunnel upwards, use that Malletape to get Spring Wario and go up for a room with 60 Gems and a pipe to Bonus Room 2, then take an easy route to Door D. If you fail to press the switch, you must crawl over the spikes on the right in order to reach Door D. Before leaving, remember to break the hard block first, to save time for escaping.
Bonus Room 2: Grab the Heart first. Bring the Old Man to the platform above and throw him through the spike, breaking the platform with Spinies (two Black and five Pink), then return to below the Heart to get coins from drown Spinies.
Room D: Right after starting the race, roll down the slope. Jump after going up a slope to get on a platform with more Gems, then just keep rolling to dodge the spikes, and roll into a narrow passage. When you reach the right end, immediately climb up and roll down another slope to the left. Jump to collect a Heart before getting into another narrow passage and hit the wall. Then quickly roll down a third slope on the right. You will land on the switch if everything is done on time. The switch will unlock Door F which leads to a different portion of Room E, otherwise you have to access from Door E. There is a Mini-Wario outside of both doors. The path to the left is blocked now.
Room E: If you come from Door F, you appear at the left shaft with an extra Mini-Wario, 180 Gems and a Heart. If you come from Door E, you must crawl through the spikes in the right shaft. At top of the room, there is a Big Diamond above Door G, in order to obtain that, move to left shaft, stun a Mini-Wario and use that to throw to the right, breaking blocks in order to release a third Mini-Wario to the floor, then use the Mini-Wario to Goomba-Jump to reach the Big Diamond.
Room G: This will be a long race. Start by going down the platforms by running to both directions. Get into the water and swim to the right. At the middle of water area you will notice a block above, break it and grab 280 Gems, but leave the second Stone Chest there, since you can safely open that after the race. If you still have time, move to the right end of water for 550 Gems, but beware of the Piranha and Spiked Clam. Now move upward with ladders and platforms, grab the Gems whenever possible, and finally reach the switch at the top. This switch will unlock a shortcut for escaping. Now return for the Stone Chest and then enter Door H.
Room H: The final race is not hard to complete, but grabbing all Gems while reaching the goal is nothing easy. You have about one second of hesitating if trying to make a perfect run. Winning the race will allow you to access Room I from Door I, otherwise, pick Door J below.
Room I: The reward of winning last race is a tasty CD Chest at the upper floor. Before opening the warphole, get rid of the Piranhas and Spiked Clam in the water, and use the ladder on the far right to break into lower right corner, revealing a pipe to Bonus Room 3. Step on the Frog Switch when you are ready. Hurry up! Now leave from either Door I (if available) or Door J.
Bonus Room 3: Repeat your jumping slam to hit the switch on the wall, raising the trigger blocks, for eight times, until you reach the pinnacle with a Big Diamond.
Room H (revisited): Use the drain on the right to return to Room G.
Room G (revisited): If you have opened the shortcut, move in for some easy Gems and simply stomp through the blocks and leave from Door G. Otherwise, fall down into the water, move left, then climb up to Door G.
Room E (revisited): Simply stomp through the blocks on the right, and leave from Door E.
Room D (revisited): This time, use the slope on the right and roll. After passing the Frog Blocks, you must jump while rolling over the second gap, in order to reach the platform with third Stone Chest. Then use the slope nearby to continue rolling and jump over the gap for more Gems. You will finally fall at Door D.
Room C (revisited): Obviously, run to the left from the safe path. At the vertical shaft, let Malletape turn you into Spring Wario and grab the aforementioned 400 Gems via a faster method. Now keep running all the way to Room 1.
Room 1 (revisited): You still do not have the Key Ghost. Grab him and fall into Room 4 below.
Room 4: Take the lower path, repeat the process of break the blocks and take out Pink Spinies for three times. You will see Pipe K above, but instead of going into it, move further left, crawl pass the spikes, pick up the Rock and move to the ladder on the left. Here, throw the Rock to above platform, and take out the last three Pink Spinies, to finally reach the fourth Stone Chest. Now crawl back to the right, use Pipe K to return to Room 1, and escape.
Room C: Two more Malletapes are in the shaft. Beware of time loss, but you can use the upmost Malletape to collect the 400 Gems earlier.
Room E: The upper-left Mini-Wario is in the lower area, so that you must unlock Door E to get the Big Diamond. An extra Mini-Wario appears above the diamond.
Room G: There are two more Piranhas in the water.
Room I: There is one more Spiked Clam in the water.
Room 4: You may immediately land on a Pink Spiny, watch out. Three of the Spinies are black, two in the right part and one in the ladder room.