Stage[edit]
Please note: This is Round 11 in the Arcade version of Wonder Boy in Monster Land and the PC Engine version of Bikkuriman World. Additionally, the following maps and their labels are only accurate for the above mentioned versions. The Famicom version and the Sega Master System version are different and will be detailed below.
Part A[edit]


- You start out on the left side of the hallway entrance. You will encounter six red snakes in a row before reaching a chamber. Note that you will no longer receive money for the rest of the game, as it no longer serves any purpose.
- The chamber beyond the snakes is occupied by Poverty. Defeat Poverty in the usual manner and continue right. Three cobras guard the remainder of the passage before you reach a fork in the path.
- A floating platform will enable you to choose the top branch or the lower branch. The upper branch will actually bring you right back to the beginning of this section, so take the lower branch to advance.
Part B[edit]

- It may start out looking identical to the previous hallway, but you can tell that it's different by the enemies which occupy it. You will encounter three green goblins before you reach a chamber inhabited by three Vampires (they may not all appear, depending on how many goblins you ignored). Defeat the vampires and proceed right.
- You will notice a drop in the pathway. If you choose to continue right, you will exit this part and be sent right back to the beginning of it. Instead, explore the drop to part C.
Part C[edit]

- As you drop down this vertical section, you will encounter four strong bats on the right, followed by four strong bats on the left. If you are interested in gathering more points, it would be to your advantage to slash at the bats as you fall down. Most of the prizes they drop will be available for you to gather when you reach the bottom.
- Once again, you are faced with a choice, and once again if you choose wrong you are merely sent back to the start of the current section. Falling left will make you repeat this section. Falling right will send you on to part D.
Part D[edit]

- Though considerably long, this section isn't particularly dangerous. There are two exits in either direction. Both of them will take you back to part B. Instead, you want to reach the drop at the far left side of the section.
- From the drop, you'll need to proceed to the left. You will encounter a number of red spirits before you run into two blue spirits near the end. There's no point in trying to defeat them here. Merely push them out of the way so that you have a clear shot at the drop to part E.

Part E[edit]
- Part E is considerably maze like. There are four means of leaving this section, but only one exit will advance you on to part F. The other three exits either send you right back to the top, or back to previous sections that you've already visited.
- To correctly make it through part E, be sure to hold right as you first enter this section. This will ensure that you land on the first ledge containing a few white snakes. You will then encounter another opportunity to drop down, or to proceed to the right.
- Drop down and continue to hold right as you fall. This should get you on the middle platform which is the only exit that leads further into the castle. Ignore the two blue spirits which patrol this area.
Part F[edit]


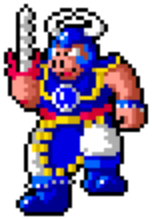
- This part can be the most difficult to figure out. When you enter, you will walk forward until you reach a chamber. The chamber will contain a Kraken. It should be no match for you by now, defeat it using whichever strategy you prefer; either stabbing it just outside of it's range, or jumping through it as you hit it.
- When the Kraken is defeated, proceed right through the next hallway. You will encounter four blue skeletons, one at a time. After you defeat the last one, you will see a path going up, and the end of the hallway to the right.
- You can't access the upward path, but don't go right. Instead, return left to the chamber where you fought the Kraken. This time it will be occupied by a Minotaur. It is safest if you remain on top of the ledge before the chamber and attempt to hit the Minotaur from a safe distance.
- Once you defeat the Minotaur, head back to the right and a newly appeared floating platform will help you travel to the upward path.
Part G[edit]

- If part F was the most difficult section to figure out, part G may be the most frustrating. Unless you know exactly what to do, and are very quick about executing it, you will fall back down to part F. If this happens you will be forced to repeat the entire section again, including the fights with the Kraken and Minotaur.
- To prevent yourself from having to repeat the previous section, be prepared to act fast. When you arrive in this section, you will see two platforms. As soon as you land on these platforms, they will begin to drop. Once you jump off of them however, they immediately move up and they don't take you with them. You will fall through them if you don't try to jump to the other platform.
- As soon as you are propelled into this section, push left and fall onto the lower of the two platforms. As soon as you land on it, immediately jump over to the right platform. This will cause the left platform to fly up. As soon as you land on the right platform, immediately jump back to the left platform, and so on.
- You must repeat this process, and do it very quickly, in order to reach the break mid-way up the tower. Here you will find a snake. Don't be tempted to exit to the right, as you would be making a huge mistake. Instead, defeat the snake and collect the item it drops. This will cause a new floating platform to appear which will enable you to jump up and continue the process that you started earlier. Ride these two platforms all the way to the top of the tower and on to part H above.
Part H[edit]

- Aside from figuring out the rest of the maze, you've completed the most challenging aspect of the castle. Now all you must do is find the boss. Proceed by walking to the right. Do not explore the path to the left or you will be taken back to part D. Do not fall back down the pit either.
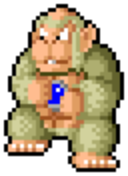
- As you walk right through the hallway, you will encounter three snow apes tossing ice cubes at you. Deal with them carefully and approach the chamber beyond. Inside, you will find a regular Kong. You can jump into the chamber and attack him aggressively, or you can stand back and attack him from the ledge.
- After Kong is defeated, continue right. Defeat the three white snakes, and you will find another branch with a floating platform. Unlike last time, the lower path is the wrong path. Instead, take the upper route to part I
Part I[edit]

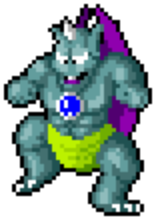
- Part I may look reminiscent of Part F at first, but it's quite different. You will walk along an empty hallway until you reach a chamber. In the chamber will be a fireball-surrounded Demon.
- The fact is, besides getting around it, there is nothing that compels you to fight and defeat the Demon. If you are able to, you can simply jump over it an ignore it. In fact, doing so will prevent the spitting plants that usually follow from appearing.
- Whether you challenge the Demon or not, proceed to the right. If you defeated the Demon, spitting plants will appear here around a drop, one at a time. Take them out if you like, and then drop down the pit to Part J.
Part J[edit]

- At this point, the game plays a cruel trick on you. Part J looks almost identical to part C, right down to the four strong bats on the right followed by four strong bats on the left. You may think you have made a big mistake and gone backwards, but you haven't.
- The way you know that part J is unique from part C is because of the enemies which appear near the bottom after you collect the items that the bats drop. Four white snakes and a Vampire will appear, and they can easily surprise you and knock you off the ledge if you're not prepared.
- Since this is not part C, you should not consider dropping down the right path. This time, take the left, and you'll arrive in part K
Part K[edit]

- You will easily be able to distinguish this section from the previous section by the alternating regular bats and strong bats. Don't forget that regular bats routinely drop hearts, so it's important to hit each one of them to see if they drop one. Bounce off the strong bats if you must to ensure that you strike them.
- You will arrive in a new hallway when you reach the bottom, which branches both to the left and to the right. The hallway is occupied by a set of blue rats and Mudmen found on either side of the drop.
- While the right end of the hallway simply ends, the left end has steps and a sign post pointing left. These signs have never lied to you before, so follow it to reach part L.
Part L[edit]

- You will immediately notice the change in scenery, as the background goes dramatically from medieval castle to futuristic technological bunker. There are no enemies in this section, and you can not return to the previous sections. All that you will find is an ominous red door at the end of the hallway. Enter it to challenge the final…
Boss[edit]
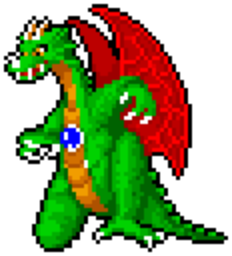
You finally made it to the last showdown in the game, between you and a fearsome green dragon. The only weak point that the dragon has is its head, so you'll often need to leap up in order to strike him. If you happen to possess the Ruby, than the first strike you connect with will weaken him substantially cutting down the length of a very difficult battle. Otherwise you must persevere and survive the complete battle.
The Dragon typically hops around and breathes huge plume of fire at you. He will even jump into the air and hover while blasting you with flame. You should be able to shield yourself from most, if not all of the dragon's attack. When the Dragon lands back on the floor, this is your best opportunity to attack. Jump up and strike him in the head and then reposition yourself for attack. The most strategic thing you can do is run underneath him while he hovers in the air. He will completely miss you with his fire, and he will land facing you, making it easy to set yourself up to strike him.
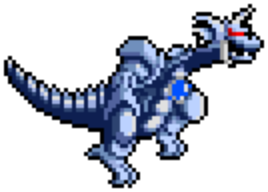
Although you may make tremendous progress on the dragon, don't get too relaxed when you are close to defeating him. The green dragon that you see before you is not the Dragon's true form. It is in fact a mechanical robot dragon. Defeating the green exterior reveals the robotic form underneath. This form will have a full health meter, and you will have no Ruby to help you defeat it quicker. Hopefully you still have Medicine remaining, just in case.
Despite the new look, the mechanical dragon fights no differently than the original form. The strategies you employed in the first fight should continue to work. Special weapons in general are not too useful against the dragon. Bombs and Whirlwinds fall to the floor where they become useless, so you must hit the dragon in the head with them before they fall. Fireballs have a high tendency to miss the dragon's head. The only special weapon that serves any practical purpose against the Dragon is lightning, which never fails to hit. Even if you have to use up your other special weapons just to get to lightning, this is worth doing.
Continue keeping constant pressure on the mechanical dragon, running underneath him when he leaps up, and jumping up to strike its head when it lands back down, and you will be sure to defeat him. Then you will be treated to the ending of the game and the credits
Systematic strategy for Arcade and PCE versions:
- The dragon is way harder than any other bosses due to its vicious hit box. Unlike any other enemies, the hit box of the dragon is slightly larger than its sprite, so it is important to keep a safe distance from it. On the other hand, its hurt box is a tiny section around the chest which your strike will miss when you are on the ground. It has 3 movement patterns before blasting flame - lunge, small leap and big leap. To get into the ready position, make sure you are facing it and stand about 2 character sprite width away from it.
- If it stays on the ground and lunges, do not move and block the fire blast.
- If it takes a hop into the air, slowly walk to a spot where you will be under the flame but do not stay too close to the dragon or it will crush you upon landing. Once it is back on the ground, you are now ready to strike. Ideally you should be standing at a position where the tip of your blade would just about touch the dragon. The most proper way to guarantee a hit is to jump vertically and strike simultaneously (i.e. press both buttons at the same time).
- Regardless of the outcome of the strike, get back to the ready position and repeat. If you happen to get hit by the flame or the dragon itself, stay calm and do not attempt to strike it while you are invisible. Forward jumping strike would most likely lead to losing more health.
- Even if you do not have the chance to pin it in the corner, you should be able to beat the dragon by the time the second hourglass is finished.
Famicom Solution[edit]
The maze has zodiac symbols at each crossroad, so that it is much easier to find the correct path. For the paths to choose, check the hints given by the monks you have saved earlier.
- At the Aries (Part A), go down.
- At the Taurus (Part B), go down.
- At the Gemini (Part C), go right.
- At the Cancer (Part D), go left. Then at the Leo, go down.
- At the Virgo, go right. Then at the Libra, go up.
- At the Scorpio (Part G), ride the elevator and go up.
- At the Sagittarius (Part H), go right. Then at the Capricorn, go left (go up actually).
- At the Aquarius (Part I), go down.
- At the Pisces, go left. Then at the Moon, go left too.
- At the Sun (Part K), go left and you will find the Ox King.
Changes of the maps:
- The Part E has been replaced with a single vertical shaft. You will need to push Right as soon as you enter the shaft, since the Virgo icon is right at the start of this shaft.
- Before you find the Libra icon, there is only a short path with no branches and some minor enemies.
- At the Libra icon, kill a monster flower on the right to make the floating platform appear.
- The Part J has been replaced with the same layout as Part D, only that the icons are different, such that the exit is also changed.
- The Part K is modified that you come from the right end. Killing a monster flower can make a floating platform appear, but...
Sega Master System Solution[edit]
For the most part, the early portion of the SMS solution is the same as the original. It changes after you climb up the tower with the rising blocks. Unfortunately, enemies still provide you with money in this version.
- Run to the right side of the first hallway (fighting two Deaths in the chamber) and take the lower pathway.
- Run to the right of the second hallway (fighting a short Red Knight in the chamber) and take the opportunity to drop down the pit.
- The next shaft will not contain bats like in the original. Drop down the right side.
- Run to the left of the hallway that you land in, fighting the Red Spirits and running beneath the Blue Spirits as you go. Drop down the pit.
- Push right as you fall, go to the next room, fall down the pit, and push right as you fall. Go to the next room.
- Run to the right in the next hallway, fight the short Red Knight, and then fight past three Blue Goblins. A floating platform should be waiting to take you up to the tower, you should not have to return to the left to make it appear if you killed everything along the way.
- The first platform that you must land on in the tower is to the right, not the left. As with the original game, you must quickly jump back and forth, allowing the block you leap off of to rise. Unlike the original, there are two breaks along the way, but there are no snakes in them.
- When you reach the top, the solution changes. Now you must head to the left where there is a branch in the path. Take the upper route.
- Run over the first drop that you encounter to the next hallway on the left. Run through the hallway to the left side. You will then come to a new hallway, with plants surrounding a drop. Fall down the drop.
- As with the last time you fell through a section like this, you want to fall to the right and land in the hallway. Go right and drop down the pit. Only this time, do not push right as you fall. Fall down to the hallway below, and head to the right. You must go through the course in this manner. You may not fall down to the lower hallway and run to the right, as that will return you to the beginning of the castle.
- You will know that you are headed in the right direction if you encounter crabs in the next hallway. If you're lucky, a crab might drop a big heart. Proceed down the hallway fighting the crabs (there's a Cobra and a Poverty in the chamber) until you reach the next drop.
- Fall down the drop, and proceed to fall all the way down to the bottom. You will end up in a hallway with Red Spirits and Blue Goblins. Run to the left. There is a very strong short Red Knight in the chamber, but you aren't required to defeat him. There is a lone red Snake sitting at the end of the hallway.
- Beyond here, you will reach the futuristic portion of the castle. Run to the left end to reach the door to the Dragon. The strategy to defeat the Dragon is the same as above, and he is not quite as strong as the original version. However, unlike the original, bombs and whirlwinds pass right through his head and have no effect on him. Fireballs and Lightning are still useful against him.
