m (Forgot to mention a nice tip) |
(→Weaver's Peak Revisited (Mountain Pass): Correcting typo) |
||
| (5 intermediate revisions by one other user not shown) | |||
| Line 1: | Line 1: | ||
{{Header Nav|game=Dragon Quest VI: Realms of Revelation}} | {{Header Nav|game=Dragon Quest VI: Realms of Revelation}} | ||
NOTE: Rex should be close to mastering Dancer. Be sure to switch him to Luminary once he has. | |||
== Weaver's Peak Revisited (Mountain Pass) == | == Weaver's Peak Revisited (Mountain Pass) == | ||
[[File:DQ6 Path to Mountain Pass.jpg|thumb|left| | [[File:DQ6 Path to Mountain Pass.jpg|thumb|left|]] | ||
[[File:DQ6 Mountain Pass (RW).png|thumb|right| | [[File:DQ6 Mountain Pass (RW).png|thumb|right|]] | ||
Warp back to Wellshire and sail towards the house listed right below the Pass; you'll find your | Warp back to Wellshire and sail towards the house listed right below the Pass; you'll find your [[File:Dragon Warrior 3 SNES Small Medal.png]] <span style="color:green">62nd Mini Medal</span> inside. As for the Pass itself, we will be making two visits through it; so leave the treasures at point '''I''' for later. | ||
Do get the rest of the treasures though. As for monsters, they are all pretty easy; Bomboulders are the only pests here, for they can cast Kerplunk. You can just incapacitate them with Fizzle and Kasnooze though, so "Fight Wisely" is more than sufficient for them. | Do get the rest of the treasures though, including the [[File:Dragon Warrior 3 SNES Small Medal.png]] <span style="color:green">63rd Mini Medal</span>. As for monsters, they are all pretty easy; Bomboulders are the only pests here, for they can cast Kerplunk. You can just incapacitate them with Fizzle and Kasnooze though, so "Fight Wisely" is more than sufficient for them. | ||
== Weaver's Peak Revisited (Village) == | == Weaver's Peak Revisited (Village) == | ||
[[File:DQ6 Weaver's Peak (RW).png|thumb|right| | [[File:DQ6 Weaver's Peak (RW).png|thumb|right|]] | ||
NOTE: You need Rex in your party for the next sequence triggers | |||
Here it is...the place where it all began. Except this time, things are a lot different. | Here it is...the place where it all began. Except this time, things are a lot different. Get the [[File:Dragon Warrior 3 SNES Small Medal.png]] <span style="color:green">64th Mini Medal</span>, talk to the mayor inside the northeast house, go to the northwest house to talk to Tania, and then the other Rex will appear inside the mayor's house. Talk to him, and leave once he panics and runs out. You'll now need to head back to the Mountain Pass, and you still need Rex in your party. So prepare your party like so: | ||
{| {{prettytable|notwide=1}} | {| {{prettytable|notwide=1}} | ||
|'''Carver (Level 22): Miracle Sword, Sacred Armour (Hela's Armour for some bosses), Platinum/Dragon Shield, Thinking Cap, Raging Ruby''' | |'''Carver (Level 22): Miracle Sword, Sacred Armour (Hela's Armour for some bosses), Platinum/Dragon Shield, Thinking Cap, Raging Ruby''' | ||
|- | |- | ||
|'''Amos (Level 20): Dream Blade, Enchanted Armour, | |'''Amos (Level 20): Dream Blade, Enchanted Armour, Magic/Dragon Shield, Iron Mask''' | ||
|- | |- | ||
|'''Rex (Level 21): ''Ghent Staff'', ''Flame Claw'', Platinum Mail, | |'''Rex (Level 21): ''Ghent Staff'', ''Flame Claw'', Platinum Mail, Magic Shield, Hat of Hermes, Gold Bracer''' | ||
|- | |- | ||
|'''Milly (Level 20): Platinum Sword, Flowing Dress, Silver Platter, Hat of Hermes, Meteorite Bracer''' | |'''Milly (Level 20): Platinum Sword, Flowing Dress, Silver Platter, Hat of Hermes, Meteorite Bracer''' | ||
|} | |} | ||
And then head back to the Mountain Pass. If you're playing the remakes, you will find the other Rex in the same place you saw him the first time you came to the Pass. But if you're playing the SNES, you will find him in the cave at point '''I'''. Whatever the case, talk to him, and a kid will come yelling for help. Get the | And then head back to the Mountain Pass. If you're playing the remakes, you will find the other Rex in the same place you saw him the first time you came to the Pass. But if you're playing the SNES, you will find him in the cave at point '''I'''. Whatever the case, talk to him, and a kid will come yelling for help. Get the [[File:Dragon Warrior 3 SNES Small Medal.png]] <span style="color:green">65th Mini Medal</span> from the cave before going back to Weaver's Peak. | ||
== Weaver's Peak Revisited (Gauntlet of Fights) == | == Weaver's Peak Revisited (Gauntlet of Fights) == | ||
| Line 37: | Line 37: | ||
[[File:DQ6 Pastor Heals Party.png|thumb|right|The pastor will restore all your HP and MP as many times as you wish!]] | [[File:DQ6 Pastor Heals Party.png|thumb|right|The pastor will restore all your HP and MP as many times as you wish!]] | ||
First of all, the pastor at the Church will heal everyone in your party for free, as many times as you wish! In fact, now's a fantastic time to spam Magic Burst, if Ashlynn got that already! This is good, because the game requires you to clear out a number of blue winged monsters from the village. Each time you talk to one, you will fight two enemies at once. You will need to be very careful in how you fight them though; they consist of Berzorkers, Sintaurs, Boss Trolls, and Bad Karmours, enemies that you wouldn't normally fight until the end of the game. You absolutely should not try to use A.I. tactics. | |||
Fortunately, the Berzorkers and Bad Karmours are weak to Fuddle; and you will fight at least one of those two in almost every single fight. So just have Rex use Fuddle Dance (or Lucida Shard) on them while your other PC's kill the other foe. | |||
Be wary of the group near Tania's house; that consists of a Boss Troll and a Sintaur. The Sintaur is immune to Fuddle, and the Boss Troll has 50% resistance; the only surefire way to have everyone survive is to cast 2x Buffs on Carver before having him spam Forebearance. Then the other three PC's dispose of the monsters at your leisure. | Be wary of the group near Tania's house; that consists of a Boss Troll and a Sintaur. The Sintaur is immune to Fuddle, and the Boss Troll has 50% resistance; the only surefire way to have everyone survive is to cast 2x Buffs on Carver before having him spam Forebearance. Then the other three PC's dispose of the monsters at your leisure. | ||
Once that's over, you will want to talk to the other Rex again. You will find him inside Tania's house if you got rid of all the other monsters. Fuse with him, and you will gain the almighty Zap spell! It costs only 6 MP, and does 70-90 Lightning damage to every single enemy it hits! More importantly, however, it is the only attack you have that can harm this next boss. If you try to challenge it before merging with the other Rex, it will simply brush off all your attacks. | Once that's over, you will want to talk to the other Rex again. You will find him inside Tania's house if you got rid of all the other monsters. Fuse with him, and you will gain the almighty Zap spell! It costs only 6 MP, and does 70-90 Lightning damage to every single enemy it hits! More importantly, however, it is the only attack you have that can harm this next boss. If you try to challenge it before merging with the other Rex, it will simply brush off all your attacks. | ||
| Line 152: | Line 150: | ||
|'''Milly (Level 21): Platinum Sword, Flowing Dress, Silver Platter, Hat of Hermes, Agility Ring/Gold Bracer (depending on how low she is on MP)''' | |'''Milly (Level 21): Platinum Sword, Flowing Dress, Silver Platter, Hat of Hermes, Agility Ring/Gold Bracer (depending on how low she is on MP)''' | ||
|- | |- | ||
|'''Nevan (Level 20): Morning Star, Flowing Dress, Magic Shield, | |'''Nevan (Level 20): Morning Star, Flowing Dress, Magic Shield, Shell Helmet, Agility Ring/Gold Bracer (depending on how low he is on MP)''' | ||
|} | |} | ||
{{Footer Nav|game=Dragon Quest VI: Realms of Revelation|prevpage=Item collection: Part 2|nextpage=Sword of Ramias}} | {{Footer Nav|game=Dragon Quest VI: Realms of Revelation|prevpage=Item collection: Part 2|nextpage=Sword of Ramias}} | ||
Latest revision as of 03:35, 24 July 2020
NOTE: Rex should be close to mastering Dancer. Be sure to switch him to Luminary once he has.
Weaver's Peak Revisited (Mountain Pass)[edit]


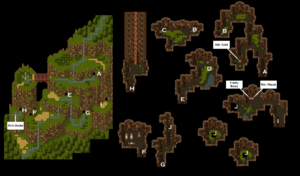
Warp back to Wellshire and sail towards the house listed right below the Pass; you'll find your ![]() 62nd Mini Medal inside. As for the Pass itself, we will be making two visits through it; so leave the treasures at point I for later.
62nd Mini Medal inside. As for the Pass itself, we will be making two visits through it; so leave the treasures at point I for later.
Do get the rest of the treasures though, including the ![]() 63rd Mini Medal. As for monsters, they are all pretty easy; Bomboulders are the only pests here, for they can cast Kerplunk. You can just incapacitate them with Fizzle and Kasnooze though, so "Fight Wisely" is more than sufficient for them.
63rd Mini Medal. As for monsters, they are all pretty easy; Bomboulders are the only pests here, for they can cast Kerplunk. You can just incapacitate them with Fizzle and Kasnooze though, so "Fight Wisely" is more than sufficient for them.
Weaver's Peak Revisited (Village)[edit]

NOTE: You need Rex in your party for the next sequence triggers
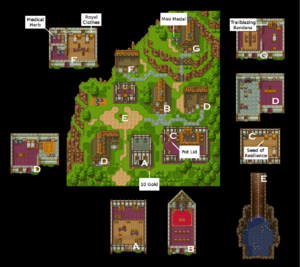
Here it is...the place where it all began. Except this time, things are a lot different. Get the ![]() 64th Mini Medal, talk to the mayor inside the northeast house, go to the northwest house to talk to Tania, and then the other Rex will appear inside the mayor's house. Talk to him, and leave once he panics and runs out. You'll now need to head back to the Mountain Pass, and you still need Rex in your party. So prepare your party like so:
64th Mini Medal, talk to the mayor inside the northeast house, go to the northwest house to talk to Tania, and then the other Rex will appear inside the mayor's house. Talk to him, and leave once he panics and runs out. You'll now need to head back to the Mountain Pass, and you still need Rex in your party. So prepare your party like so:
| Carver (Level 22): Miracle Sword, Sacred Armour (Hela's Armour for some bosses), Platinum/Dragon Shield, Thinking Cap, Raging Ruby |
| Amos (Level 20): Dream Blade, Enchanted Armour, Magic/Dragon Shield, Iron Mask |
| Rex (Level 21): Ghent Staff, Flame Claw, Platinum Mail, Magic Shield, Hat of Hermes, Gold Bracer |
| Milly (Level 20): Platinum Sword, Flowing Dress, Silver Platter, Hat of Hermes, Meteorite Bracer |
And then head back to the Mountain Pass. If you're playing the remakes, you will find the other Rex in the same place you saw him the first time you came to the Pass. But if you're playing the SNES, you will find him in the cave at point I. Whatever the case, talk to him, and a kid will come yelling for help. Get the ![]() 65th Mini Medal from the cave before going back to Weaver's Peak.
65th Mini Medal from the cave before going back to Weaver's Peak.
Weaver's Peak Revisited (Gauntlet of Fights)[edit]

First of all, the pastor at the Church will heal everyone in your party for free, as many times as you wish! In fact, now's a fantastic time to spam Magic Burst, if Ashlynn got that already! This is good, because the game requires you to clear out a number of blue winged monsters from the village. Each time you talk to one, you will fight two enemies at once. You will need to be very careful in how you fight them though; they consist of Berzorkers, Sintaurs, Boss Trolls, and Bad Karmours, enemies that you wouldn't normally fight until the end of the game. You absolutely should not try to use A.I. tactics.
Fortunately, the Berzorkers and Bad Karmours are weak to Fuddle; and you will fight at least one of those two in almost every single fight. So just have Rex use Fuddle Dance (or Lucida Shard) on them while your other PC's kill the other foe.
Be wary of the group near Tania's house; that consists of a Boss Troll and a Sintaur. The Sintaur is immune to Fuddle, and the Boss Troll has 50% resistance; the only surefire way to have everyone survive is to cast 2x Buffs on Carver before having him spam Forebearance. Then the other three PC's dispose of the monsters at your leisure.
Once that's over, you will want to talk to the other Rex again. You will find him inside Tania's house if you got rid of all the other monsters. Fuse with him, and you will gain the almighty Zap spell! It costs only 6 MP, and does 70-90 Lightning damage to every single enemy it hits! More importantly, however, it is the only attack you have that can harm this next boss. If you try to challenge it before merging with the other Rex, it will simply brush off all your attacks.
VS. Demon-at-Arms (2)[edit]
| Recommended Level: | Carver Lvl 22, Amos Lvl 20, Rex Lvl 21, Milly Lvl 20 |
|---|---|
| Recommended A.I. Settings (Including the SNES version!): | Everyone: (Focus on Healing) |
| HP: | 400 |
| MP: | 50 |
| Item: | Medicinal Herb (1/4096 of dropping) |
| Attack: | 160 |
| Defense: | 270 |
| Agility: | 57 |
| EXP: | 1800 |
| Gold: | 320 |
| Attack Patterns (Has a 50% chance of attacking twice in a single round!): | Slash [1.25x Damage] (33.33%), Attack (16.66%), Flame Breath [30-40 Fire Damage] (16.66%), Kacrackle [80-104 Ice Damage] (16.66%), Kasap (16.66%) |
| A.I. Pecularities: | None |
| Resistances: | No resistance to Zap, Immunity to everything else |
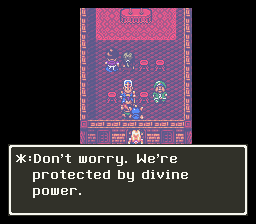
This is a weird boss in several ways. First of all, this is not the Demon-at-Arms you would have fought if you had not gotten Zap. Instead, you would have fought Demon-at-Arms (1), who has almost 4x the HP, a guaranteed 2x attacks per round, a second AoE attack, and higher stats across the board. Secondly, this boss was literally created so that only Rex could seriously hurt it. Finally, it is impossible to actually LOSE this fight; if Rex dies, the battle will be interrupted by a cinematic. The other Rex will scream from the main Rex's subconscious, the whole party will be restored, and Demon-at-Arms (2) will be replaced by the following:
VS. Demon-at-Arms (3)[edit]
| Recommended Level: | Carver Lvl 22, Amos Lvl 20, Rex Lvl 21, Milly Lvl 20 |
|---|---|
| Recommended A.I. Settings (Including the SNES version!): | Everyone: (Focus on Healing) |
| HP: | 150-0 HP (damage from any previous Demon-at-Arms (3) fights will carry over) |
| MP: | 2 |
| Item: | Medicinal Herb (1/4096 of dropping) |
| Attack: | 140 |
| Defense: | 230 |
| Agility: | 28 |
| EXP: | 1800 |
| Gold: | 320 |
| Attack Patterns (Only attacks once per round): | Attack (33.33%), Slash [1.25x Damage] (16.66%), Kasizzle [Insufficient MP] (33.33%), Kacrackle [Insufficient MP] (16.66%) |
| A.I. Pecularities: | None |
| Resistances: | No resistance to Zap, Immunity to everything else |
And if you somehow lose to this version, the game will revive you once again; and it will keep doing so until Rex finally lands two Zaps. And if Rex is somehow weak enough that just one attack kills him, you can just keep trying until Demon-at-Arms (3) wastes it's turn trying to cast a spell.
In other words, the fight is just a glorified cutscene. Just put everyone on Focus on Healing and Zap Demon-at-Arms to death.
Getting the Helm of Sebath[edit]
Zoom back to Real World Somnia, go through all the scenes, and collect every blue orb scattered around the castle. There are three on the 1st floor and three on the 2nd floor. Then once you've collected those, you will find a seventh one found in the throne room. Once all is said and done, you will finally get your first piece of legendary equipment; the Helm of Sebath!
This helmet is exlusive to the hero, and grants almost total immunity to all status and death spells! At 45+ Defense, it is tied with the Golden Tiara for 2nd best helmet in the game! Combine that with Rex's newly acquired Zap spell, and that means he's finally strong enough to join the main party! So arrange your group as so:
| Carver (Level 23): Miracle Sword, Sacred Armour (Hela's Armour for some bosses), Platinum/Dragon Shield, Thinking Cap, Raging Ruby |
| Rex (Level 22): Ghent Staff, Flame Claw, Dream Blade, Platinum Armour, Magic/Dragon Shield, Helm of Sebath, Meteorite Bracer |
| Milly (Level 21): Platinum Sword, Flowing Dress, Silver Platter, Hat of Hermes, Agility Ring/Gold Bracer (depending on how low she is on MP) |
| Nevan (Level 20): Morning Star, Flowing Dress, Magic Shield, Shell Helmet, Agility Ring/Gold Bracer (depending on how low he is on MP) |
