m (Attempting to remove excess bold-face and italics) |
m (Reformatting to help players keep better track of Mini Medals; and other general touch ups.) |
||
| Line 9: | Line 9: | ||
With that said, one neat thing you can do here is receive free infinite healing for both HP and MP. Simply take the stairs at point '''B''', and you'll find two orbs dedicated to HP restoration and MP restoration. So if you don't like spending money for Inns, you can simply Zoom to Sorceria whenever you wish. In addition, one can also get the Wizardly Whip as a powerful weapon upgrade for Ashlynn, and one can also get the Staff of Antimagic (free Fizzle) if they're lacking Fizzle users, and haven't gotten one from Swanstone. | With that said, one neat thing you can do here is receive free infinite healing for both HP and MP. Simply take the stairs at point '''B''', and you'll find two orbs dedicated to HP restoration and MP restoration. So if you don't like spending money for Inns, you can simply Zoom to Sorceria whenever you wish. In addition, one can also get the Wizardly Whip as a powerful weapon upgrade for Ashlynn, and one can also get the Staff of Antimagic (free Fizzle) if they're lacking Fizzle users, and haven't gotten one from Swanstone. | ||
In any case, | In any case, fetch the [[File:Dragon Warrior 3 SNES Small Medal.png]] <span style="color:green">75-76th Mini Medals</span>, as well as the [[File:DQ3 SNES Book.png]] <span style="color:blue">11-12th Dreamscapes</span> before heading to point '''N'''. Have Ashlynn use the Sand Urn while standing on the sand, and talk to Eldress Isnomor to get Magic Burst. Head back to the entrance, get the Prayer Ring from the well, and then talk to Old Man Soren in the house at point '''L'''. | ||
This is where the Plush Rug from [[Dragon Quest VI: Realms of Revelation/Item collection: Part 3|Item collection: Part 3]] comes in. If you won that from the Chateau de Sass, Soren will convert it into a Magic Carpet! Now you can fly any time you wish, in both worlds! You can't fly over mountains, but you ''can'' traverse parts of the overworld that were previously blocked off by other terrain. | This is where the Plush Rug from [[Dragon Quest VI: Realms of Revelation/Item collection: Part 3|Item collection: Part 3]] comes in. If you won that from the Chateau de Sass, Soren will convert it into a Magic Carpet! Now you can fly any time you wish, in both worlds! You can't fly over mountains, but you ''can'' traverse parts of the overworld that were previously blocked off by other terrain. | ||
| Line 18: | Line 18: | ||
Your next destination is the ruins of Graceskull, which houses the Armour of Orgo. Zoom to the Fashion Forge, ride your Magic Carpet as close as you can to the ruins of Graceskull, then get off. Walk through the forests until you're next to the pond that separates you from the ruins. Then you'll want to get back on the Magic Carpet and fly over it! Get off the carpet again, and enter the ruins. | Your next destination is the ruins of Graceskull, which houses the Armour of Orgo. Zoom to the Fashion Forge, ride your Magic Carpet as close as you can to the ruins of Graceskull, then get off. Walk through the forests until you're next to the pond that separates you from the ruins. Then you'll want to get back on the Magic Carpet and fly over it! Get off the carpet again, and enter the ruins. | ||
== Graceskull Ruins == | == Graceskull Ruins == | ||
[[File:DQ6 Graceskull Ruins.png|thumb|right|The well | [[File:DQ6 Graceskull Ruins.png|thumb|right|]] | ||
[[File:DQ6 Hidden Passage at Graceskull Ruins.png|thumb|left|The stairs in this picture won't be revealed until you use the Golden Pickaxe on that specific tile]] | |||
The game expects you to enter the well and go through all the cutscenes in the Dream World version of Graceskull. It is only then that blind players would know to use the Golden Pickaxe to reveal the stairs. However, this is not a mandatory sequence trigger; one can simply reveal the stairs and head straight to the Armour of Orgo. However, there are two more Mini Medals and a Dreamscape to be grabbed on the other side of the well. | |||
== Castle Graceskull == | == Castle Graceskull == | ||
[[File:DQ6 Graceskull Castle.png|thumb|right|There are many cutscenes, but only the 1st one in the throne room needs to be viewed to collect every item | [[File:DQ6 Graceskull Castle.png|thumb|right|There are many cutscenes, but only the 1st one in the throne room needs to be viewed to collect every item.]] | ||
Like with Graceskull's Real World counterpart, the Golden Pickaxe must be used on the upper-right tile at point '''L''' before you can access the cellars. Aside from that, there are no special requirements for raiding the castle; you can skip all but one cutscene in the throne room if you | Like with Graceskull's Real World counterpart, the Golden Pickaxe must be used on the upper-right tile at point '''L''' before you can access the cellars. Aside from that, there are no special requirements for raiding the castle; you can skip all but one cutscene in the throne room if all you want are the [[File:Dragon Warrior 3 SNES Small Medal.png]] <span style="color:green">77-78th Mini Medals</span>, as well as the [[File:DQ3 SNES Book.png]] <span style="color:blue">13th Dreamscape</span>. | ||
But if you do want to view the cutscenes, talk to the guard at point '''I''', get the offering from the woman next to point '''E''', talk to the guard at point '''I''' again, go back to the throne room, watch another cutscene, then talk to the king at point '''I''' to watch the carnage unfold. But be sure to get the three treasures in the cellar before doing so; the game takes control away from you the moment the monster is summoned. | |||
In any case, you should now have | In any case, you should now have 78 Mini Medals and 13 Dreamscapes. Zoom to Amor and head to your next destination. | ||
{{Footer Nav|game=Dragon Quest VI: Realms of Revelation|prevpage=Seabed Shrine|nextpage=Shield of Valora}} | {{Footer Nav|game=Dragon Quest VI: Realms of Revelation|prevpage=Seabed Shrine|nextpage=Shield of Valora}} | ||
Latest revision as of 10:48, 27 April 2017
Sorceria[edit]
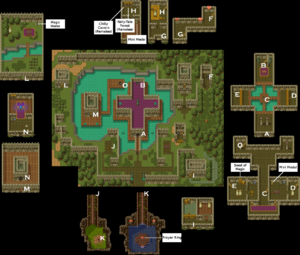
NOTE: Ashlynn must be in your party for the sequence triggers!
With that said, one neat thing you can do here is receive free infinite healing for both HP and MP. Simply take the stairs at point B, and you'll find two orbs dedicated to HP restoration and MP restoration. So if you don't like spending money for Inns, you can simply Zoom to Sorceria whenever you wish. In addition, one can also get the Wizardly Whip as a powerful weapon upgrade for Ashlynn, and one can also get the Staff of Antimagic (free Fizzle) if they're lacking Fizzle users, and haven't gotten one from Swanstone.
In any case, fetch the ![]() 75-76th Mini Medals, as well as the
75-76th Mini Medals, as well as the ![]() 11-12th Dreamscapes before heading to point N. Have Ashlynn use the Sand Urn while standing on the sand, and talk to Eldress Isnomor to get Magic Burst. Head back to the entrance, get the Prayer Ring from the well, and then talk to Old Man Soren in the house at point L.
11-12th Dreamscapes before heading to point N. Have Ashlynn use the Sand Urn while standing on the sand, and talk to Eldress Isnomor to get Magic Burst. Head back to the entrance, get the Prayer Ring from the well, and then talk to Old Man Soren in the house at point L.
This is where the Plush Rug from Item collection: Part 3 comes in. If you won that from the Chateau de Sass, Soren will convert it into a Magic Carpet! Now you can fly any time you wish, in both worlds! You can't fly over mountains, but you can traverse parts of the overworld that were previously blocked off by other terrain.
Path to Graceskull Ruins[edit]
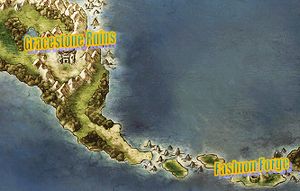
Your next destination is the ruins of Graceskull, which houses the Armour of Orgo. Zoom to the Fashion Forge, ride your Magic Carpet as close as you can to the ruins of Graceskull, then get off. Walk through the forests until you're next to the pond that separates you from the ruins. Then you'll want to get back on the Magic Carpet and fly over it! Get off the carpet again, and enter the ruins.
Graceskull Ruins[edit]
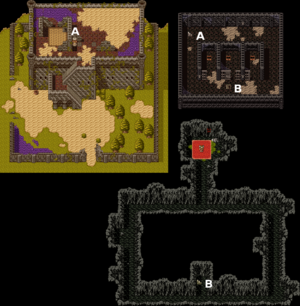
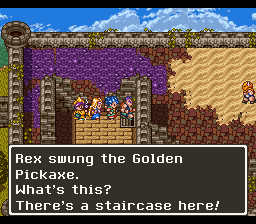
The game expects you to enter the well and go through all the cutscenes in the Dream World version of Graceskull. It is only then that blind players would know to use the Golden Pickaxe to reveal the stairs. However, this is not a mandatory sequence trigger; one can simply reveal the stairs and head straight to the Armour of Orgo. However, there are two more Mini Medals and a Dreamscape to be grabbed on the other side of the well.
Castle Graceskull[edit]
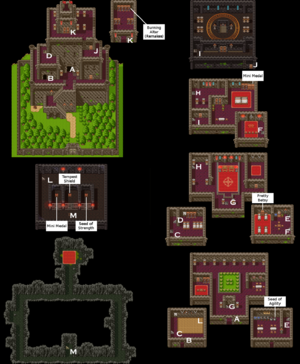
Like with Graceskull's Real World counterpart, the Golden Pickaxe must be used on the upper-right tile at point L before you can access the cellars. Aside from that, there are no special requirements for raiding the castle; you can skip all but one cutscene in the throne room if all you want are the ![]() 77-78th Mini Medals, as well as the
77-78th Mini Medals, as well as the ![]() 13th Dreamscape.
13th Dreamscape.
But if you do want to view the cutscenes, talk to the guard at point I, get the offering from the woman next to point E, talk to the guard at point I again, go back to the throne room, watch another cutscene, then talk to the king at point I to watch the carnage unfold. But be sure to get the three treasures in the cellar before doing so; the game takes control away from you the moment the monster is summoned.
In any case, you should now have 78 Mini Medals and 13 Dreamscapes. Zoom to Amor and head to your next destination.
