(establish page) |
|||
| (9 intermediate revisions by 5 users not shown) | |||
| Line 1: | Line 1: | ||
{{Header Nav|game=Super Mario Bros. 3}} | {{Header Nav|game=Super Mario Bros. 3}} | ||
{{floatingtoc|float=left|limit=2}} | {{floatingtoc|float=left|limit=2}} | ||
[[File:SMB3-Level7.png|right]] | [[File:SMB3-Level7.png|right]]{{-}} | ||
{{-}} | |||
==7-9== | ==World 7-9== | ||
{{Scrolling map|SMB3 | Navigate a gnarled pipe maze to reach the goal before time runs out. Distinguished by its length, you'll really have to watch your timer on this one. Don't go after bonus items unless you have plenty of seconds. Among the items available here are 3 Fire Flowers and a 1-Up.{{-}} | ||
* | {{Scrolling map|SMB3 W7 S9 a.png}} | ||
* | * '''1''': Jump through the crack in the structure, but be careful of what's lurking overhead. Enemies can drop from above. | ||
* | * '''2''': As you fall from the ledge, hole {{nes|Right|Dpad}} on the control pad and press {{nes|B}} to throw Ice Blocks. It may take several tries to clear the passage, but in this hard-to-reach area, you'll find a useful power-up. If you're Super Mario, the middle '''?''' Block below will sprout a Fire Flower. | ||
* | * '''3''': Collect coins by smashing through the block from below. There are several rich coin deposits in this stage, so try to take them all. | ||
* | * '''4''': Don't run too fast on the top of the structure, or you'll run the risk of crashing into a Goomba. Use fireballs to clear the path ahead of you. | ||
{{Scrolling map|SMB3 W7 S9 b.png}} | |||
* '''5''': The bottom passage here leads to a 1-Up and some bonus coins. The upper path leads to the end of the level. Don't go for the 1-Up unless you have plenty of time. It will take Super Mario's strength to bust through the block from below. When the passage is open, jump to the coins above. Most players miss the 1-Up in the center of these coins. To collect it, duck and jump in the middle, under the space in between the coins. | |||
* '''6''': Finding your way around the twisted maze of metal tubing can take some time, but if you have any to spare, collect the group of coins near the end of the stage. They can add up to an easy 1-Up, which you may need on the road to Bowser. | |||
* '''7''': Gather the last set of coins to the right of the exit pipe before heading to the end of the stage. | |||
==World 7 2nd Fortress== | |||
Piranha Plant-infested pipes for the only bridge across a sea of frothing lava.This Fortress can be a real terror. There are lots of Piranha Plants, Thwomps, Boo Diddlys and Roto Discs. Precise jumping is essential. Wear a Hammer Brother Suit if possible. | |||
{{Scrolling map|SMB3 W7 F2 a.png}} | |||
* '''1''': From the starting position, begin running while holding {{nes|B}} when the Piranha Plant is fully extended. By the time you land on the pipe, it should have retreated. | |||
* '''2''': Draw Boo Diddly to you and jump over him to the next pipe. Time your jump so that you avoid both the Piranha Plant and the Roto-Disc. | |||
* '''3''': Hurry and grab the Starman sealed in the '''?''' Block. Just don't fall into the lave trying to do it, and watch out for Boo Diddly. The Venus Fire Trap will spit fireballs at you, so you'll have to collect the Starman in a hurry to avoid getting roasted. | |||
* '''4''': Dupe the Boo Diddly here. Draw him near by facing away from him, and when he gets close, jump over him. | |||
{{Scrolling map|SMB3 W7 F2 b.png}} | |||
* '''5''': Wait for the two Piranha Plants to sync up and retreat into their pipes before you attempt to pass. If you delay on the lower pipe, duck so the upper one won't get you. | |||
* '''6''': Use the {{nes|B}} dash to run through here, but don't jump to the next pipe until Thwomp is resetting. | |||
* '''7''': To get to the end pipe, jump up and then curve around the overhang as you fall. Walk off the ledge and hold {{nes|Left|Dpad}} on the control pad. You should land on the pipe. If not, you'll be immersed in magma. | |||
{{Scrolling map|SMB3 W7 F2 c.png}} | |||
* '''8''': Just before you face BOOM-BOOM, you'll have to slip past a deviously engineered trap. Run and slide underneath the wall while the Roto-Disc swings away, then scramble along quickly or the Thwomp Trap will flatten you. | |||
* '''B''': Bust out your best anti-BOOM-BOOM strategy: stomp on him and wait only an instant before you stomp again. Time it so you land on him the very instant he retracts his spikes and goes back to normal. Use the tactic three times in quick succession to knock him out before he can even attack. | |||
==World 7 Piranha Plant 2== | |||
The tyrannical botanicals have grown back as the last obstacle before the King's Castle. This Piranha Plant mini-world looks impressive, but it's actually pretty easy. Try to make it past the first field of Munchers in one leap.{{-}} | |||
[[File:SMB3 W7 P2 b.png|right]] | |||
{{Scrolling map|SMB3 W7 P2 a.png}} | |||
* '''1''': Before you begin the level, use a Starman from your inventory. The area at the beginning of the stage will be much easier to pass while invincible. If using a Starman isn't an option, time your jumps and move methodically to avoid being chomped. | |||
* '''2''': When it's safe, run under the plants and jump onto the pipe. Watch your back, or you'll get smoked from behind. | |||
* '''3''': Cross a pit overgrown with Munchers by bouncing on Jump Blocks. Press {{nes|A}} when you contact the Jump Blocks to spring high into the air. To cross the final gap, use the same high-jump technique to bounce off the Koopa Paratroopa and onto the pipe. Besides being able to advance to the Koopaling's Airship, your only reward here is a Power-Up Mushroom.{{-}} | |||
==World 7 Airship== | |||
With one look into the eyes of the cruelest of Bowser's Koopalings, you'll be scared stiff. Ludwig von Koopa's airship is the Koopa fleet's flagship. It doesn't have any cannons, but it's loaded with tricky jumps and Bolt Lifts, and manned by Ludwig's scurvy crew of Rocky Wrenches.{{-}} | |||
{{Scrolling map|SMB3 W7 AS a.png}} | |||
A piece of advise: This would be an excellent place to use P-wings. There are no flying bullets to hit you in the air, and it will make the long, dangerous task of this ship a piece of cake. Also, this Koopa would be easier to defeat from the air since his leaps will stun you into inaction when you're touching the ground. | |||
* '''1''': You can choose to cross the gap at point 1 using the Bolt Lifts, but it's much safer (and easier) to cross the gap using the platforms where the Rocket Engines fire—just be sure to avoid the flames. | |||
{{Scrolling map|SMB3 | {{Scrolling map|SMB3 W7 AS b.png}} | ||
* | * '''2''': As soon as the gap under the wall scrolls into view, run and slide underneath it. Collect the power-up in the '''?''' Block above. Alternatively, you can hit the Bolt Lift under the platform from underneath to make it move left. Then use it to give yourself a boost to where the power-up is. | ||
* | * '''3''': Hop on the Bolt Lifts to move them out as far as possible, then leap across the gap. If you have the Raccoon Suit, float across. If you're exceptionally skilled at jumping, you can make it from platform to platform without using the Bolt Lifts by using the {{nes|B}} button jump. | ||
* | {{Scrolling map|SMB3 W7 AS c.png}} | ||
* '''4''': You might prefer to use the Bolt Lifts here, because it takes perfect timing to get over the gap with a {{nes|B}} button jump. | |||
== | === B: Ludwig von Koopa === | ||
[[File:SMB3 W7 Boss.png|right]] | |||
As the oldest and meanest Koopaling, Ludwig von Koopa is also the most formidable. He is second in command only to Bowser himself, so expect a ferocious fight. | |||
* | * Ludwig von Koopa suffers from the same weakness as his Koopa siblings—he's sensitive to a stomp on the head. | ||
* | * Just like the other Koopas, he'll spin at you when he's injured. However, the real danger comes from his paralyzing ability. | ||
* After you stomp him, land far away. As he charges, you'll be temporarily paralyzed! When the ailment wears off, stomp him. | |||
== | === Bowser's Underworld Hideout is next! === | ||
Although he was a little tougher to beat than the average Koopaling, Ludwig has been defeated. But what's this? The next letter you receive isn't from the Princess; it's from Bowser! The fiend has taken the Princess to his underworld domain. | |||
{{Footer Nav|game=Super Mario Bros. 3|prevpage=World 7 Part 2|nextpage=World 8}} | {{Footer Nav|game=Super Mario Bros. 3|prevpage=World 7 Part 2|nextpage=World 8}} | ||
Latest revision as of 15:37, 12 September 2015
World 7-9[edit]
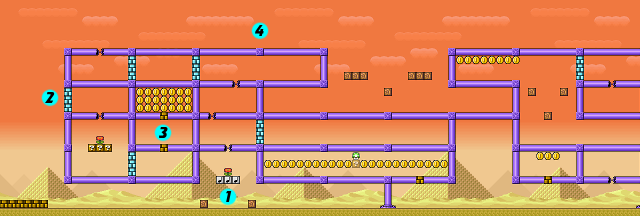
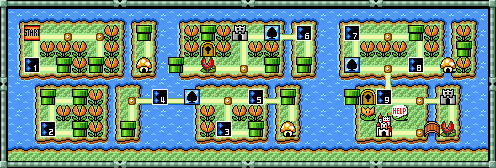
Navigate a gnarled pipe maze to reach the goal before time runs out. Distinguished by its length, you'll really have to watch your timer on this one. Don't go after bonus items unless you have plenty of seconds. Among the items available here are 3 Fire Flowers and a 1-Up.
- 1: Jump through the crack in the structure, but be careful of what's lurking overhead. Enemies can drop from above.
- 2: As you fall from the ledge, hole
 on the control pad and press
  to throw Ice Blocks. It may take several tries to clear the passage, but in this hard-to-reach area, you'll find a useful power-up. If you're Super Mario, the middle ? Block below will sprout a Fire Flower.
 - 3: Collect coins by smashing through the block from below. There are several rich coin deposits in this stage, so try to take them all.
- 4: Don't run too fast on the top of the structure, or you'll run the risk of crashing into a Goomba. Use fireballs to clear the path ahead of you.
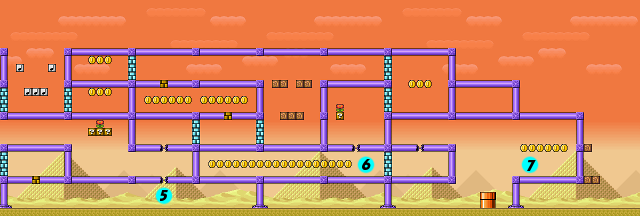
- 5: The bottom passage here leads to a 1-Up and some bonus coins. The upper path leads to the end of the level. Don't go for the 1-Up unless you have plenty of time. It will take Super Mario's strength to bust through the block from below. When the passage is open, jump to the coins above. Most players miss the 1-Up in the center of these coins. To collect it, duck and jump in the middle, under the space in between the coins.
- 6: Finding your way around the twisted maze of metal tubing can take some time, but if you have any to spare, collect the group of coins near the end of the stage. They can add up to an easy 1-Up, which you may need on the road to Bowser.
- 7: Gather the last set of coins to the right of the exit pipe before heading to the end of the stage.
World 7 2nd Fortress[edit]
Piranha Plant-infested pipes for the only bridge across a sea of frothing lava.This Fortress can be a real terror. There are lots of Piranha Plants, Thwomps, Boo Diddlys and Roto Discs. Precise jumping is essential. Wear a Hammer Brother Suit if possible.
- 1: From the starting position, begin running while holding
 when the Piranha Plant is fully extended. By the time you land on the pipe, it should have retreated.
 - 2: Draw Boo Diddly to you and jump over him to the next pipe. Time your jump so that you avoid both the Piranha Plant and the Roto-Disc.
- 3: Hurry and grab the Starman sealed in the ? Block. Just don't fall into the lave trying to do it, and watch out for Boo Diddly. The Venus Fire Trap will spit fireballs at you, so you'll have to collect the Starman in a hurry to avoid getting roasted.
- 4: Dupe the Boo Diddly here. Draw him near by facing away from him, and when he gets close, jump over him.
- 5: Wait for the two Piranha Plants to sync up and retreat into their pipes before you attempt to pass. If you delay on the lower pipe, duck so the upper one won't get you.
- 6: Use the
 dash to run through here, but don't jump to the next pipe until Thwomp is resetting.
 - 7: To get to the end pipe, jump up and then curve around the overhang as you fall. Walk off the ledge and hold
 on the control pad. You should land on the pipe. If not, you'll be immersed in magma.
- 8: Just before you face BOOM-BOOM, you'll have to slip past a deviously engineered trap. Run and slide underneath the wall while the Roto-Disc swings away, then scramble along quickly or the Thwomp Trap will flatten you.
- B: Bust out your best anti-BOOM-BOOM strategy: stomp on him and wait only an instant before you stomp again. Time it so you land on him the very instant he retracts his spikes and goes back to normal. Use the tactic three times in quick succession to knock him out before he can even attack.
World 7 Piranha Plant 2[edit]
The tyrannical botanicals have grown back as the last obstacle before the King's Castle. This Piranha Plant mini-world looks impressive, but it's actually pretty easy. Try to make it past the first field of Munchers in one leap.
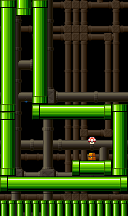
- 1: Before you begin the level, use a Starman from your inventory. The area at the beginning of the stage will be much easier to pass while invincible. If using a Starman isn't an option, time your jumps and move methodically to avoid being chomped.
- 2: When it's safe, run under the plants and jump onto the pipe. Watch your back, or you'll get smoked from behind.
- 3: Cross a pit overgrown with Munchers by bouncing on Jump Blocks. Press
 when you contact the Jump Blocks to spring high into the air. To cross the final gap, use the same high-jump technique to bounce off the Koopa Paratroopa and onto the pipe. Besides being able to advance to the Koopaling's Airship, your only reward here is a Power-Up Mushroom.
World 7 Airship[edit]
With one look into the eyes of the cruelest of Bowser's Koopalings, you'll be scared stiff. Ludwig von Koopa's airship is the Koopa fleet's flagship. It doesn't have any cannons, but it's loaded with tricky jumps and Bolt Lifts, and manned by Ludwig's scurvy crew of Rocky Wrenches.
A piece of advise: This would be an excellent place to use P-wings. There are no flying bullets to hit you in the air, and it will make the long, dangerous task of this ship a piece of cake. Also, this Koopa would be easier to defeat from the air since his leaps will stun you into inaction when you're touching the ground.
- 1: You can choose to cross the gap at point 1 using the Bolt Lifts, but it's much safer (and easier) to cross the gap using the platforms where the Rocket Engines fire—just be sure to avoid the flames.
- 2: As soon as the gap under the wall scrolls into view, run and slide underneath it. Collect the power-up in the ? Block above. Alternatively, you can hit the Bolt Lift under the platform from underneath to make it move left. Then use it to give yourself a boost to where the power-up is.
- 3: Hop on the Bolt Lifts to move them out as far as possible, then leap across the gap. If you have the Raccoon Suit, float across. If you're exceptionally skilled at jumping, you can make it from platform to platform without using the Bolt Lifts by using the
 button jump.
- 4: You might prefer to use the Bolt Lifts here, because it takes perfect timing to get over the gap with a
 button jump.
B: Ludwig von Koopa[edit]
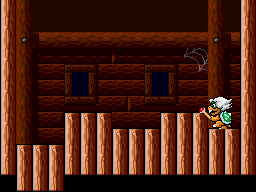
As the oldest and meanest Koopaling, Ludwig von Koopa is also the most formidable. He is second in command only to Bowser himself, so expect a ferocious fight.
- Ludwig von Koopa suffers from the same weakness as his Koopa siblings—he's sensitive to a stomp on the head.
- Just like the other Koopas, he'll spin at you when he's injured. However, the real danger comes from his paralyzing ability.
- After you stomp him, land far away. As he charges, you'll be temporarily paralyzed! When the ailment wears off, stomp him.
Bowser's Underworld Hideout is next![edit]
Although he was a little tougher to beat than the average Koopaling, Ludwig has been defeated. But what's this? The next letter you receive isn't from the Princess; it's from Bowser! The fiend has taken the Princess to his underworld domain.
