m (→Maps: forcing line break) |
No edit summary |
||
| (One intermediate revision by one other user not shown) | |||
| Line 14: | Line 14: | ||
{| align="center" | {| align="center" | ||
|+ '''Dungeon map color key''' | |+ '''Dungeon map color key''' | ||
| | | style="background-color:red" | '''Red''' || Dungeon exit | ||
|- | |- | ||
| | | style="background-color:orange" | '''Orange''' || Rooms with circles on the floor | ||
|- | |- | ||
| | | style="background-color:yellow" | '''Yellow''' || Dungeon shops (refer to the list below) | ||
|- | |- | ||
| | | style="background-color:lightgreen" | '''Green''' || Bounder Tower rooms | ||
|- | |- | ||
| | | style="background-color:cyan" | '''Blue''' || Dungeon entrance | ||
|}<br/> | |}<br/> | ||
{| {{prettytable}} | {| {{prettytable}} | ||
| Line 31: | Line 31: | ||
! Dungeon 3 || Dungeon 4 | ! Dungeon 3 || Dungeon 4 | ||
|- align="center" | |- align="center" | ||
| The entrance to Dungeon 3 leads to a | | The entrance to Dungeon 3 leads to a Shop 6 before all seven bells are burned.<br/>[[Image:Deadly Towers dungeon3.png]]|| [[Image:Deadly Towers dungeon4.png]] | ||
|- | |- | ||
! Dungeon 5 || Dungeon 6 | ! Dungeon 5 || Dungeon 6 | ||
| Line 39: | Line 39: | ||
! Dungeon 7 || Dungeon 8 | ! Dungeon 7 || Dungeon 8 | ||
|- align="center" | |- align="center" | ||
| [[Image:Deadly Towers dungeon7.png]] || The entrance to Dungeon 8 leads to a | | [[Image:Deadly Towers dungeon7.png]] || The entrance to Dungeon 8 leads to a Shop 3 before all seven bells are burned.<br/>[[Image:Deadly Towers dungeon8.png]] | ||
|- | |- | ||
! Dungeon 9 || Dungeon 10 | ! Dungeon 9 || Dungeon 10 | ||
| Line 47: | Line 47: | ||
== Shops == | == Shops == | ||
Shops are a fairly reliable source for equipment. Unfortunately, some of the best equipment is rather expensive, considering that the most money that you can carry is 250 Ludder. That's why knowing the location of the nearest Bounder Tower rooms is so important, so that you can quickly recoup the money that you spend. Shops will always have a preset list of items available, and that list will only change at two points throughout the game. After three bells have been | Shops are a fairly reliable source for equipment. Unfortunately, some of the best equipment is rather expensive, considering that the most money that you can carry is 250 Ludder. That's why knowing the location of the nearest Bounder Tower rooms is so important, so that you can quickly recoup the money that you spend. Shops will always have a preset list of items available, and that list will only change at two points throughout the game. After three bells have been collected (even if you do not burn them right away), the shops will change to reflect the increased difficulty of the enemies that you will encounter outside. This happens for a second time after five bells have been collected. Some items are not available for sale until these changes have taken place. Other items, like the Hyper Boots, are ''only'' available early on in the game. | ||
{| {{prettytable}} | {| {{prettytable}} | ||
! rowspan="3" | Shop 1 | ! rowspan="3" | Shop 1 | ||
| ''0-2 bells | | ''0-2 bells collected:'' || Red Drink || 50 || Shield || 100 || Figurine || 90 | ||
|- | |- | ||
| ''3-4 bells | | ''3-4 bells collected:'' || Red Drink || 60 || Magic Key || 120 || Orange Crystal || 90 | ||
|- | |- | ||
| ''5-7 bells | | ''5-7 bells collected:'' || Red Drink || 70 || Green Necklace || 200 || Red Crystal || 100 | ||
|- | |- | ||
! rowspan="3" | Shop 2 | ! rowspan="3" | Shop 2 | ||
| ''0-2 bells | | ''0-2 bells collected:'' || Red Drink || 40 || Gloves || 100 || Orange Necklace || 90 | ||
|- | |- | ||
| ''3-4 bells | | ''3-4 bells collected:'' || Red Drink || 50 || Normal Gloves || 180 || Green Necklace || 90 | ||
|- | |- | ||
| ''5-7 bells | | ''5-7 bells collected:'' || Green Drink || 99 || Normal Gloves || 150 || Blue Scroll || 95 | ||
|- | |- | ||
! rowspan="3" | Shop 3 | ! rowspan="3" | Shop 3 | ||
| ''0-2 bells | | ''0-2 bells collected:'' || Red Drink || 40 || Shield || 80 || Red Crystal || 60 | ||
|- | |- | ||
| ''3-4 bells | | ''3-4 bells collected:'' || Blue Scroll || 40 || Lion Shield || 90 || Fire Magic || 80 | ||
|- | |- | ||
| ''5-7 bells | | ''5-7 bells collected:'' || Orange Drink || 70 || Orange Scroll || 190 || Blue Drink || 90 | ||
|- | |- | ||
! rowspan="3" | Shop 4 | ! rowspan="3" | Shop 4 | ||
| ''0-2 bells | | ''0-2 bells collected:'' || Red Drink || 50 || Short Sword || 100 || Chain Helmet || 92 | ||
|- | |- | ||
| ''3-4 bells | | ''3-4 bells collected:'' || Green Drink || 99 || Normal Sword || 140 || Figurine || 90 | ||
|- | |- | ||
| ''5-7 bells | | ''5-7 bells collected:'' || Red Drink || 90 || Normal Sword || 240 || Green Scroll || 90 | ||
|- | |- | ||
! rowspan="3" | Shop 5 | ! rowspan="3" | Shop 5 | ||
| ''0-2 bells | | ''0-2 bells collected:'' || Red Drink || 99 || Chain Helmet || 100 || Shield || 90 | ||
|- | |- | ||
| ''3-4 bells | | ''3-4 bells collected:'' || Orange Drink || 99 || Iron Helmet || 120 || Blue Crystal || 45 | ||
|- | |- | ||
| ''5-7 bells | | ''5-7 bells collected:'' || Orange Drink || 99 || Magic Mace || 150 || Green Crystal || 130 | ||
|- | |- | ||
! rowspan="3" | Shop 6 | ! rowspan="3" | Shop 6 | ||
| ''0-2 bells | | ''0-2 bells collected:'' || Red Drink || 30 || Chain Helmet || 80 || Fire Magic || 60 | ||
|- | |- | ||
| ''3-4 bells | | ''3-4 bells collected:'' || Red Drink || 45 || Iron Helmet || 150 || Red Scroll || 73 | ||
|- | |- | ||
| ''5-7 bells | | ''5-7 bells collected:'' || Red Drink || 55 || Iron Helmet || 150 || Fire Magic || 80 | ||
|- | |- | ||
! rowspan="3" | Shop 7 | ! rowspan="3" | Shop 7 | ||
| ''0-2 bells | | ''0-2 bells collected:'' || Red Drink || 70 || Orange Scroll || 100 || Hyper Boots || 232 | ||
|- | |- | ||
| ''3-4 bells | | ''3-4 bells collected:'' || Red Drink || 80 || Green Scroll || 123 || Shield || 80 | ||
|- | |- | ||
| ''5-7 bells | | ''5-7 bells collected:'' || Red Drink || 98 || Cup (Evil) || 150 || Red Necklace || 240 | ||
|- | |- | ||
! rowspan="3" | Shop 8 | ! rowspan="3" | Shop 8 | ||
| ''0-2 bells | | ''0-2 bells collected:'' || Red Drink || 40 || Leather Armor || 100 || Figurine || 98 | ||
|- | |- | ||
| ''3-4 bells | | ''3-4 bells collected:'' || Red Drink || 60 || Plate Armor || 155 || Orange Scroll || 90 | ||
|- | |- | ||
| ''5-7 bells | | ''5-7 bells collected:'' || Blue Drink || 99 || Plate Armor || 150 || Lion Shield || 99 | ||
|} | |} | ||
{{Footer Nav|game=Deadly Towers|prevpage=Enemies|nextpage=Walkthrough}} | {{Footer Nav|game=Deadly Towers|prevpage=Enemies|nextpage=Walkthrough}} | ||
Latest revision as of 11:22, 18 April 2015
Dungeons are probably one of the most frustrating aspect of the game, and the worst part is, a majority of them are entirely unnecessary. The only reason that a player should ever willingly enter a dungeon is to go shopping for basic items. Even so, you should know exactly how to get from the entrance to the shop or shops, and how to get from the shops to the exit, so that you don't end up wandering around the dungeon aimlessly and losing all of your health.
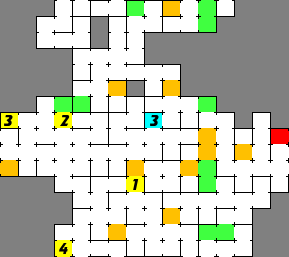
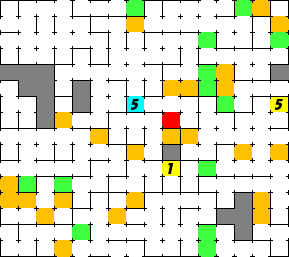
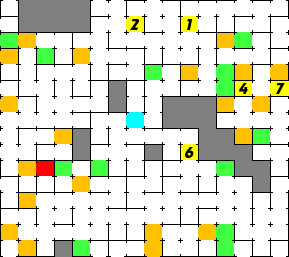
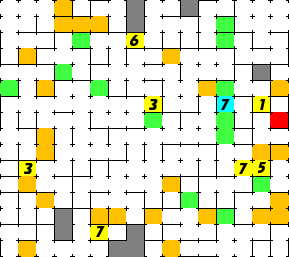
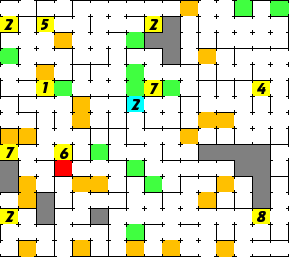
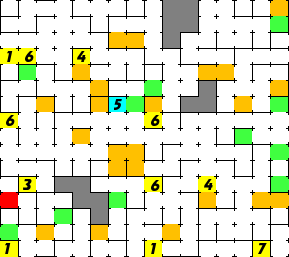
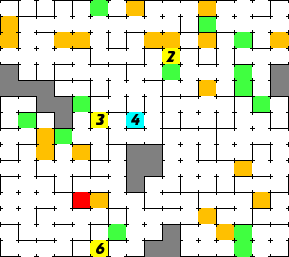
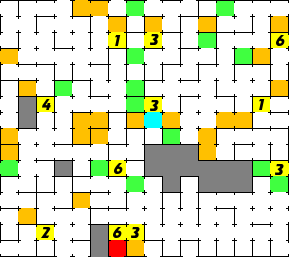
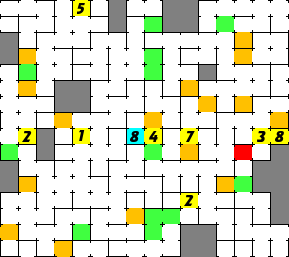
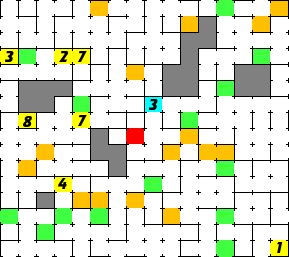
Even with these maps, the dungeons can be a bit quirky and difficult to figure out. Each dungeon can be laid out on a 16 by 16 grid. The edges of the grid do not necessarily mark the edges of the dungeon. It is possible to travel from a room on one edge, to another room on the opposite edge, both horizontally and vertically. A number of features are indicated on the maps to help you navigate through them and ensure that you are not getting lost.
The most obvious points to indicate are the entrances (your starting point) and the exits (the only point from which you can leave the dungeon.) In addition to this, three more things are indicated; the locations of rooms that have circles on the floor which lead to shops (with the specific shop indicated by a number from 1 through 8, see below), the location of rooms that have circles on the floor which don't lead to shops or exits (that is, they are plainly decorative), and the location of rooms that contain Bounder Towers.
The Bounder Towers are indicated for two reasons. The obvious reason is that Bounder Towers are exceptional rooms to collect money and health from. The less obvious reason is because when you travel into a Bounder Tower room through the north door, it is extremely easy to become hit and killed by these towers as they rise. When moving south through a door into a Bounder Tower room, always enter through one of the extreme sides of the doorway, and travel diagonally away from the center as you arrive in the room.
One last note about the dungeon maps: You will notice that some dungeon entrances also contain shops, but when you enter the dungeon, you may not see them. These entrance shops will only appear under certain conditions. First, you must have visited the holy flame at the cliff wall by using an Orange Scroll at least one time, and you must exit the room and reenter in order for the shop to appear.
Maps[edit]
| Red | Dungeon exit |
| Orange | Rooms with circles on the floor |
| Yellow | Dungeon shops (refer to the list below) |
| Green | Bounder Tower rooms |
| Blue | Dungeon entrance |
Shops[edit]
Shops are a fairly reliable source for equipment. Unfortunately, some of the best equipment is rather expensive, considering that the most money that you can carry is 250 Ludder. That's why knowing the location of the nearest Bounder Tower rooms is so important, so that you can quickly recoup the money that you spend. Shops will always have a preset list of items available, and that list will only change at two points throughout the game. After three bells have been collected (even if you do not burn them right away), the shops will change to reflect the increased difficulty of the enemies that you will encounter outside. This happens for a second time after five bells have been collected. Some items are not available for sale until these changes have taken place. Other items, like the Hyper Boots, are only available early on in the game.
| Shop 1 | 0-2 bells collected: | Red Drink | 50 | Shield | 100 | Figurine | 90 |
|---|---|---|---|---|---|---|---|
| 3-4 bells collected: | Red Drink | 60 | Magic Key | 120 | Orange Crystal | 90 | |
| 5-7 bells collected: | Red Drink | 70 | Green Necklace | 200 | Red Crystal | 100 | |
| Shop 2 | 0-2 bells collected: | Red Drink | 40 | Gloves | 100 | Orange Necklace | 90 |
| 3-4 bells collected: | Red Drink | 50 | Normal Gloves | 180 | Green Necklace | 90 | |
| 5-7 bells collected: | Green Drink | 99 | Normal Gloves | 150 | Blue Scroll | 95 | |
| Shop 3 | 0-2 bells collected: | Red Drink | 40 | Shield | 80 | Red Crystal | 60 |
| 3-4 bells collected: | Blue Scroll | 40 | Lion Shield | 90 | Fire Magic | 80 | |
| 5-7 bells collected: | Orange Drink | 70 | Orange Scroll | 190 | Blue Drink | 90 | |
| Shop 4 | 0-2 bells collected: | Red Drink | 50 | Short Sword | 100 | Chain Helmet | 92 |
| 3-4 bells collected: | Green Drink | 99 | Normal Sword | 140 | Figurine | 90 | |
| 5-7 bells collected: | Red Drink | 90 | Normal Sword | 240 | Green Scroll | 90 | |
| Shop 5 | 0-2 bells collected: | Red Drink | 99 | Chain Helmet | 100 | Shield | 90 |
| 3-4 bells collected: | Orange Drink | 99 | Iron Helmet | 120 | Blue Crystal | 45 | |
| 5-7 bells collected: | Orange Drink | 99 | Magic Mace | 150 | Green Crystal | 130 | |
| Shop 6 | 0-2 bells collected: | Red Drink | 30 | Chain Helmet | 80 | Fire Magic | 60 |
| 3-4 bells collected: | Red Drink | 45 | Iron Helmet | 150 | Red Scroll | 73 | |
| 5-7 bells collected: | Red Drink | 55 | Iron Helmet | 150 | Fire Magic | 80 | |
| Shop 7 | 0-2 bells collected: | Red Drink | 70 | Orange Scroll | 100 | Hyper Boots | 232 |
| 3-4 bells collected: | Red Drink | 80 | Green Scroll | 123 | Shield | 80 | |
| 5-7 bells collected: | Red Drink | 98 | Cup (Evil) | 150 | Red Necklace | 240 | |
| Shop 8 | 0-2 bells collected: | Red Drink | 40 | Leather Armor | 100 | Figurine | 98 |
| 3-4 bells collected: | Red Drink | 60 | Plate Armor | 155 | Orange Scroll | 90 | |
| 5-7 bells collected: | Blue Drink | 99 | Plate Armor | 150 | Lion Shield | 99 |
