Alien Syndrome/Walkthrough
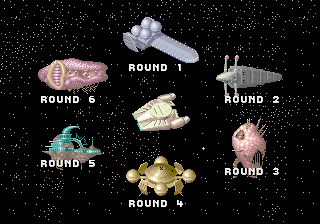
In Alien Syndrome, you travel from one space station to the next in an effort to rescue several comrades from an alien infestation that has broken out, before locating the exit and challenging the boss alien of that station. Once you defeat the boss, you immediately begin in the next station and start the process over. You must clear six stations, and defeat the ultimate boss in a seventh and final station. If you succeed, you will be shown the ending before starting the process back over from the first station. Each station must be completed in order; there is no selecting or skipping of stations.
Round 1[edit]
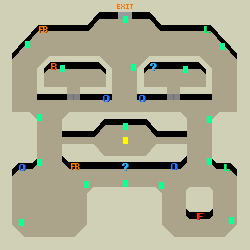
You begin the game in the very center of the first space station. No enemies are present so that you can learn the mechanic of rescuing your first comrade, who is standing right above you. Immediately above this person is a map which you can reference from here, and from several other locations throughout the station. The map indicates the positions of every remaining comrade, as well as the general layout of the station itself. From there, you must choose to go left or right, and explore the station in an effort to locate nine more comrades before you can access the exit. Once you step out from the center, you will begin to see the aliens which occupy this station. They appear as large wriggling worms, and there are three varieties of them.

The pink aliens are the simplest, simple roaming around the hallways somewhat randomly. They don't fire and aren't particularly aggressive, but their movements can catch you by surprise.

These aliens don't look very different from the pink aliens, but their skin has a slight purple hue to it. They differ from the normal variety in that they will occasionally stand up and spit out a baby which quickly grows to full size and joins the invasion.

The last variety of alien is much easier to discern from the rest. It's bright green skin indicates that it is capable of emitting a projectile at you. It will come to a stop and launch a green blob at you before going back to wriggling around with the other aliens.
It's fairly easy to arm yourself well in this station; there are four panels that contain Options, so you can easily reach the maximum of two that follow you around and cover your back. A couple of different weapons are available, particularly two panels on the left half which offer fireballs, and two panels on the right half which offer lasers. Try out each one to learn their strengths and weaknesses; it's easier to hit the aliens with fireballs, but the laser can take out several aliens with one shot. Either weapon is a good choice against the boss of this round. Once you rescue at least ten comrades, you'll be able to access the boss through the entrance, which is found at the very top of the station.
Boss - Asophy[edit]
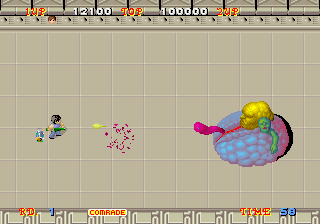
Alien Syndrome doesn't ease you into the sight of eerie bosses, it starts right away with this two-headed brain blob-like creature named Asophy. It moves around the right side of the screen, shooting a projectile at you. The body of the boss will open up and a purple worm will escape from the body and slowly make its way to you. These worms can be destroyed, and you shouldn't leave them on the screen for too long and allow them to overwhelm you. The only time the boss is vulnerable to attack is when the body opens up for a worm to pop out. You must time your shots so they hit this opening, all while dodging the projectiles and worms. For a first boss battle, this can be pretty tough. Be sure to eliminate the worms as frequently as you can, while also setting yourself up to shoot the front of the body when it opens.
Once you shoot the body enough, it will explode, but your battle isn't over yet. The pieces of the body that fly off must be avoided, and the smaller head will fly off in your direction before exiting the screen. Dodge the smaller head, and wait for the large head to begin moving around. After a short while, the larger head's mouth will extend and it will launch to the left towards your character. You must quickly get out of its path to avoid getting killed. However, it is only vulnerable to attack when the mouth is extended like this. If you line up with the head before it flies at you, you can usually get a shot or two off before you have to run away. Fortunately, it does not take many shots to defeat the boss once it is in this form. Destroy the head and you will advance to the next station.
Round 2[edit]
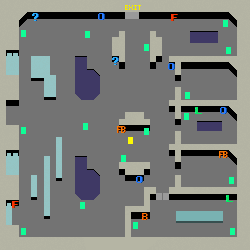
The majority of what you learned in the first round will serve you well in the second. Besides the layout, the two major distinctions from the previous round are the more aggressive aliens, and the potential to fall into pits and lose one life. Pits are indicated by the dark blue on the map to the right. The aliens that you face look more directly inspired by the Alien film, and they also come in three varieties.

The most common enemy that you will face is the red variety. They wander around, somewhat aimlessly, and they will occasionally stop and spit projectiles at you. They are easy to defeat, but their movements are unpredictable.

The blue version of these enemies is a bit smarter. Instead of wandering around in no particular direction, blue aliens actually track you down and run toward you. For this reason, if you can't get a barrier between you, or scroll them off the screen, you should make killing them a priority.

The last enemy color that you'll encounter is the green kind. These aliens spawn from pods which are located throughout the station. Once they appear, they behave like the blue aliens and follow you around. Until you remove the pods, they will continue to appear (but the pods must be present on the screen for them to spawn.) The pods can be removed, but it takes a large number of shots, and may not be worth your time.
The layout for this space station includes a couple of living quarters along the right side of the station where you can enter to rescue comrades and find some weapons. The left side is a bit more open space, which actually gives the aliens more opportunity to get to you. Be sure to fire all around you while you attempt to rescue people. Like the previous stage, the exit is found near the center of the top. Lasers are the recommended weapon for the boss fight.
Boss - Hugger[edit]
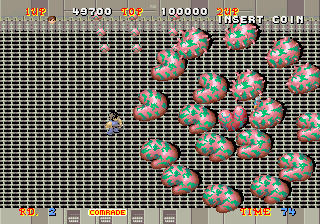
This alien is surrounded by a cluster of blobs that circle around the boss, blocking any attempts to shoot the boss directly until you do enough damage to the blobs to remove them. However, the laser is capable of shooting right through all the blobs, significantly decreasing the amount of time it takes to defeat this boss. Throughout the fight, the boss will spit out up to nine smaller organisms over to the left side of the screen where you are firing from. These organisms grow and slowly migrate to your position. Every now and then, you'll need to break off your attack on the blobs and the boss to shoot the organisms and clear them away before they get too close to you. Then you can resume your attack. If you did not bring lasers to this fight, you'll have to shoot at the blobs until you damage and destroy enough of them to create an opening through which you can shoot the boss. Only the lower portion of the boss' body seems vulnerable to attack.
Round 3[edit]
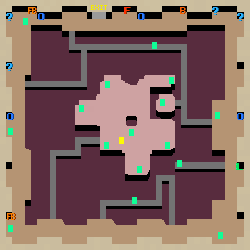
In round 3, you start out in the middle of a center platform which is cut off from the outside portion of the station with the exception of a single bridge in the lower left corner. Obviously, you must avoid falling over any edges. There are seven comrades and no weapons on the platform. All weapons must be obtained by traveling to the outside portion of the station.

There is one single enemy type that you must watch out for. These little creatures hop around and launch their eyeballs at you before replacing them by growing more. Fortunately, they're easy to pick off with the regular weapon because you won't have the opportunity to obtain a better one until you make it off the center platform. The ones on the ground with you are a threat, but you must also watch out for instances of these creatures on the level below who leap all the way up to your level and send more eyeballs at you before falling back down. You cannot shoot the ones which leap up, so focus your fire on the creatures around you.
After you collect six or seven of the comrades on the center platform, carefully make your way across the bridge, to the outer portion of the station where you can obtain weapons and option robots. There are more comrades along the outside, and a few on bridges, but you should take the bridges slowly to avoid falling off. There's only one laser weapon offered near the lower right corner, and you'll definitely want to collect it before you head through the exit along the top and face the boss.
Boss - Tacapy[edit]
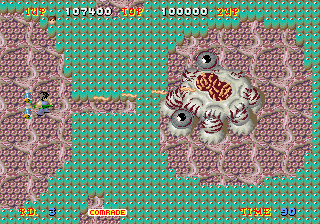
The boss of this round starts off on the right side of the screen, surrounded by particles that occupy the room. You start off on the left. In order to even damage the boss, you will first have to shoot through several of the particles. This is why lasers are so key for this battle. They clear away several of the particles in one shot. Once you blast through, you should have a clear shot at some of the boss' legs. Meanwhile, the boss will attack by launching his two eyeballs outward in circles. You won't necessarily have to move out of the way of the eyes, but if the boss is getting closer to you, you may be forced to move. In addition to the eyes, small worms fly off the boss and wander in your direction. You must remove them as well. Once all of the legs are removed, the boss will be immobilized, but it will still attack with its eyes. While the eyes are flying, you will need to target the "brain" beneath the eyes and shoot at it until the boss is destroyed. If you take too long to defeat the boss, there may come a point where you are forced to tunnel above or below in order to reach the right side and attack from behind, but if you have the lasers, you should be able to defeat the boss before that's necessary.
Round 4[edit]
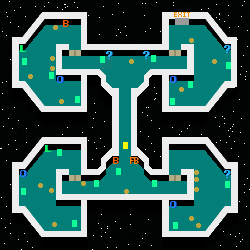
The space station of the fourth round is broken up into five distinct compartments; four corner chambers connected to one central section. Since the exit is in the upper right chamber, it is recommended that you attempt to rescue comrades from the lower chambers first, and work your way up.

Like the previous stage, there is only one variety of enemy that you have to watch out for. Pods are scattered throughout the station, and each of these pods releases a segmented creature that crawls along the floor. These creatures take several shots to remove, with each shot removing a single segment until all of the segments are destroyed. The cramped nature of the station can make it easy for the creatures to overwhelm you if you don't deal with them quickly enough. It is possible to destroy the pods, but they take even more hits to defeat and you will spend a considerable amount of time shooting them, time which you cannot afford to waste.
Lasers will do a good job ripping through the enemies, but the fireball weapon is effective as well. You can even collect the bomb weapon, although it's difficult to use against enemies that are approaching you. The only reason to consider using it is because it's somewhat effective against the boss.
Boss - Minnow[edit]
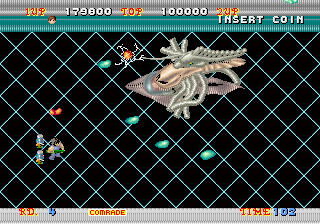
Compared to the strategy required for many of the previous bosses, this boss is fairly simple, although by no means easy. The boss slides up and down and the right side of the screen. From the left side, you must aim your weapon at the alien's head. All the while, the boss will release blue particles that spread outward across the room, while the red orb attached to the head fires a red particle directly at you from time to time. Your first priority should be to survive and avoid touching the particles at all costs. Only when you are safe from harm should you focus your gun on the boss and fire as rapidly as you can until you have to move again.
Round 5[edit]
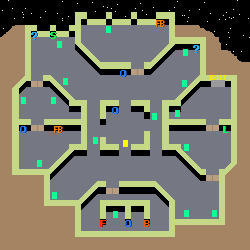
The fifth round continues the compartmentalized theme from the previous round, with several rooms closed off by one door, all surrounding a central area. However, the central area is quite big and offers more room to maneuver. The threat of course, comes in the form of a pair of rather unpredictable aliens.

These pod-like aliens are the ones that you will see the most. They dart around the station in a very undirected fashion, but they are fast and change direction frequently, making them very dangerous since they are hard to avoid if too many of them take over the screen. When you remove some, new ones may appear from holes in the ground that open up.

The pods are not the only threat; you must also watch out for these tongues that appear out of nowhere. They remain stationary the entire time, so they are less of a threat than the pods, but they appear without warning, and it's quite easy to trip over one if you're too focused on where you are shooting instead of where you are walking.
One other unforeseen threat in this stage is the glass ceiling which partially obscures your view of the floor, making it even easier to overlook an enemy that has appeared beneath your feet. For a basic strategy, start out by collecting the option robot right above your starting location, and then again directly above that. Because you only need to collect 10 comrades, you can essentially avoid all of the chambers except for the right two, where the exit is located. However, it's not a bad idea to pick up the flamethrower weapon from the bottom chamber, as it is very handy to have in this stage, as well as against the boss. The game actually provides you with an opportunity to collect the lasers just before reaching the exit, but in this one case, you might be better off with the flamethrower.
Boss - Yocotie[edit]
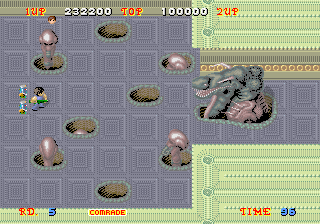
There's a lot going on in this boss battle, but you don't need to concern yourself with all of it. The boss itself will appear on the right side of the room after a short period of time. However, the left side of the room will be occupied by what resembles a whack-a-mole arrangement of aliens. These smaller aliens merely rise up, and reach out to your player before sinking back down. They don't shoot at you, so you can safely remove them by shooting at them for a while from a distance. You just have to be careful that you don't end up getting struck by a different alien then the one you are shooting at. Ultimately, you should aim to remove the alien directly to the left of the boss' head, as the position directly above its hole will be critical to defeating the boss. You will also need to defeat the alien above and to the right of that one in order to stand their safely.
The boss itself doesn't move, and it sprays a set of particles outward in almost every direction. Whether by design or due to a bug, the particles can't pass the holes that the aliens pop out of, even if you've defeated the aliens that used to rise from them. If you manage to clear out the alien directly to the left of the boss' head, and the alien closest to that hole, you can stand directly above the hole and shoot the boss in the head until it is defeated without fear of getting hit by any of the particles.
Round 6[edit]
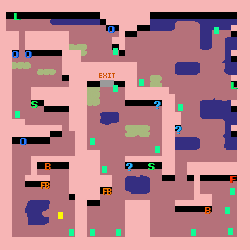
You begin the sixth round in the lower left corner of the final space station that you must clear. Unlike the other maps, this map is actually somewhat linear, in that you must essentially walk up the left side of the map, cross over to the right side, head down, and then make your way to the center, where the exit it. Two different versions of the same basic enemy hunt for you in this station.

The red and yellow version of these aliens is the basic standard version. They appear throughout the stage and wander around. Every now and then they stop, and launch what appears to be a small bug or spider at you. These insects can actually be shot and removed, but they move quite fast and can be hard to hit, so it's best to avoid them.

The blue and purple variety of the aliens are extremely similar to their red and yellow cousins in every way. The only exception is that they actually spawn from the very walls of the station you are exploring. Therefore it's a good idea to keep on eye on the walls, and get out of the way if any of them appear to be opening up to release another alien.
Since you are given very few options about which way to travel, it's best to ensure that the area ahead of you, if not all around you, is clear of aliens. Early on, you have the opportunity to collect the fireball weapon, and you should have two option robots by the time you make it to the upper left corner, where you will find a laser weapon. Grab this laser and hang on to it for the rest of the stage, since it does a great job ripping through several of the aliens at once. There is a large cache of comrades in the lower right corner of the map, so be sure to visit it and pick them up. Between those and the ones you pick up along the way, you should be able to collect enough comrades to open the exit in the center of the stage.
Boss - Minenor[edit]
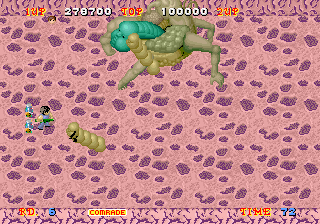
This alien boss appears to be less inspired by any western alien survival horror film, and more directly inspired by Japanese mythology. Minenor hops around the room, releasing segmented aliens to protect itself. The only vulnerable location on the boss is the sac-like organ just behind the neck. You'll want to focus your fire there, but the segmented aliens which fly out and land on the ground will chase you around and make it very difficult to stand still for very long. You'll need to stop and turn your attention to them from time to time, but even doing so won't be very productive. You may wish to simply walk around the outside edge of the room as you line up your shots to attack, and lure the aliens around the outside edge with you, constantly moving so they are forced to catch up with you. The boss will take quite a number of hits before it is defeated, so it's a good idea to get here with as much time remaining as possible.
Round 7[edit]
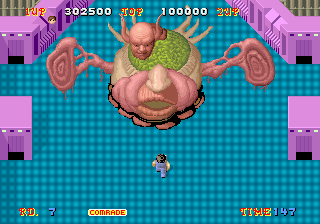
For the final round, you will not have to rescue any more comrades. Instead, you'll come face to face with the mastermind behind the alien syndrome menace itself. In this last confrontation, you must survive the battle and destroy the boss the save mankind. The boss resembles a large face with a smaller head floating back and forth above it on a tentacle. It is only this smaller head which is vulnerable to attack. Unfortunately, you are never given the opportunity to find better weapons, so you are forced to fight with the basic weapon which has an unfortunately short range. In order to hit the smaller head, you'll have to get quite close to the boss. All the while, the boss employs its only means of defending itself by sucking in gusts of wind. If you are caught in any of the six gusts that circle around, you will be sucked into the boss' mouth and lose a life. These gusts alternate between moving clockwise and counterclockwise each time. Unfortunately, these gusts are extremely difficult to dodge, as they appear to grab you even when you think you've skirted by. The best approach to avoiding them is as follows: From the center of the fight, when the gusts are traveling clockwise, move straight to the left side of the screen, and when the gusts travel counterclockwise, move over to the right. If you time your movements right, you'll slip through the circles of gusts and survive. As soon as you realize you made it, immediately turn around and get close enough to resume shooting the head until you are forced to move to the sides again. This fight is extremely difficult, as the odds are very much against you. If you manage to destroy the boss and witness the ending, congratulations, you are an excellent player. After the epilogue, the game will start over from the first round.