Jump to navigation
Jump to search
Images pertaining to Quake II.
Media in category "Quake II images"
The following 139 files are in this category, out of 339 total.
(previous page) (next page)-
 Quake II Outer Courts First Secret.png 800 × 600; 184 KB
-
 Quake II Outer Courts Flooded Room.png 800 × 600; 268 KB
-
 Quake II Outer Courts Inside Gate.png 800 × 600; 353 KB
-
 Quake II Outer Courts Last Secret.png 800 × 600; 171 KB
-
 Quake II Outer Hangar Bridge Over Lake.png 800 × 600; 357 KB
-
 Quake II Outer Hangar Patrolling Tank.png 800 × 600; 166 KB
-
 Quake II Outer Hangar Secret Adrenaline.png 800 × 600; 112 KB
-
 Quake II Outer Hangar Turbine Fuse.png 800 × 600; 147 KB
-
 Quake II Outlands Air Strike Marker.png 800 × 600; 167 KB
-
 Quake II Outlands Fuel Pod.png 800 × 600; 289 KB
-
 Quake II Outlands Gun Emplacement.png 800 × 600; 284 KB
-
 Quake II Outlands The Air Strike.png 800 × 600; 319 KB
-
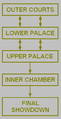 Quake II Palace Area Unit Map.png 320 × 625; 13 KB
-
 Quake II Parasite.png 400 × 300; 53 KB
-
 Quake II Power Plant Iron Maiden.png 800 × 600; 218 KB
-
 Quake II Power Plant See Big Gun.png 800 × 600; 253 KB
-
 Quake II Power Shield.png 400 × 300; 50 KB
-
 Quake II Processing Plant Bio Processing Control Unit.png 800 × 600; 299 KB
-
 Quake II Processing Plant Bio-Compression Chamber.png 800 × 600; 259 KB
-
 Quake II Processing Plant Emulsifying Flesh Press Unit.png 800 × 600; 229 KB
-
 Quake II Processing Plant Enemy Processing Unit.png 800 × 600; 190 KB
-
 Quake II Processing Plant Hidden Red Light.png 800 × 600; 222 KB
-
 Quake II Processing Plant Ionization Catalyst Chamber.png 800 × 600; 326 KB
-
 Quake II Processing Plant Organic Material Liquifier.png 800 × 600; 250 KB
-
 Quake II Processing Plant Secret Adrenaline.png 800 × 600; 239 KB
-
 Quake II Processing Plant Secret Area.png 800 × 600; 173 KB
-
 Quake II Processing Plant Secret Power Shield.png 800 × 600; 147 KB
-
 Quake II Processing Plant Secret Quad Damage.png 800 × 600; 152 KB
-
 Quake II Processing Plant Starting Room.png 800 × 600; 273 KB
-
 Quake II Processing Plant Strogg Bio-Assimilation Tank.png 800 × 600; 260 KB
-
 Quake II Pumping Station 2 Explode Floor.png 800 × 600; 270 KB
-
 Quake II Pumping Station 2 Secret Armor.png 800 × 600; 270 KB
-
 Quake II Pumping Station 2 Secret Invulnerability.png 800 × 600; 242 KB
-
 Quake II Pyramid Key.png 400 × 300; 39 KB
-
 Quake II Quad Damage.png 400 × 300; 35 KB
-
 Quake II Rail Gun.png 400 × 300; 61 KB
-
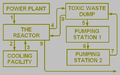 Quake II Reactor Unit Map.png 700 × 440; 23 KB
-
 Quake II Rebreather.png 400 × 300; 52 KB
-
 Quake II Receiving Center Above Waterfall.png 800 × 600; 230 KB
-
 Quake II Receiving Center Broken Bridge.png 800 × 600; 260 KB
-
 Quake II Receiving Center Exit.png 800 × 600; 261 KB
-
 Quake II Receiving Center Laser Pit.png 800 × 600; 230 KB
-
 Quake II Receiving Center Lava Bridge 1.png 800 × 600; 276 KB
-
 Quake II Receiving Center Lava Bridge 2.png 800 × 600; 233 KB
-
 Quake II Receiving Center Lava Puzzle.png 800 × 600; 264 KB
-
 Quake II Receiving Center Red Pipe.png 800 × 600; 269 KB
-
 Quake II Receiving Center Secret Area 1.png 800 × 600; 136 KB
-
 Quake II Receiving Center Secret Area 2.png 800 × 600; 187 KB
-
 Quake II Receiving Center Secret In Tank.png 800 × 600; 142 KB
-
 Quake II Red Key.png 400 × 300; 40 KB
-
 Quake II Research Lab Blue Key.png 800 × 600; 165 KB
-
 Quake II Research Lab Commanders Head.png 800 × 600; 245 KB
-
 Quake II Research Lab Easter Egg.png 800 × 600; 136 KB
-
 Quake II Research Lab Kill Me.png 800 × 600; 194 KB
-
 Quake II Research Lab Maintenance Bridge.png 800 × 600; 179 KB
-
 Quake II Research Lab Parasite Ambush.png 800 × 600; 208 KB
-
 Quake II Research Lab Secret Cell.png 800 × 600; 192 KB
-
 Quake II Research Lab Secret Reward.png 800 × 600; 146 KB
-
 Quake II Research Lab Secret Shoot.png 800 × 600; 168 KB
-
 Quake II Rocket Launcher.png 400 × 300; 40 KB
-
 Quake II Security Complex Exit To Torture Chambers.png 800 × 600; 188 KB
-
 Quake II Security Complex First Tank.png 800 × 600; 225 KB
-
 Quake II Security Complex Grenade Launcher.png 800 × 600; 259 KB
-
 Quake II Security Complex On Arrival.png 800 × 600; 238 KB
-
 Quake II Security Complex Pyramid.png 800 × 600; 250 KB
-
 Quake II Security Complex Red Key.png 800 × 600; 217 KB
-
 Quake II Security Complex Willits Drop Pod.png 800 × 600; 242 KB
-
 Quake II Security Pass.png 400 × 300; 43 KB
-
 Quake II Shotgun Guard.png 400 × 300; 69 KB
-
 Quake II Shotgun.png 400 × 300; 38 KB
-
 Quake II Sudden Death Adrenaline.png 800 × 600; 245 KB
-
 Quake II Sudden Death Rail Gun.png 800 × 600; 231 KB
-
 Quake II Sudden Death Starting Point.png 800 × 600; 245 KB
-
 Quake II Super Shotgun.png 400 × 300; 28 KB
-
 Quake II Supply Station Call Lift Platform.png 800 × 600; 231 KB
-
 Quake II Supply Station Cargo Hoists.png 800 × 600; 177 KB
-
 Quake II Supply Station Fighting Starts.png 800 × 600; 300 KB
-
 Quake II Supply Station First Power Cube.png 800 × 600; 178 KB
-
 Quake II Supply Station Logistical Train.png 800 × 600; 299 KB
-
 Quake II Supply Station Mega-Health.png 800 × 600; 293 KB
-
 Quake II Supply Station Secret Armor.png 800 × 600; 152 KB
-
 Quake II Supply Station Secret Lift Platform.png 800 × 600; 293 KB
-
 Quake II Supply Station Secret Quad Damage.png 800 × 600; 197 KB
-
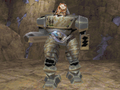
 Quake II Tank Commander.png 400 × 300; 86 KB
-
 Quake II Tank.png 400 × 300; 70 KB
-
 Quake II Technician.png 400 × 300; 49 KB
-
 Quake II The Reactor Secret Ladder.png 800 × 600; 181 KB
-
 Quake II Torture Chambers Cell Block A.png 800 × 600; 201 KB
-
 Quake II Torture Chambers Cell Block B.png 800 × 600; 188 KB
-
 Quake II Torture Chambers Iron Maiden.png 800 × 600; 226 KB
-
 Quake II Torture Chambers Lava Vat.png 800 × 600; 254 KB
-
 Quake II Torture Chambers Secret HyperBlaster Far.png 800 × 600; 299 KB
-
 Quake II Torture Chambers Secret HyperBlaster Near.png 800 × 600; 310 KB
-
 Quake II Torture Chambers Secret Invulnerability.png 800 × 600; 76 KB
-
 Quake II Torture Chambers Secrets In Lava.png 800 × 600; 244 KB
-
 Quake II Torture Chambers Wall Block.png 800 × 600; 129 KB
-
 Quake II Toxic Waste Dump Both Secrets Step 1.png 800 × 600; 309 KB
-
 Quake II Toxic Waste Dump Both Secrets Step 2.png 800 × 600; 143 KB
-
 Quake II Toxic Waste Dump Both Secrets Step 3.png 800 × 600; 329 KB
-
 Quake II Toxic Waste Dump Both Secrets Step 4.png 800 × 600; 169 KB
-
 Quake II Toxic Waste Dump Both Secrets Step 5.png 800 × 600; 346 KB
-
 Quake II Upper Mines Elevator Ambush.png 800 × 600; 189 KB
-
 Quake II Upper Mines Fireball Hallway.png 800 × 600; 187 KB
-
 Quake II Upper Mines Gladiator Tunnel.png 800 × 600; 251 KB
-
 Quake II Upper Mines Quad Damage.png 800 × 600; 191 KB
-
 Quake II Upper Mines Secret Bullets.png 800 × 600; 86 KB
-
 Quake II Upper Mines Secret Panel.png 800 × 600; 218 KB
-
 Quake II Upper Mines Shooting Cabinet.png 800 × 600; 179 KB
-
 Quake II Upper Mines Sparking Cabinet.png 800 × 600; 174 KB
-
 Quake II Upper Mines Starting Area.png 800 × 600; 241 KB
-
 Quake II Upper Mines Ventilation Control.png 800 × 600; 231 KB
-
 Quake II Upper Palace Below Laser.png 800 × 600; 190 KB
-
 Quake II Upper Palace Comm Laser Down.png 800 × 600; 175 KB
-
 Quake II Upper Palace Data CD.png 800 × 600; 219 KB
-
 Quake II Upper Palace Elevator Entrance.png 800 × 600; 238 KB
-
 Quake II Upper Palace Elevator Shaft.png 800 × 600; 281 KB
-
 Quake II Upper Palace Flag Room.png 800 × 600; 326 KB
-
 Quake II Upper Palace Guards Overhead.png 800 × 600; 212 KB
-
 Quake II Upper Palace In The Mine.png 800 × 600; 219 KB
-
 Quake II Upper Palace Mine Entrance.png 800 × 600; 193 KB
-
 Quake II Upper Palace Mine Head.png 800 × 600; 102 KB
-
 Quake II Upper Palace Mine Secret Room.png 800 × 600; 119 KB
-
 Quake II Upper Palace Mine Switch.png 800 × 600; 140 KB
-
 Quake II Upper Palace Mine Way Out.png 800 × 600; 102 KB
-
 Quake II Upper Palace Secret Adrenaline.png 800 × 600; 215 KB
-
 Quake II Upper Palace Secret Decor.png 800 × 600; 214 KB
-
 Quake II Upper Palace Secret Hole.png 800 × 600; 198 KB
-
 Quake II Upper Palace Security Pass.png 800 × 600; 178 KB
-
 Quake II Upper Palace Two Ways.png 800 × 600; 259 KB
-
 Quake II Upper Palace Unit Exit.png 800 × 600; 196 KB
-
 Quake II Warehouse Begin In Darkness.png 800 × 600; 195 KB
-
 Quake II Warehouse Blow Up Door.png 800 × 600; 260 KB
-
 Quake II Warehouse Secret Area.png 800 × 600; 240 KB
-
 Quake II Warehouse Secret Glow Button 1.png 800 × 600; 266 KB
-
 Quake II Warehouse Secret Glow Button 2.png 800 × 600; 243 KB
-
 Quake II Warehouse Secret Quad Damage.png 800 × 600; 230 KB
-
 Quake II Warehouse Secret Stairs Down.png 800 × 600; 234 KB
-
 Quake II Warehouse Third Power Cube.png 800 × 600; 284 KB
-
 Quake2Box.jpg 328 × 400; 22 KB


