Head left in the Sand Zone. You'll see someone spot you and run off--who could it be?
To find out, continue left and then use the platforms to head up, being careful of the enemies along the way. They like to hide off-screen or behind grates, but will only move if you enter their line of sight, so watch out. At the top, break through the blocks and go left some more.
Enter the building to start a short cutscene, then prepare to fight! Look here for a strategy. Afterwards, Curly will realize you don't want to hurt anyone--provided you tell her you aren't there to hurt anyone, of course. She'll offer you her Machine Gun in exchange for your Polar Star--if you are new to the game, you should probably take it.
Talk with the mimigas, then enter the room and grab the dog by the bed. Save and heal if you need, then head out to the rest of the Sand Zone.
Lift the Spell on the Sunstones
Go right, destroying the blocks to progress, until you reach the area with columns of breakable blocks. Shoot a path into the first open area and either dodge or kill the Polish inside. Be careful of the sandy pit--any time you see a pile of bones on sand, it means there is a sandcroc waiting for you, and they do a lot a damage per hit. In the second column of breakable blocks, a heart container lies at the top--grab it and move on.
At the last column, make another staircase and climb to the top. Shoot out the blocks on the platform to the right, then jump over to it. This is easiest if you leave a level below the unbreakable blocks to run and jump from. Next, hop up towards the paw print block on the wall--you'll go right through! Behind the stalactites you'll see a floppy disk--save if you'd like, then drop down to the next area.
Now we are at the breakable Xs. Shoot out the spinning suns but destroy as little blocks as possible so that you don't have to fall into pits with a sandcroc or go chasing experience. This part is actually easier than the columns. At the end, be careful of what you shoot--take your time and destroy the blocks that will let you jump to the floating platform so you can heal. (See the screenshots for help.) The second platform has a sandcroc in it that is almost impossible to avoid, so don't jump in it at all. At the large wall of breakable blocks, be careful: there are enemies in them that will fall on you if you aren't careful.
Hopefully your weapons and health are full or near full, because you are about to fight a boss. After a short cutscence where Misery almost battles you, Omega appears, making it look as though maybe she doesn't have to fight you after all. After the battle a notice appears informing you that the spell on the sunstones has been lifted--go back to almost the beginning to see what it means.
Finding Jenka (and her puppies!)
After you have defeated Omega, on your way back to the beginning, two blocks with a sun picture will open a path for you. Jump down and kill the skulls or keep going. Before going on, make sure you have a puppy with you. If you don't have one, head back to the Sand Zone Residence, talk to the mimiga at the far left, and take the dog next to the bed with you. Once you find a small entrance to your left, go in and open the door. Jenka will be inside, and you can give her the puppy (note that you can only carry one puppy at a time). next, go find a block with a paw print on it to the right and up from Jenka's house. Go through to yield a secret passage, at the end of which is a life up and a treasure chest. open the chest, and find out that puppy #2 is sleeping inside. bring him back, and find the next one.
Screenshots
- Click the images for a larger view:
-
Getting the life container.
Doing it properly will yield great treasure. -
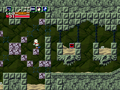
Get to the healing station!
Break just the right amount of bricks!
