The Legend of Zelda: Oracle of Seasons/North Horon and Gnarled Root Dungeon

The first dungeon in the game is very simple. There isn't much to it, but enough to give you somewhat of a challenge.
Easy Puzzles and Easy Battles
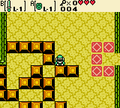
As you enter the first room, head north into the next one. Once you enter, the doors will shut and you will find four peculiar blocks. The one on your top-right is movable. Push it to open up the doors.
Head north again to find a sage. He will mention that you need to relight unlit torches. Remember that. You can't light any now, but there is an item in the dungeon that can. Head back into the block room and resolve the puzzle, then head east.
A Small Key
In this room are four Stalfos. Kill them all to get a ![]() Small Key. With it, you can open one locked door in the dungeon. In fact, there's one nearby. Head into the block room again. This time, you don't have to mess with the puzzle. Instead, head west and unlock the door.
Small Key. With it, you can open one locked door in the dungeon. In fact, there's one nearby. Head into the block room again. This time, you don't have to mess with the puzzle. Instead, head west and unlock the door.
-
Defeat all four Stalfos...
-
...and your reward is a Small Key.
-
Use it on the locked door.
The Dungeon Map
In the next room are four more Stalfos. Kill them to open up the doors, and make a chest appear, which holds the File:Zelda Oracles Dungeon Map.PNG Dungeon Map. The map (viewable by pressing ![]() ) will now show all the rooms in this dungeon. Darkened rooms haven't been visited yet. Now, you can keep track of
your progress. There is also another helpful item in the dungeon. It's the companion to the Dungeon Map, but it's in another room.
) will now show all the rooms in this dungeon. Darkened rooms haven't been visited yet. Now, you can keep track of
your progress. There is also another helpful item in the dungeon. It's the companion to the Dungeon Map, but it's in another room.
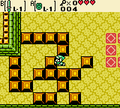
Head on north to the next room. Here, you'll face four Zols. They're not very strong. Slashing will split them into two smaller blobs called Gels, which you can kill easily. When they're all gone, you'll open up a door. However, it's only the door you came through. You can't head left, and the door ahead is shut, too, but there's a mine cart ahead. Run over to it, and hop in. You'll be taken for a ride down the tracks. The door ahead will open to let you through, and you'll ride a small track through the next room.
-
Get rid of these guys first.
-
Hop in the mine cart for a ride down the tracks.
-
Watch out for the Keese...
-
The track ends here.
Several Keese are in here, but you can get rid of them with your sword if they bother you. The mine cart will go through another door, where the tracks will end. Now, you have two options: one, head up the stairs or two, head left.
A Gasha Seed
If you head left, there are a couple of Moblins. These enemies throw boomerangs at you if they see you, but a couple hits will get rid of them. With them gone, there is a block nearby. Push it, and the door will open. Be careful heading towards it. Two spike traps will come after you. Lure them out, and wait for them to get out of your way. Beware; this isn't the last you'll see of them.
In the next room, there is a block puzzle. It seems confusing, but there are 4 simple steps to solving it:
Solving the Block Puzzle
-
Step 1: Push this block down.
-
Step 2: Push this block left once.
-
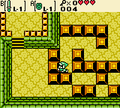
Step 3: Push this block left like the last one.
-
Step 4: Push this block down, and you've solved the puzzle.


At the end of the puzzle, go up the stairs. You'll find a treasure chest waiting for you. Inside is a ![]() Gasha Seed. With the puzzle done, head out.
Gasha Seed. With the puzzle done, head out.
The Compass
If you head up the stairs, you'll find a path to the right. It will take you into the last room, but in a different place.
Go open the chest at the end of the path. You'll get the File:Zelda Oracles Compass.PNG Compass, the Dungeon Map's companion. This handy item will help you find keys hidden in the dungeon. Listen for a noise (four beeps) to find out if an object is hidden in the room.
There is also a lever up here. It can switch the tracks below. Hit it with your sword to move it. The track will switch over to a new path. Then, hop back in the mine cart.
Getting Bombs
This time, you'll travel into a new room and pass by a treasure chest. When the mine cart comes to a stop, go back and open the chest. The reward? Ten File:Zelda Oracles Bomb.PNG Bombs. You'll need them later.
Another Small Key
Head right... and you'll hear four beeps. That's the Compass telling you there's a key hidden here.
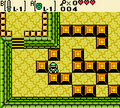
Close by are some stairs. Go up them and head right again to find more stairs leading down a path. Here, you will encounter the Spinning Blade Trap. It will chase after you if you come near it. Try to run past it before it gets too close.
At the end of the path is a switch. Step on it to reveal a chest with another ![]() Small Key.
Small Key.
Once you get the key, go back the way you came, but don't take the stairs back down. Instead, head left to find a crack in the wall. Now, equip your bombs. Place one by the crack and let it go off. You'll blow open an entrance to another room.
Traps Galore
The next room teaches you about spike traps. Make your way through carefully. Traps have freedom to go up and down or left and right if they can. There are places where you can dodge the traps if they get too close.
-
Blue traps are slow.
-
Green traps move at medium-speed.
-
Red traps cause trouble.
-
Yellow is very fast, and some blues come in pairs.
When you make it past all the traps, you'll reach a locked door. Open it, and get ready: here comes a mini-boss.
The Goriya Brothers
The mini-boss is the Goriya Brothers. The two of them share a boomerang that they throw at you. It's tricky to avoid, but can't go very far.
It doesn't take much to defeat the brothers. Focus on one, and keep attacking him. The two are bound by fate, so when one dies, so does the other. When you've defeated them, a warp point and fairy will appear. Use the fairy to restore your health. Then, go into the next room.
The Seed Satchel
This room has several traps and a wall blocking a staircase. However, the block in the left corner of the wall can be pushed aside.
When you venture down the staircase, you'll find a reward waiting for you: the File:Zeldaoracles Seed Satchel.gif Seed Satchel. It has 20 File:Zeldaoracles Ember Seed.gif Ember Seeds in it. Ember Seeds set things ablaze, and these are just what you need to light torches.
Returning Light
Equip the Seed Satchel and head back to the miniboss room. You can push the blocks out of your way to get out. From there, step into the warp point. You'll return to the room where the mine cart was when you found it. Now, you have the means to light the torches, using the Ember Seeds. This will open the door.
Inside are a few Moblins. Defeat them to make a chest appear. Inside is the File:Zelda Oracles Boss Key.PNG Boss Key. This key can open the big locked door to a dungeon boss's lair.
From here, go back to where you got the Dungeon Map. Light the torches there, and a new path will open. Now, you'll navigate a maze full of Floormasters. Don't let them grab you.
Inside the maze is a chest, and it holds a ring. You can appraise it later, and it will become the![]() Discovery Ring (#41) (this ring lets you detect hidden Soft Soil patches).
Discovery Ring (#41) (this ring lets you detect hidden Soft Soil patches).
When you fend off the Floormaters and make it through the maze, you'll reach the lair of the boss. Be on your guard, and go in...
Boss: Aquamentus


When you enter the lair, a large dragon will appear: Aquamentus, the boss of the dungeon.


The dragon will spit out three fireballs and try to ram you. However, he has one big weakness: the horn on his head. Slash away at Aquamentus's horn, and the dragon will fall in defeat.
The reward for slaying Aquamentus is a File:Zelda Oracles Heart Container.PNG Heart Container. Grab it, and your health will be fully restored, and another heart will be added to it.
With the defeat of Aquamentus, go into the room to the right. Inside, you'll obtain the File:Zelda Oracles Fertile Soil.PNG Fertile Soil, the first Essence of Nature. "Seeds scattered across bountiful lands are nourished in this Fertile Soil!"
Heading Out
Upon claiming the Fertile Soil, you'll be warped out of the dungeon, and be contacted by the Maku Tree. The Fertile Soil has restored some of his strength, and he has dreamt that the Temple of Seasons is now in another, unknown land. He says there is a helpful item there. The question is: where is that land...?